

Halloween pumpkin painting is an easy, fun activity for kids ages 3–10 that lets them decorate pumpkins without carving. With simple paints and creative designs, children can make ghosts, monsters, animals, superheroes, and colorful Halloween characters. These Halloween pumpkin painting ideas are perfect for family time because they are easy to adjust for different ages and skill levels. Parents can choose simple designs for younger children and more detailed patterns for older kids. From spooky faces to bright rainbow pumpkins, there are plenty of fun options to make Halloween decorating exciting, creative, and memorable.
What are the easiest Halloween pumpkin painting ideas for kids ages 3–10?
Halloween pumpkin painting gives children a fun way to decorate pumpkins without carving knives or complicated tools. For younger children, simple faces, animals, ghosts, and colorful patterns are excellent choices because they can be completed with large brushes and easy shapes.
Older children can try designs such as haunted houses, galaxies, dinosaurs, or painted characters with more detail.
The best Halloween pumpkin painting ideas allow children to choose their own colors and add their own little changes.
A parent can draw a basic outline with a washable marker, while the child fills it with paint. This keeps the activity manageable without taking away the child’s creative control. The 20 ideas below give families plenty of options for a fun Halloween afternoon at home.
- Related post The Ultimate Guide to Halloween Games for Kids: Creative Ideas for an Unforgettable Halloween Party
What paints, materials, and techniques are best for creating kid friendly Halloween pumpkin designs?
Acrylic paint is a popular choice for Halloween pumpkin painting because it sticks well to a pumpkin surface and offers strong color.
Washable tempera paint can also work well for younger children, especially when parents want easier cleanup.
Use child safe brushes in several sizes, paint trays, cups of water, paper towels, aprons, and newspaper or a plastic table cover.
Before painting, wipe each pumpkin with a damp cloth and let it dry.
For smooth coverage, apply thin coats instead of one thick coat.
A small brush works nicely for eyes, mouths, stripes, and tiny details, while a wider brush covers large areas faster.
Let each color dry before adding another one so the designs stay neat and bright.
How can parents make Halloween pumpkin painting a fun, safe, and mess free family activity?
Parents can make pumpkin painting much easier by preparing the work area before children begin.
Cover the table and floor with newspaper, an old tablecloth, or a washable sheet.
Give each child a small paint tray and only a few colors at first, which helps reduce spills.
Young children should use washable, child safe paints and should be supervised throughout the activity.
Keep paint away from eyes and mouths, and wash hands after painting.
Small pumpkins are often easier for little hands to hold and decorate.
Parents can also set up a drying area where finished pumpkins can sit without being touched.
Playing Halloween music, offering several design choices, and allowing children to name their pumpkins can make the afternoon feel like a special family event.
Top 21 Halloween Pumpkin Painting Ideas
Glow in the Dark Ghost Pumpkin

Turn a plain pumpkin into a friendly ghost with white paint, large black eyes, and a wide smiling mouth. Add glow in the dark paint over the white areas once the first coat has dried. Children ages 3 to 5 can use simple round eyes, while older children can add raised eyebrows, tiny stars, or floating ghost shapes around the face. A black background can make the glowing ghost stand out even more. This is one of the Halloween pumpkin painting ideas that looks cheerful during the day and spooky after sunset. Place the finished pumpkin near a porch, window, or doorway where the design can be seen clearly.
Rainbow Drip Pumpkin

Create a rainbow pumpkin by painting the top in red, orange, yellow, green, blue, and purple. After the paint dries, add small amounts of each color near the upper edge and allow them to run downward for a painted drip effect. Children can control the length of each drip with a brush. A white pumpkin can make the rainbow colors look especially bright. For younger kids, parents can mark simple sections around the top before painting. Older children can add stars, hearts, or tiny clouds between the colors. This colorful design gives children plenty of freedom while keeping the pumpkin easy to recognize as a Halloween decoration.
One Eyed Monster Pumpkin
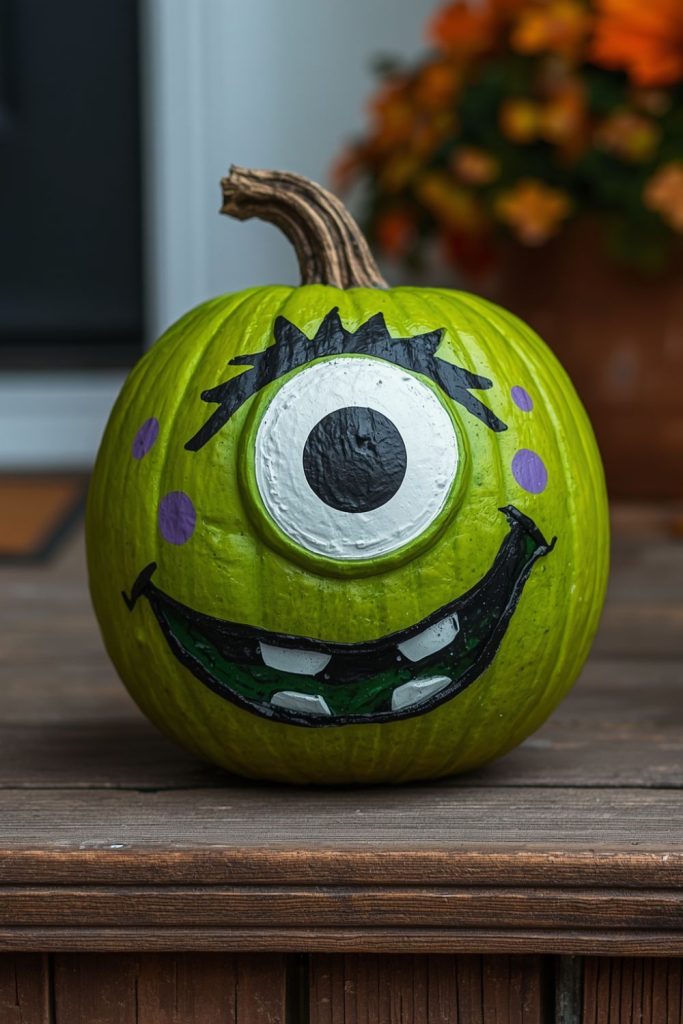
Paint the pumpkin green, purple, or bright blue, then give it one huge round eye in the center. Add thick black eyebrows, a funny mouth, crooked teeth, and colorful spots around the face. Children can choose whether their monster looks silly, surprised, sleepy, or scary. A black outline around the eye helps the face stand out against the pumpkin color. This is one of the easiest Halloween pumpkin painting ideas because the design relies on circles, lines, and simple shapes. Older children can add several small monsters around the main face or create a whole family of painted creatures.
Spooky Cat Pumpkin

A black cat face makes a wonderful Halloween pumpkin design for children who enjoy animals. Paint the pumpkin black or dark purple, then add large yellow eyes, a pink nose, white whiskers, and triangular ears. White paint can create tiny highlights inside the eyes. Children can add orange stars, small bats, or painted paw prints around the cat. A purple background can make the black face easier to see. Younger children can focus on the large eyes and whiskers, while older kids can add more facial details. This design works especially well on small pumpkins because the cat face can remain simple and bold.
Candy Corn Pumpkin

Use three painted bands to turn a pumpkin into a giant candy corn. Paint the bottom section yellow, the middle orange, and the top white. Once the paint has dried, add a black Halloween face over the center for an extra playful touch. Children can also paint tiny candy corn shapes around the pumpkin. A round pumpkin works well because its natural curves create a soft striped appearance. This idea uses only three main colors, making it suitable for younger children. Older kids can add glitter paint, dots, stars, or a painted candy bowl beside the candy corn design.
Unicorn Halloween Pumpkin

Paint the pumpkin pink, purple, pale blue, or white and turn it into a Halloween unicorn. Add large closed eyes with black lashes, rosy cheeks, and a gold or silver horn at the top. Paint a rainbow mane across one side using bright pastel colors. Small stars and moons can fill empty spaces around the face. Younger children can choose three or four favorite colors for the mane, while older children can create more detailed patterns. This is a sweet option for children who prefer cute Halloween pumpkin painting ideas instead of traditional scary faces. A little metallic paint can make the horn stand out beautifully.
Mummy Pumpkin

Create a mummy with white, gray, and black paint. Cover the pumpkin with uneven white bandage stripes, leaving small gaps where the darker pumpkin color can show through. Add two large eyes between the strips and outline them in black. Children can make the bandages straight, curved, or slightly crooked. The imperfect lines actually make the mummy look more playful. Older children can add tiny spiders or cobwebs around the sides. This design is easy to adjust for different ages because younger children can paint broad stripes, while older children can add shadows and small facial details.
Frankenstein Pumpkin
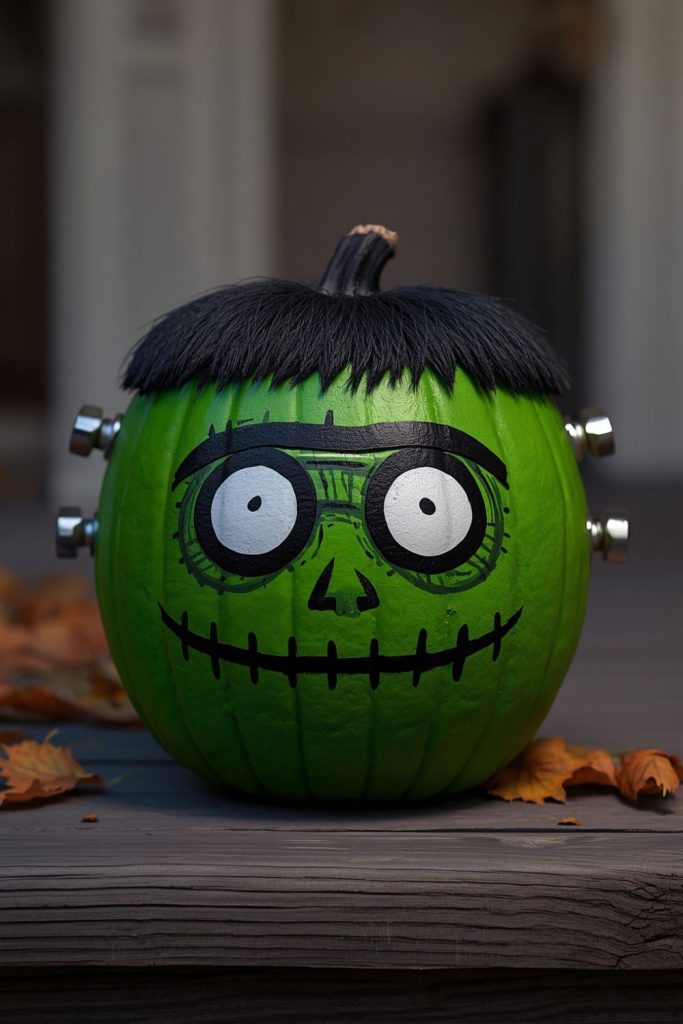
Paint the pumpkin green and let it dry before adding Frankenstein’s black hair. Use thick black eyebrows, round eyes, a stitched mouth, and two gray neck bolts to complete the face. Children can make the expression friendly or funny rather than frightening. A purple or black background painted behind the face can make the green stand out. Younger kids can use large simple shapes, while older children can add scars, stitches, ears, and small bats. Among Halloween pumpkin painting ideas, Frankenstein is especially useful because the face can be created from basic lines and circles that children can easily copy.
Spiderweb Pumpkin

Paint the pumpkin black, dark purple, or navy blue. Once it dries, use white paint to create a spiderweb across the front. Start with several straight lines meeting in the center, then connect them with curved lines. Add a small black, purple, or red spider in the middle. Children who enjoy bright colors can paint the web in neon pink, blue, or green instead of white. Younger children can make a simple web with fewer lines, while older children can add several smaller webs. The strong contrast between dark paint and bright web lines makes this one of the most striking Halloween pumpkin painting ideas.
Vampire Pumpkin

Give the pumpkin a pale purple, gray, or white base and paint a vampire face on top. Add black hair with a pointed center, red eyes, raised eyebrows, and two white fangs. A small red mouth can complete the face without making it too frightening for young children. Older kids can add a black cape shape behind the head or tiny bats around the sides. Gold paint can be used for small details such as buttons. This design gives children an easy face to copy while leaving plenty of room for personal color choices.
Pumpkin Within a Pumpkin

Paint a large orange pumpkin and add a smaller painted pumpkin face inside its main face. The inner pumpkin can have yellow, white, or green features so it stands out. Children can create a smiling pumpkin inside a surprised pumpkin for a funny layered effect. Older children can paint several tiny pumpkins around the main design, giving the picture more depth. Use black outlines around each face so the shapes remain easy to see. This idea is especially fun for siblings because each child can choose a different expression for the small pumpkin.
Dinosaur Halloween Pumpkin

Turn a pumpkin into a friendly dinosaur with green paint, large eyes, nostrils, teeth, and colorful spikes. Purple, orange, or blue spikes can run from the top to the back of the pumpkin. Children can choose a T rex style face, a triceratops inspired look, or their own imaginary dinosaur. Add small painted bats and stars to give the design a Halloween theme. Younger children can use large spots and simple eyes, while older kids can add scales and facial details. This is a great choice for children who love dinosaurs but want something different from traditional pumpkin faces.
Wide Eyed Owl Pumpkin

Paint the pumpkin brown, gray, white, or orange to create a Halloween owl. Use two enormous circular eyes with black pupils, a small yellow beak, and curved feather shapes around the face. White and cream paint can create rings around the eyes, making them stand out. Children can add tiny stars, moons, or branches around the owl. For younger kids, large circles and simple lines are enough. Older children can add layered feather patterns and several colors. The large eyes make this pumpkin especially noticeable on a porch or shelf.
Haunted House Pumpkin

Paint the pumpkin dark blue, purple, or black to create a nighttime background. Add a crooked haunted house with yellow windows, a round moon, black trees, and tiny bats flying above the roof. Children can make the house friendly by adding smiling ghosts near the door. Older kids can add fences, pumpkins, clouds, and winding paths. Use white or yellow paint for small highlights so the scene does not disappear against the dark background. This design gives older children more space to tell a little Halloween story through their painting.
Jack o Lantern Emoji Pumpkin

Give a pumpkin an oversized emoji style expression using bright orange, yellow, black, red, or pink paint. Try heart shaped eyes, a laughing face, a surprised expression, or a silly tongue sticking out. Children can choose an emotion and create a pumpkin character around it. Thick black outlines help the facial features remain visible from a distance. Younger children can copy a simple smiley expression, while older kids can combine different expressions on several small pumpkins. This is one of the most playful Halloween pumpkin painting ideas for a group activity.
Space Monster Pumpkin
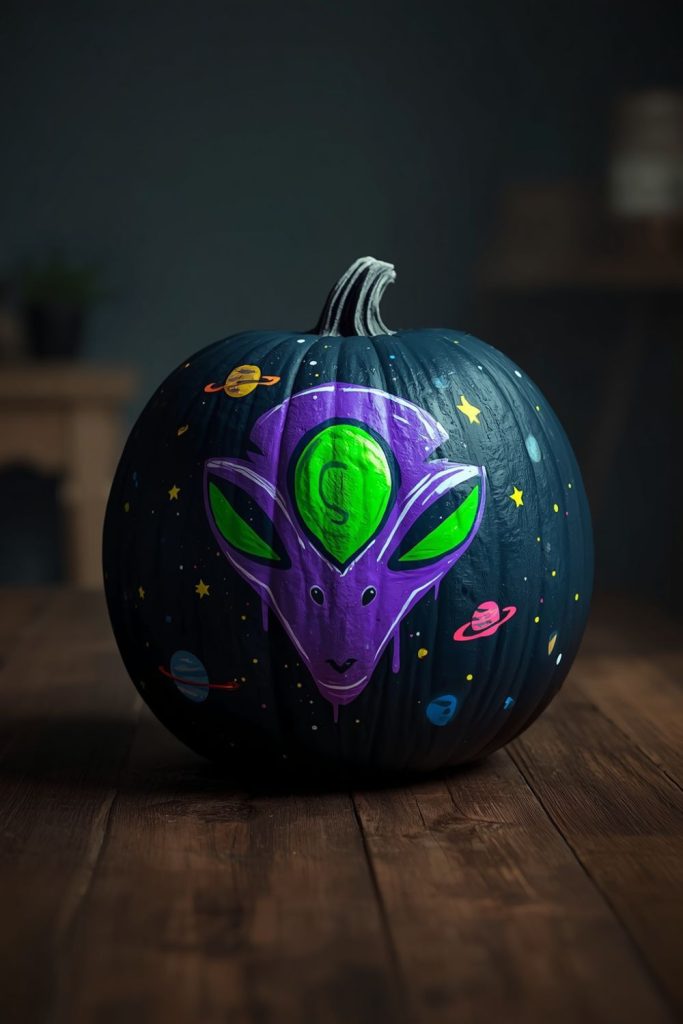
Paint the pumpkin dark blue, purple, or black and turn it into a colorful space scene. Add a three eyed alien with green or blue skin, then paint planets, stars, moons, and tiny spaceships around it. Neon colors work especially well against the dark base. Children can create their own alien face with different eye shapes and expressions. Older kids can paint rings around planets or tiny constellations. The design combines Halloween fun with an outer space theme, making it a good choice for children who are less interested in traditional ghosts and witches.
Witch’s Hat Pumpkin

Paint the pumpkin purple, orange, or black, then create a large black witch’s hat across the top. Add an orange buckle, stars, moons, and tiny painted bats around the hat. Children can give the witch a funny face below the hat or leave the pumpkin as a simple decorated hat design. Purple and green details work nicely against black paint. Younger children can focus on broad hat shapes, while older children can add stripes and small decorations. This design can also be repeated across several pumpkins using different hat colors.
Cartoon Skeleton Pumpkin

Paint the pumpkin white or light gray and create a cartoon skeleton face using black paint. Large hollow eyes, a small triangular nose, and a row of simple teeth make the design easy for children to copy. Add colorful stars or small hearts around the skull to make it friendlier. Older children can paint crossed bones beneath the face or add a tiny skeleton character beside it. A black pumpkin with white skeleton details can create the opposite effect. The simple shapes make this a useful Halloween pumpkin painting idea for children who enjoy spooky designs without anything too frightening.
Ladybug Halloween Pumpkin

Paint the pumpkin bright red and add a black center line running from top to bottom. Cover the sides with black dots and create a black head near the top. White eyes with black pupils can give the ladybug a friendly face. Add tiny Halloween bats or orange stars around the body for a seasonal touch. Children can experiment with different dot sizes and colors. A purple or orange ladybug can also be fun if children want something less traditional. This animal design is cheerful, simple, and easy for younger children to paint.
Galaxy Halloween Pumpkin
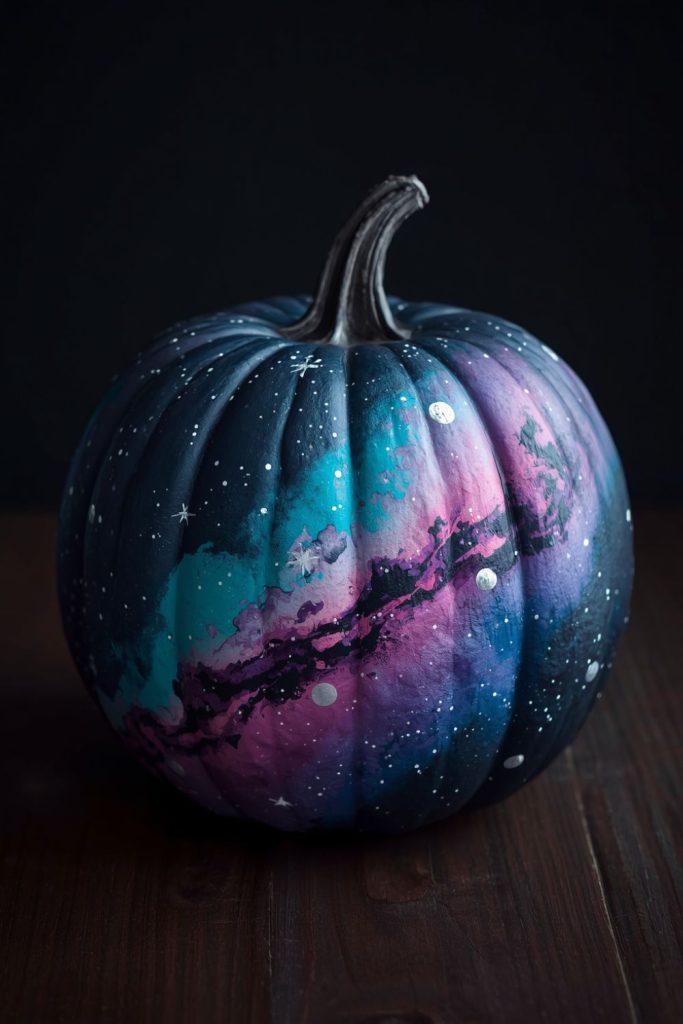
Paint the pumpkin navy blue, purple, pink, and turquoise in soft sections that blend into one another. Once the base is dry, add tiny white dots for stars and larger dots for planets. Metallic silver paint can create moons, rings, and small shooting stars. Older children can add a Halloween moon, tiny bats, or a ghost floating through the galaxy. Younger children can focus on colorful patches and simple white stars. The dark background makes the lighter paint stand out strongly, giving the pumpkin a dramatic appearance without requiring difficult shapes.
Paw Print Pumpkin Family

Paint one large pumpkin with a big paw print in the center, then decorate smaller pumpkins with different paw print sizes. Use orange, black, purple, pink, or blue for the prints. Children can create a pumpkin for every person or pet in the family by giving each one a different color. Add small painted hearts, bones, stars, or Halloween bats around the prints. Younger kids can stamp or paint simple circles and toe shapes, while older children can make more detailed paw patterns. This family themed design works well when several pumpkins are being decorated at the same time.