
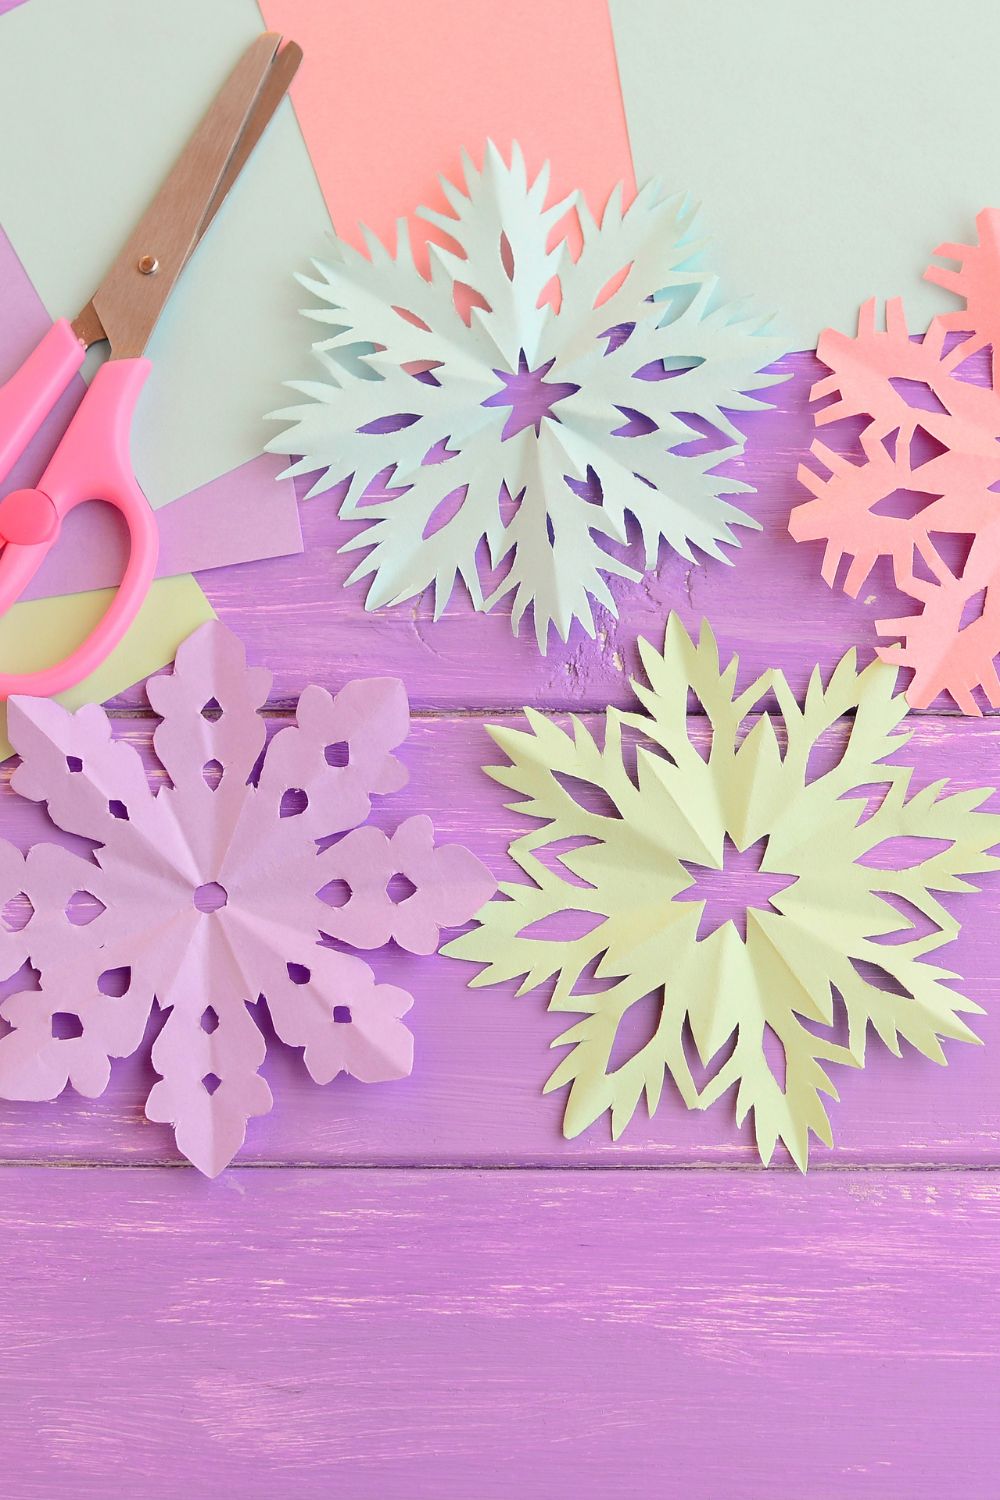
Winter is the perfect time to keep kids busy with fun, easy indoor activities. These 21 winter crafts use simple materials like paper, cardboard, yarn, and glue to create snowy villages, cute animals, colorful decorations, and more. Perfect for preschoolers and school aged children, each activity includes a materials list and step by step instructions for a fun, creative day at home.
1. Cardboard Winter Village With Glowing Yellow Windows
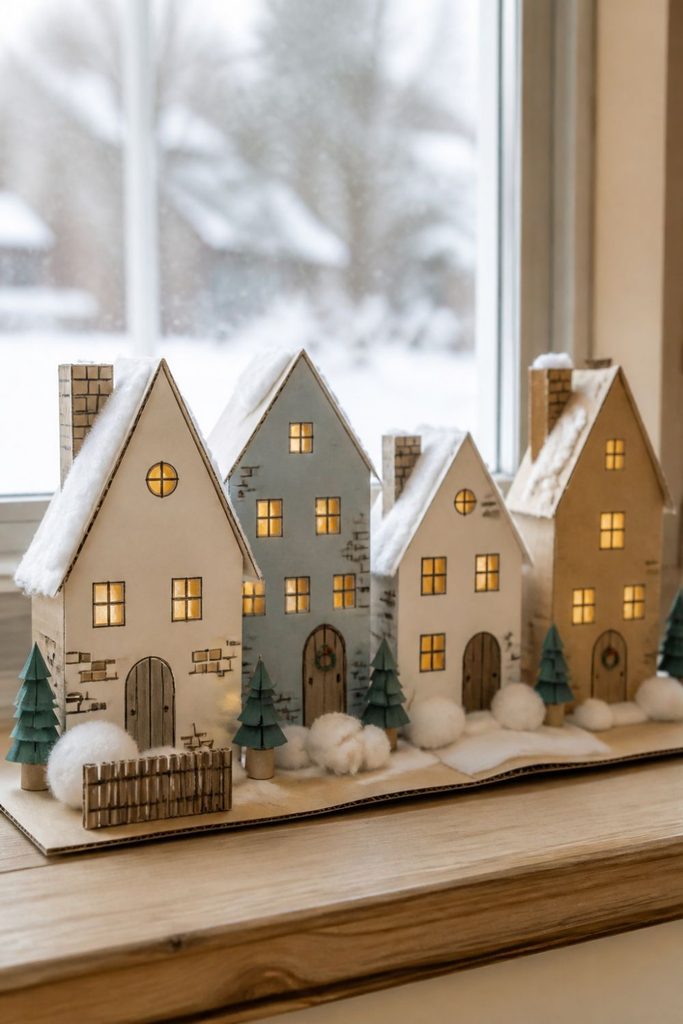
A cardboard winter village gives children the chance to build a row of tiny houses covered in snow, with bright yellow windows that look warm against the chilly colors. This activity is especially lovely for a windowsill, bookshelf, or winter themed table display.
Materials needed
- Empty cereal boxes or lightweight cardboard
- White, pale blue, and brown paper
- Yellow tissue paper or yellow construction paper
- Child safe scissors and a glue stick
- Crayons, markers, cotton balls, and a ruler
- Battery operated tea lights for an optional glow
Step by step method
- Cut the cardboard into several house shapes, using rectangles for the walls and triangles for the roofs. Make the houses different heights so the village looks interesting.
- Cover the walls with brown, cream, pale blue, or white paper. Children can draw bricks, doors, tiny wreaths, and roof tiles with markers.
- Cut small square or rectangular window openings with adult help. Glue yellow tissue paper behind each opening to create a glowing window effect.
- Add white paper along the roof edges to represent freshly fallen snow. Cotton balls can become snowy bushes beside the doors.
- Stand the houses on a flat cardboard base and add paper trees, snowy paths, and little fences.
- For a gentle nighttime display, place battery operated tea lights behind the houses, keeping them away from loose tissue paper and other flammable materials.
Encourage children to give every house a name, such as Snowdrop Cottage or Little Pine House. They can even invent stories about who lives inside each home.
2. Torn Paper Polar Bear Emerging From an Ice Cave
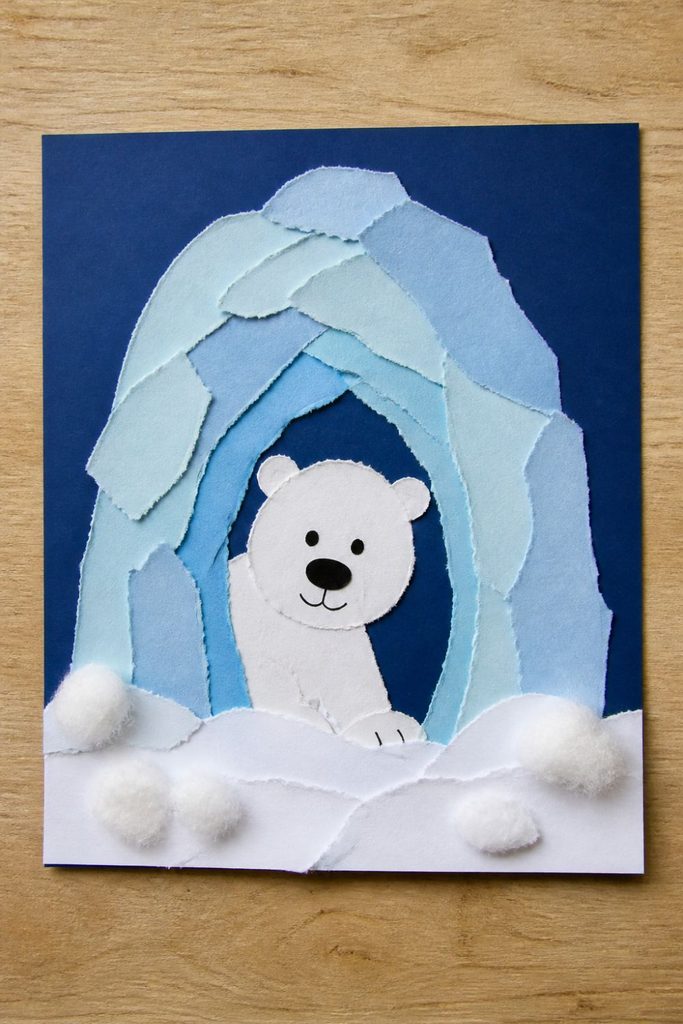
This polar bear activity uses torn paper instead of perfectly cut shapes, making it a good choice for children who are still developing their hand control. The finished picture shows a white bear peeking out from a cool blue ice cave.
Materials needed
- Dark blue or light blue construction paper
- White paper and scraps of pale blue paper
- Gray paper or a gray crayon
- Glue stick
- Black marker
- Cotton balls, optional
- Child safe scissors for preparing the cave shape
Step by step method
- Give each child a blue sheet as the background. Tear white paper into rough pieces for snow, and pale blue paper into smaller pieces for the icy cave.
- Draw a large cave opening near the center of the page. Add torn blue paper around its edges, layering the pieces to create the look of thick ice.
- Tear or cut a large white oval for the polar bear’s face and a larger rounded shape for its body. Position the body partly behind the cave opening.
- Add two small rounded ears, a black oval nose, and tiny black eyes. A curved line can form a gentle smile.
- Glue a few white paper scraps along the cave floor to create snow. Small cotton tufts can add a soft texture, if desired.
- Finish with pale blue marks and white paper shards around the cave to suggest icy cracks.
Ask children to decide whether their bear is waking up, looking for a friend, or waiting for snow to stop falling. This small storytelling step makes each picture feel personal.
3. Patterned Mini Mitten Garland for a Bedroom Wall
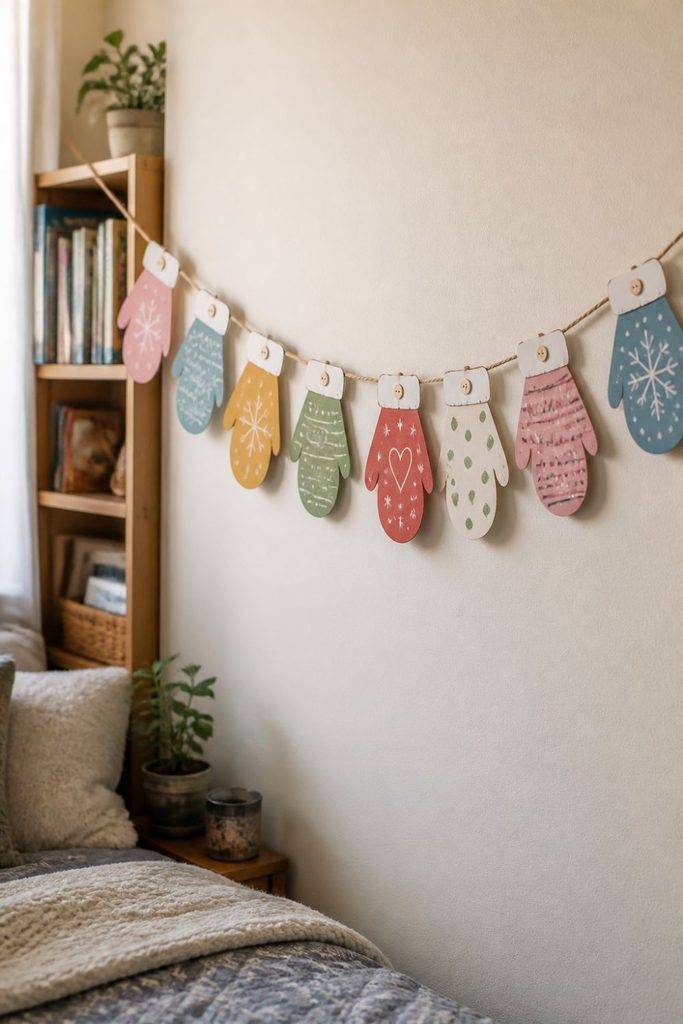
Tiny paper mittens make a cheerful winter decoration, especially when every pair has a different pattern. Children can create stripes, dots, hearts, stars, and zigzags, then string the finished mittens into a garland for their bedroom or playroom.
Materials needed
- Colored cardstock or thick construction paper
- White paper scraps
- Markers, crayons, or colored pencils
- Child safe scissors
- Glue stick
- Yarn, ribbon, or string
- Hole punch and tape
Step by step method
- Draw a simple mitten shape on a piece of cardstock. Cut it out to use as a template, then trace it several times onto different colored sheets.
- Cut out the mittens and arrange them in pairs. Children can choose matching colors or mix bright shades for a playful look.
- Decorate each mitten with stripes, dots, snowflakes, hearts, or tiny trees. Use white paper strips for raised cuffs and small paper circles for buttons.
- Turn the mittens over and write a winter word, a family member’s name, or a cheerful message on the back.
- Punch a small hole near the top of each mitten. Thread yarn or ribbon through the holes, alternating colors and patterns.
- Tie a loop at each end of the string and hang the garland along a wall, bookshelf, or study corner. Use removable wall hooks or tape suited to the surface.
For a sweet personal touch, ask each child to design one mitten for every family member. The finished garland becomes a little collection of handmade winter greetings.
4. Masking Tape Birch Forest With a Pink Winter Sunset
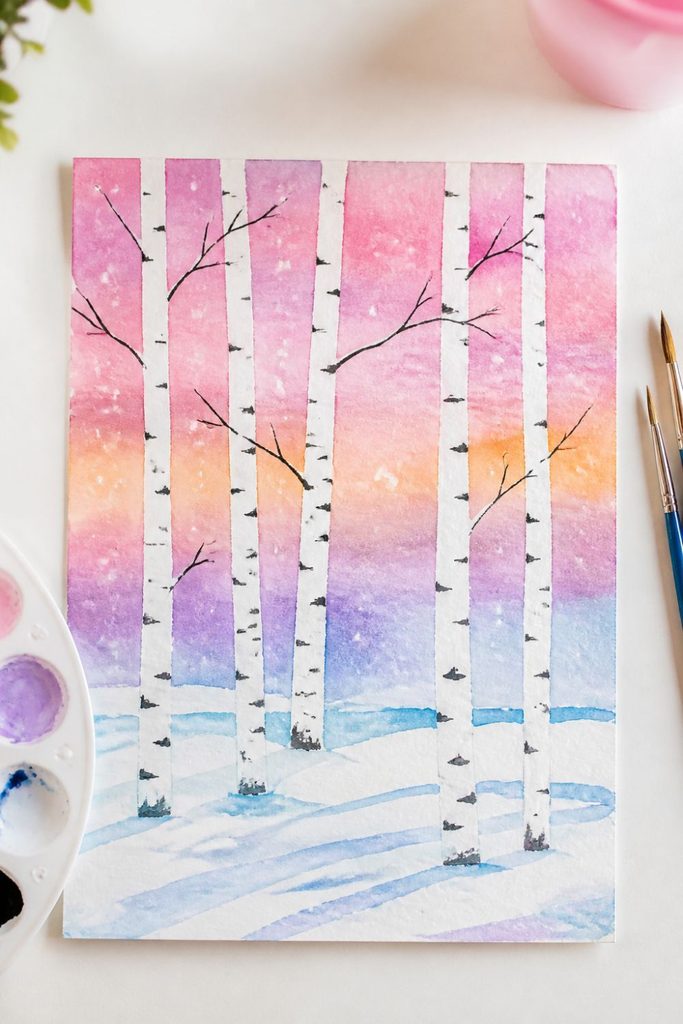
A birch forest picture is a lovely way for children to experiment with color and simple painting techniques. White tree trunks stand against a pink, peach, purple, or blue sunset, creating a peaceful winter scene that looks beautiful on a bedroom wall.
Materials needed
- White cardstock or thick drawing paper
- Masking tape or painter’s tape
- Washable paints in pink, peach, purple, blue, and white
- Paintbrushes or sponges
- Black crayon or marker
- Child safe scissors
Step by step method
- Tear or cut strips of masking tape and stick them vertically across the paper. Use different widths and angles to make the tree trunks look natural.
- Paint the exposed background with bands of pink, peach, purple, and pale blue. Children can blend the colors gently with a damp sponge.
- Let the paint dry completely before carefully peeling away the masking tape. White strips will remain where the trees stood.
- Add short black or dark gray marks along the trunks to represent the distinctive bark of birch trees. Keep the marks uneven and scattered.
- Paint or draw small dark branches reaching out from the trunks. Add a few white dots in the sky for falling snow.
- Finish with a white strip along the bottom of the page to represent snow on the ground. A few small blue shadows can make the snowy floor look more natural.
Remind children that no two trees need to look alike. Some can be tall and straight, while others lean gently to one side. The pink sky gives the picture a soft winter sunset effect without requiring detailed drawing skills.
5. Arctic Animal Masks: Snowy Owl and Arctic Fox
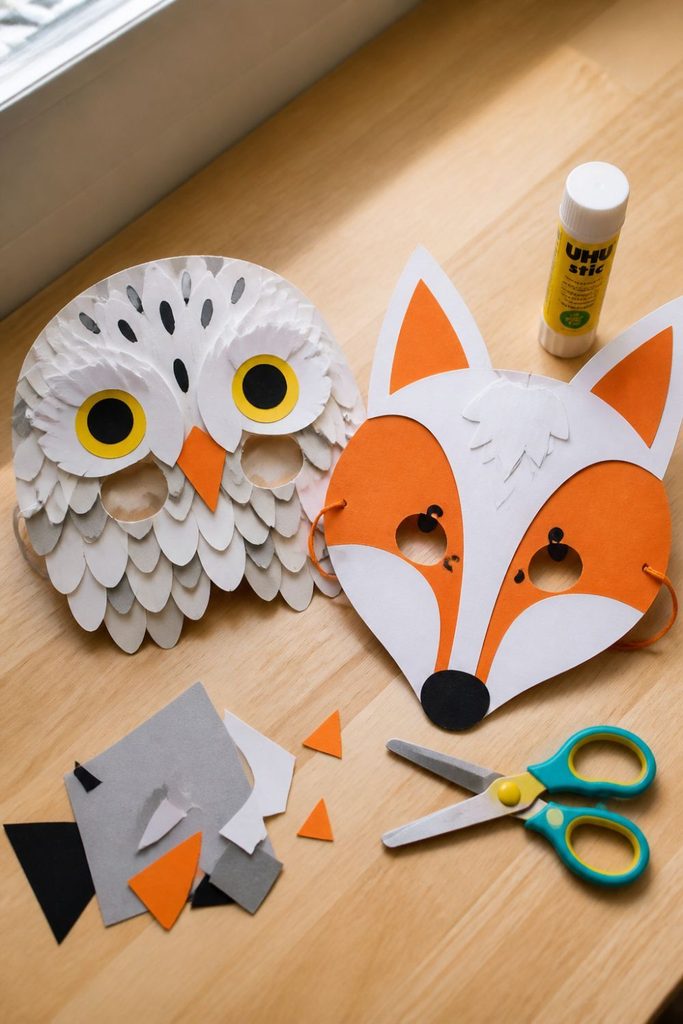
Animal masks invite children to move beyond the art table and use their creations in pretend play. A snowy owl mask can have wide eyes and feather like shapes, while an Arctic fox mask can feature pointed ears and a fluffy white face.
Materials needed
- White cardstock or paper plates
- White, gray, orange, and black construction paper
- Child safe scissors
- Glue stick
- Crayons or washable markers
- Elastic string or a craft stick
- Adult help for making eye openings
Step by step method
- Draw a large mask shape on cardstock, leaving enough room for the child’s eyes. An adult should cut out the eye openings and check that the mask fits comfortably.
- For the snowy owl, cut small white and gray paper feathers. Glue them around the forehead and cheeks in overlapping rows.
- Add two large round eyes using yellow, black, and white paper circles. A small orange or yellow triangle becomes the owl’s beak.
- For the Arctic fox, make two pointed ears and a rounded face. Add white cheek patches, a black nose, and orange paper along the sides of the face.
- Decorate the fox’s forehead with a white blaze and add gray or pale blue details around the edges.
- Attach a craft stick to the bottom of each mask or have an adult attach elastic securely. Make sure the mask does not block breathing or vision.
Once the masks are ready, children can act out a short Arctic animal story. One child might play an owl searching for a warm tree hollow, while another pretends to be a fox exploring the snow.
6. Translucent Tissue Paper Snowflake Window Mosaics
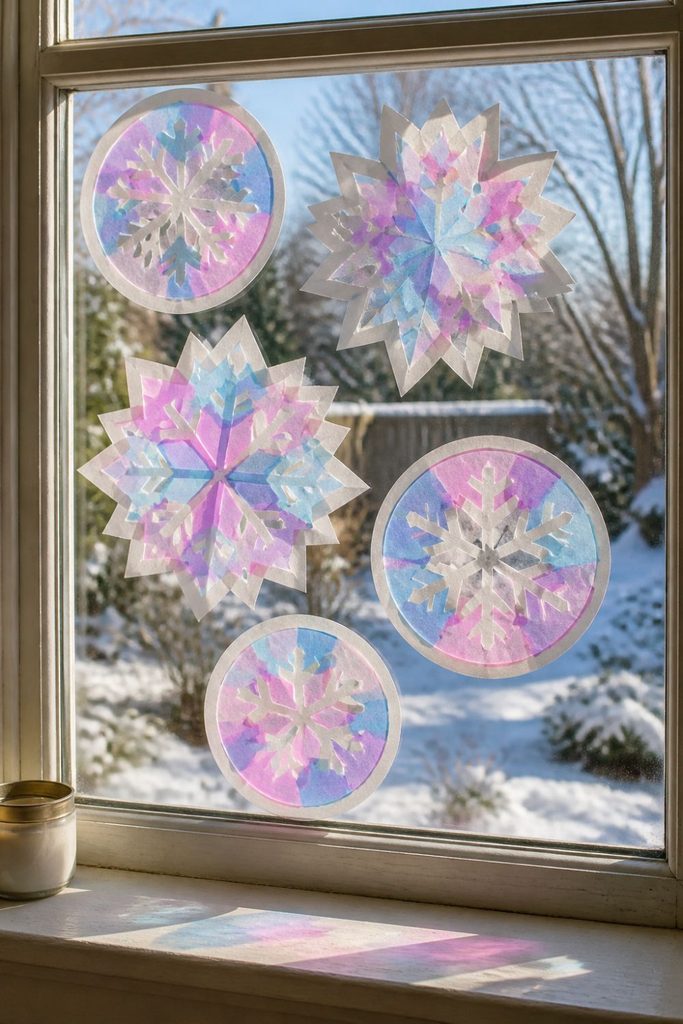
Tissue paper snowflakes bring soft color to a cold winter morning. When placed on a window, their overlapping layers allow daylight to pass through, creating a cheerful decoration that changes slightly as the sun moves.
Materials needed
- White tissue paper and colored tissue paper
- Clear contact paper
- White cardstock
- Child safe scissors
- Pencil
- Removable tape
- Optional snowflake templates
Step by step method
- Fold a piece of white paper and cut out a simple snowflake. Younger children can use large, easy shapes, while older kids can try smaller branches and diamond patterns.
- Cut colored tissue paper into small squares, triangles, and strips. Pale blue, purple, pink, and white work especially well together.
- Place a sheet of clear contact paper sticky side up on the table. Tape its corners down so it does not move while children work.
- Arrange the snowflake in the center, then fill the surrounding space with tissue paper pieces. Allow some colors to overlap for a stained glass effect.
- Place another sheet of contact paper over the design, smoothing it gently to seal the pieces inside.
- Trim the edges into a circle, square, or large snowflake shape. Attach the finished mosaic to a clean window with removable tape.
Children can create several snowflakes in different color combinations and arrange them across the glass. Leave small gaps between the pieces so daylight can shine through, making the tissue paper glow.
7. Wobbling Cardboard Penguins With Removable Paper Scarves
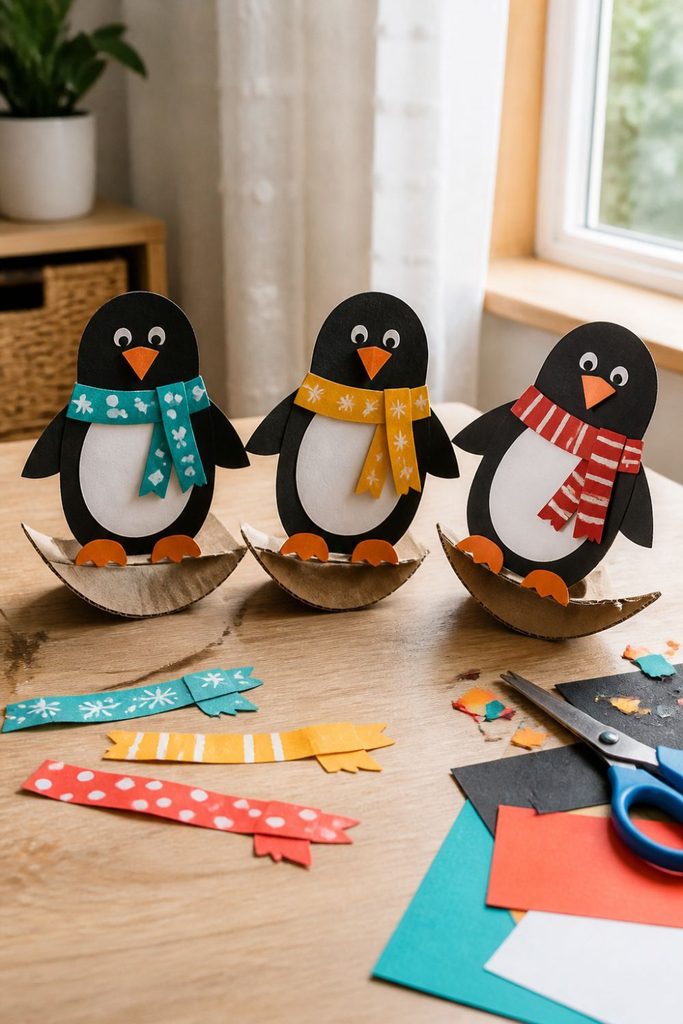
These cheerful penguins can rock gently from side to side when tapped, making them more playful than ordinary paper decorations. Removable scarves add a dress up activity, allowing children to change the penguins’ outfits throughout the winter.
Materials needed
- Thin cardboard from cereal boxes
- Black, white, and orange construction paper
- Colored paper scraps for scarves
- Glue stick
- Child safe scissors
- Black marker
- Round household object for tracing
Step by step method
- Trace a large circle on thin cardboard and cut it out. Fold the circle in half, then open it slightly so the curved base allows it to rock.
- Cut an oval penguin body from black paper and a smaller white oval for its belly. Glue the body onto a folded cardboard support, keeping the curved base free to move.
- Add two small white eye circles, black pupils, and an orange triangular beak. Cut tiny orange feet and attach them near the base.
- Make scarves from narrow strips of colored paper. Fold each scarf around the penguin’s neck and secure it loosely at the back with a small paper tab or removable paper fastener.
- Draw stripes, dots, snowflakes, or zigzags on each scarf. Prepare extra scarves so children can swap them whenever they like.
- Stand the penguin on a flat table and gently tap its side. Adjust the folded base if needed to help it wobble without falling over.
Children can name their penguins and prepare different scarves for snowy days, holiday parties, or pretend trips to the South Pole. For younger kids, an adult can prepare the curved cardboard bases in advance.
8. Midnight Winter Cityscape With Golden Paper Windows
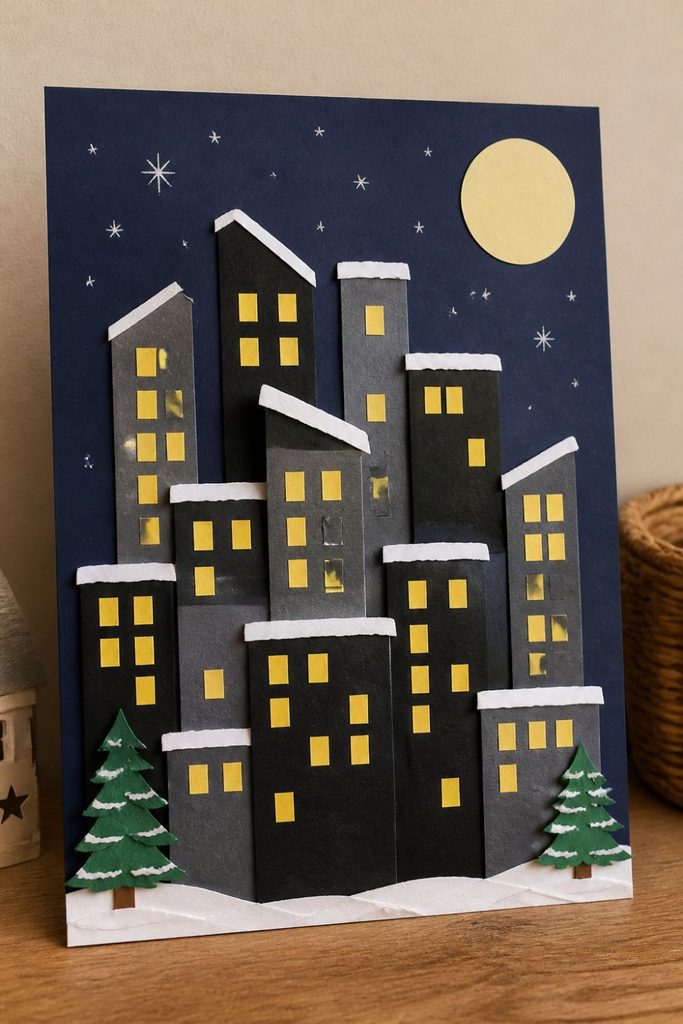
A midnight city picture combines dark colors with small golden windows to create a striking nighttime scene. Children can build a row of tall buildings, add snowy rooftops, and make every window look warm against the deep blue sky.
Materials needed
- Navy blue or black cardstock
- Black, gray, and dark blue paper
- Yellow or gold construction paper
- White paper
- Glue stick and child safe scissors
- Silver or white crayons
- Optional star stickers
Step by step method
- Cover the work surface with scrap paper and place a sheet of navy cardstock in the center. This will be the night sky.
- Cut rectangles of different heights from black and gray paper to make apartment blocks, houses, and tall buildings. Arrange them along the bottom of the page.
- Cut tiny yellow or gold rectangles for windows. Glue them onto the buildings in neat rows, leaving a few dark windows to make the city look more natural.
- Add white paper along the rooftops to show snow. Use a white crayon to draw icicles, snowy ledges, and small flakes drifting through the sky.
- Cut a pale yellow moon from paper and place it near the top corner. Add small silver stars or hand drawn dots around it.
- Finish by drawing a road or footpath along the bottom. Children can add little paper people, parked cars, or a snow covered tree.
This project is ideal for children who enjoy arranging shapes and patterns. Encourage them to vary the building heights and window spacing, then give the city a name such as Moonlight Street or Snowy Town.
9. Giant Hot Chocolate Mug With 3D Marshmallows
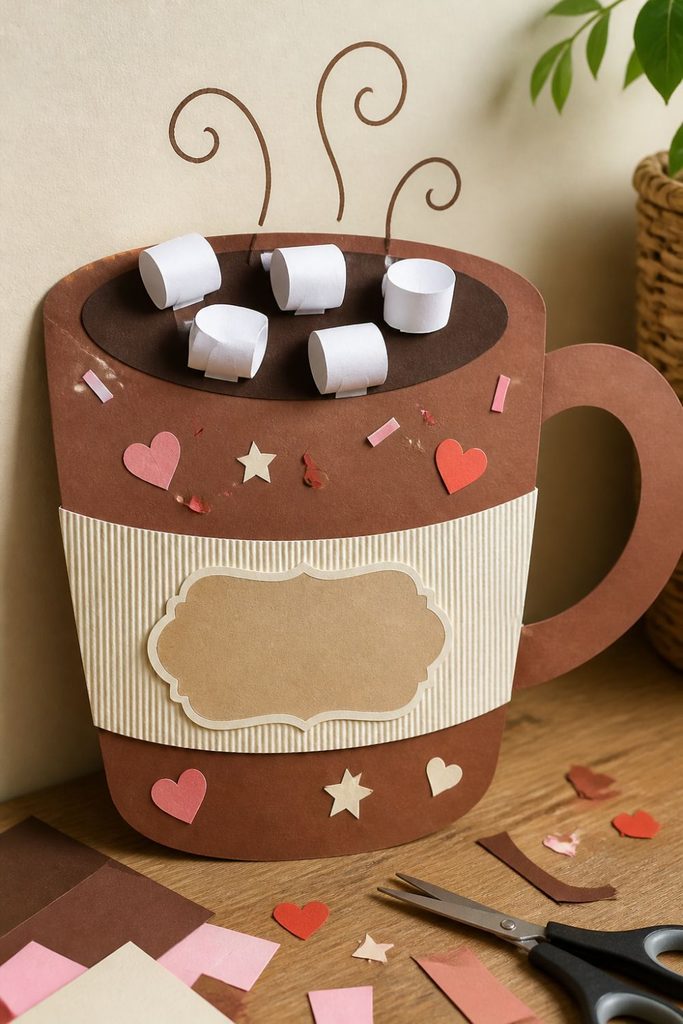
A giant paper mug makes a fun winter display for a kitchen, classroom, or child’s bedroom. The raised marshmallows add a playful three dimensional effect, and children can decorate the mug with hearts, stars, candy canes, or their own pretend café logo.
Materials needed
- Brown or colored cardstock
- White paper or cotton balls
- Pink, red, cream, and other colored paper scraps
- Glue stick
- Child safe scissors
- Pencil and markers
- Small pieces of folded scrap paper
Step by step method
- Draw a large mug shape on cardstock, including a wide body and a curved handle. Cut it out carefully.
- Add a darker brown oval near the top to represent hot chocolate. Draw a few curved lines across it to suggest steam or a swirl of cream.
- Cut white paper into small squares or rounded rectangles for marshmallows. Fold a tiny tab behind each one so it can stand slightly away from the page.
- Glue the tabs to the mug’s surface, arranging the marshmallows so some appear to sit above the rim.
- Decorate the mug with hearts, stars, stripes, or a paper label reading something cheerful, such as Cocoa Club. Add a paper sleeve around the middle for extra color.
- Draw steam curls above the cup and scatter small paper sprinkles around the top. If you want a larger display, mount the mug on a second sheet of cardboard for support.
Invite children to invent a pretend hot chocolate flavor, such as strawberry cocoa or cinnamon cloud. They can write its name on a small paper menu and add prices for their imaginary winter café.
10. Accordion Fold Mountain Range With Tiny Skiers
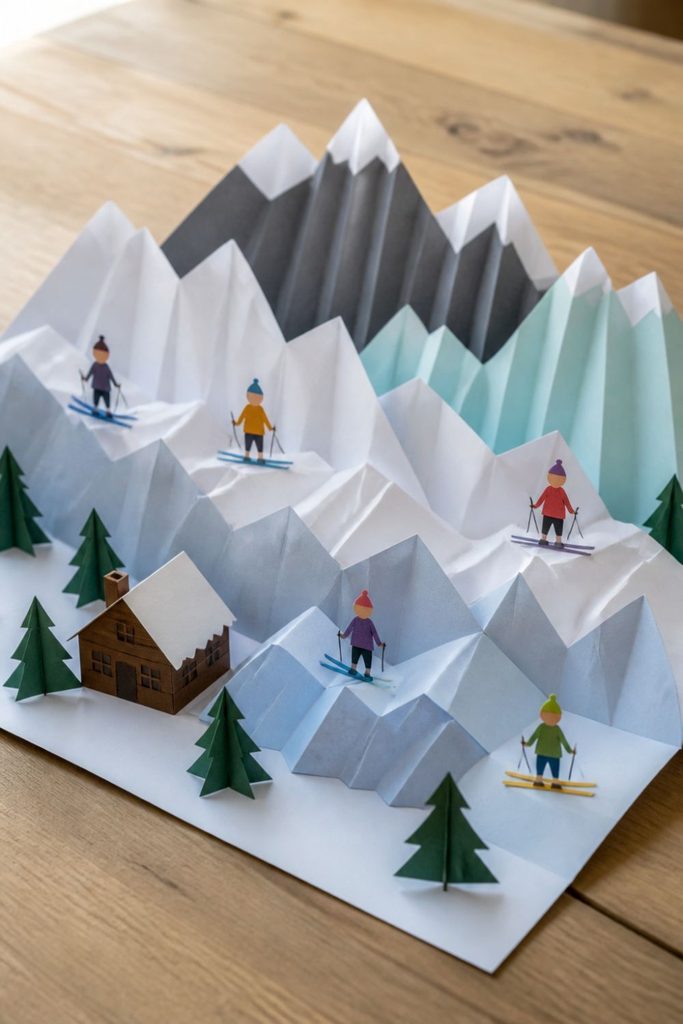
Folded paper mountains create a layered winter scene that stands up slightly from the page. Tiny skiers, snowy peaks, and winding slopes make this project a good choice for children who enjoy building scenes and inventing outdoor adventures.
Materials needed
- White, blue, gray, and green construction paper
- Cardstock for the background
- Small colored paper scraps
- Child safe scissors
- Glue stick
- Markers or crayons
- Ruler, optional
Step by step method
- Cut long strips of blue, white, and gray paper. Fold each strip back and forth like a fan to make an accordion.
- Draw mountain peaks along the top edge of some folded strips. Cut the peaks carefully, keeping enough paper at the bottom for the folds to stay connected.
- Glue the lower edges of the folded strips onto a cardstock background. Place the tallest mountains at the back and shorter snowy hills near the front.
- Cut tiny skier bodies from colored paper. Use thin strips for their legs and arms, and add small round heads.
- Draw or glue two narrow paper skis beneath each skier. Add thin poles using marker lines or paper strips.
- Place the skiers on the snowy slopes, using folded tabs to help them stand out from the background. Add pine trees, snowflakes, and a small ski lodge.
Children can name their ski resort and decide where each skier is heading. They might add a beginner slope, a steep mountain trail, or a cozy resting hut. Keep the figures simple, since even tiny shapes can bring the whole scene to life.
11. Pinecone Owls Perched on Miniature Snowy Branches
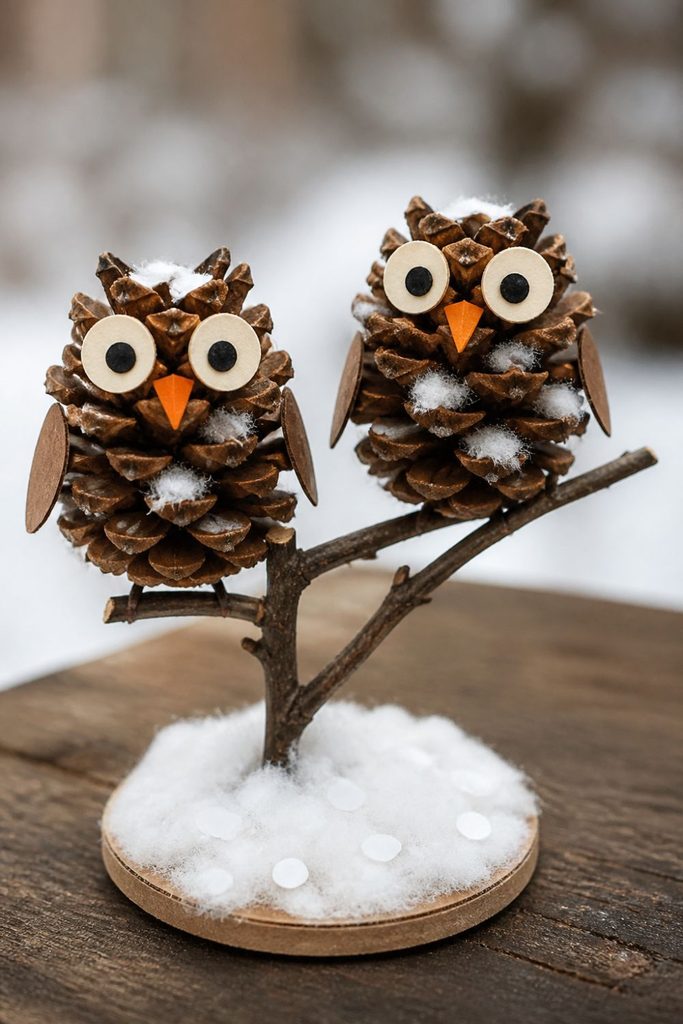
Pinecone owls bring natural materials into an indoor winter activity. The rough texture of a pinecone makes a wonderful body for a small owl, while white cotton or paper snow adds a soft contrast to the brown scales.
Materials needed
- Clean, dry pinecones
- White felt or cardstock
- Small pieces of orange and black paper
- Cotton balls or white wool
- Glue suitable for the materials
- Small dry twigs
- Cardboard base
- Adult help for attaching parts securely
Step by step method
- Choose a clean pinecone with a stable base. An adult should check it for loose debris and insects, then let it dry fully before use.
- Cut two white or cream circles for the owl’s eyes and two smaller black circles for the pupils. Glue them near the upper part of the pinecone.
- Cut a tiny orange triangle for the beak. Add small paper wings to either side, using brown, gray, or white shapes.
- Pull cotton into small tufts and tuck a few pieces between the pinecone scales to suggest snowy feathers. Avoid filling every gap, so the natural texture remains visible.
- Glue a dry twig onto a sturdy cardboard base. With adult assistance, attach the pinecone owl to the branch using a suitable adhesive.
- Add small white paper dots or cotton tufts along the twig to create a snowy perch. Let all glued parts dry completely before moving the display.
Children can make a whole family of owls in different sizes. Give each owl a name and place them together on a miniature forest branch for a lovely seasonal decoration.
For safety, supervise the use of pinecones and small parts, particularly with toddlers who may put objects in their mouths.
12. Reversible Paper Snow Globe With a Hidden Winter Scene
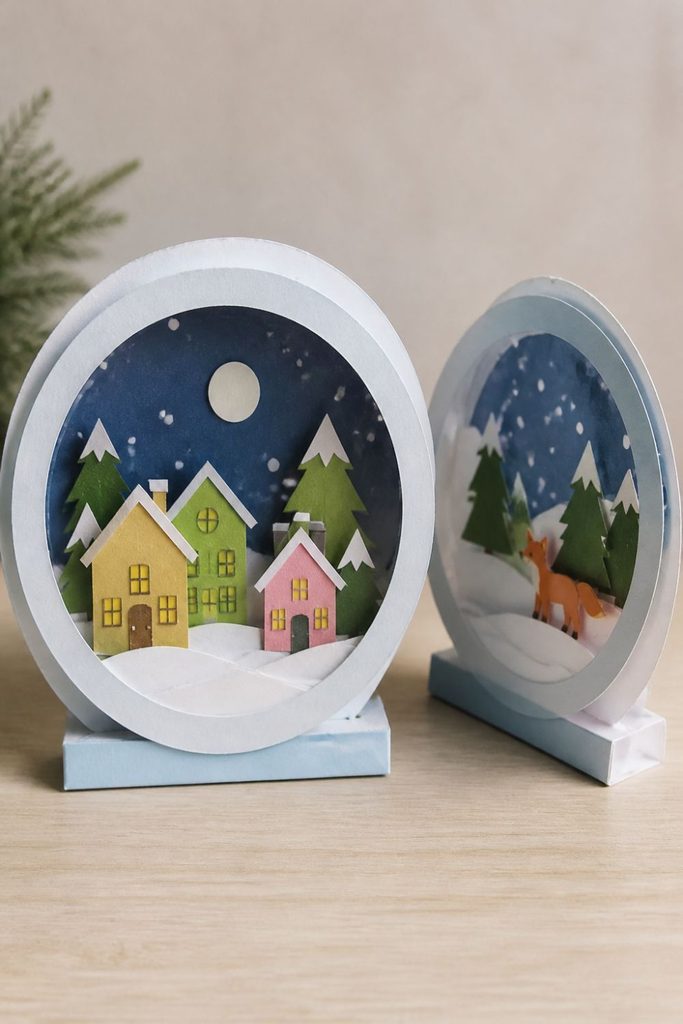
A reversible snow globe gives children two pictures in one project. One side can show a quiet snowy village, while the other reveals a hidden animal, a winter picnic, or a little house beneath the snow.
Materials needed
- White and blue cardstock
- Clear plastic sheet or transparent craft film
- Colored paper scraps
- Glue stick
- Child safe scissors
- Markers
- Paper fastener or removable tape
- Pencil and a circular template
Step by step method
- Trace two large circles on cardstock and cut them out. Draw a snow globe base at the bottom of each circle.
- On the first circle, create a winter scene using paper houses, trees, snowbanks, and a moon. Keep the main shapes away from the outer edge.
- On the second circle, make a different scene. Add an Arctic fox, a sleeping rabbit, or a hidden cabin that appears only when the globe is turned over.
- Cut a window in the center of a third cardstock circle, leaving a wide border around the opening. Attach a piece of transparent film behind it.
- Place the two scenes back to back, with the window frame in front. Join the layers along the edge using tape or a paper fastener, depending on the design.
- Decorate the frame with paper snowflakes and a label. Turn the globe over to reveal the second scene, then invent a short story that connects both pictures.
The project works best when the scenes are simple and the paper layers stay flat. An adult can help secure the transparent sheet and check that the fastener does not have sharp edges.
13. Geometric Snowflakes Wrapped in Chunky, Colorful Yarn
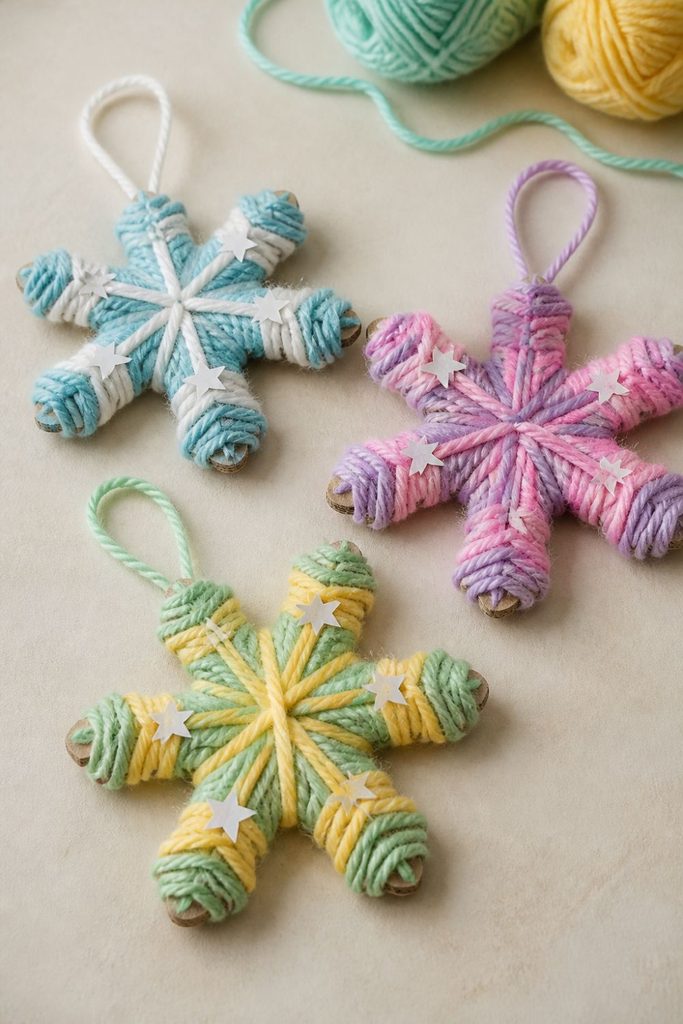
These yarn snowflakes combine simple geometric shapes with a soft, textured finish. Children can choose cool winter colors or bright rainbow shades, making decorations that look lovely hanging from a shelf or bedroom hook.
Materials needed
- Cardboard or thick cardstock
- Chunky yarn in two or three colors
- Child safe scissors
- Pencil and ruler
- Glue or paper tape
- Hole punch
- Optional beads or paper stars
Step by step method
- Draw a six armed snowflake on cardboard, making sure each arm is thick enough to wrap with yarn. Cut out the shape carefully.
- Secure the end of a yarn strand to the back of the cardboard with tape. Begin wrapping the yarn around one arm at a time, keeping the strands close together.
- Change colors halfway through or wrap each arm in a different shade. Children can experiment with blue and white, pink and purple, or bright green and yellow.
- Wrap yarn around the center of the snowflake several times to cover the cardboard and hold the arms together visually.
- Tie off the yarn on the back and secure the loose end. Add small paper stars or snowflake shapes where the arms meet.
- Punch a hole near the top and thread through a hanging loop. Display the snowflake on a wall or attach several to a long string for a colorful winter garland.
For younger children, prepare the cardboard shapes in advance and use shorter lengths of yarn. This makes wrapping easier and reduces tangles. Adults should supervise cutting and make sure loose yarn stays away from very young children.
14. Paper Hot Air Balloon Carrying a Tiny Polar Bear
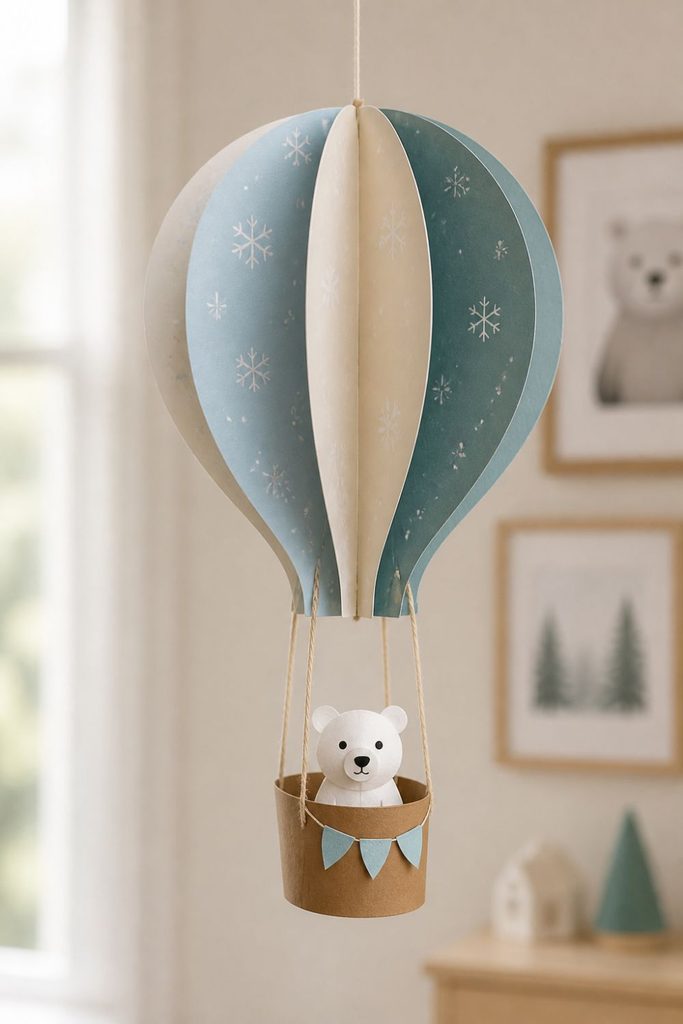
A paper hot air balloon carrying a tiny polar bear creates a playful winter scene that can hang from a bedroom ceiling or sit on a shelf. Children can decorate the balloon with stripes, stars, or little snowflakes before adding their animal passenger.
Materials needed
- Colored cardstock
- White paper
- String or yarn
- Glue stick
- Child safe scissors
- Markers or crayons
- Small cardboard pieces
- Hole punch
Step by step method
- Draw a large balloon shape on colored paper and cut out several matching pieces. Fold each piece in half vertically.
- Glue the folded halves together one at a time, aligning the center folds. Before joining the final two halves, add a length of string through the top for hanging.
- Decorate the balloon with stripes, dots, stars, or paper snowflakes. Use contrasting colors to make the patterns stand out.
- Cut a small basket from brown or tan cardstock and fold its sides upward. Attach it beneath the balloon with two pieces of string.
- Make a tiny polar bear from white paper using a rounded head, an oval body, two small ears, and black paper eyes and nose.
- Glue the bear inside the basket or secure it with a paper tab. Add a few tiny blue paper clouds or snowflakes around the balloon.
Children can give the bear a name and invent a destination for its flight. Perhaps it is travelling above a snowy forest or looking for a new home near the Arctic sea. Keep the hanging version lightweight and attach it securely, away from ceiling fans and walkways.
15. Mini Winter Sweater Gallery With Textured Paper Patterns
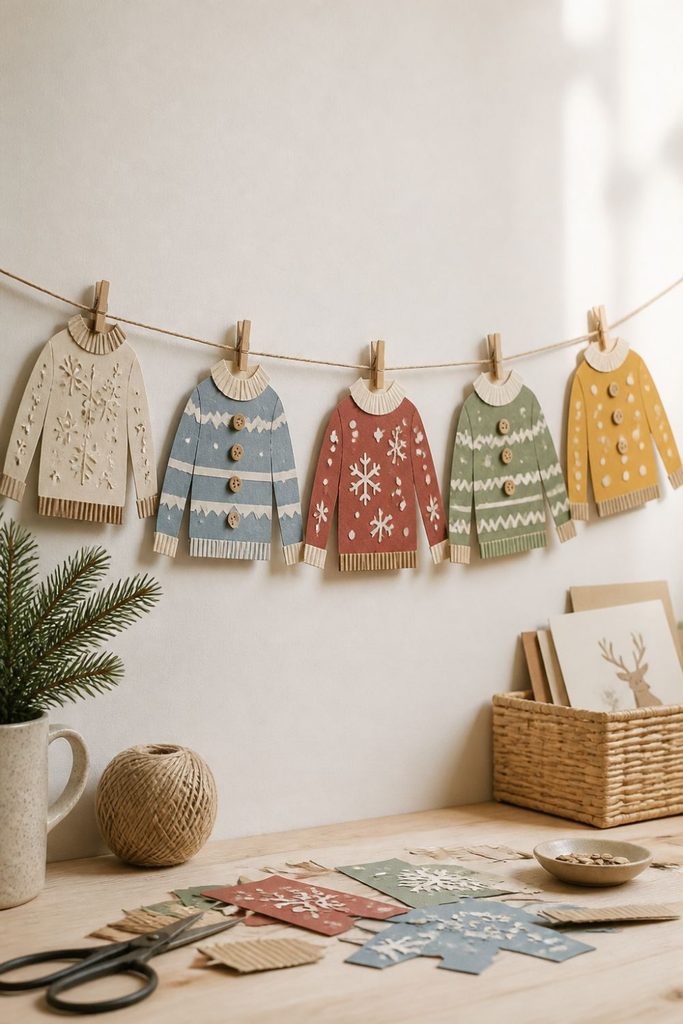
Tiny paper sweaters are a fun way to experiment with patterns, colors, and textures without needing fabric or sewing supplies. Each sweater can have its own design, from chunky stripes and zigzags to tiny snowflakes and raised paper buttons.
Materials needed
- Cardstock in white, blue, red, green, and cream
- Tissue paper and corrugated cardboard scraps
- Yarn or ribbon
- Child safe scissors
- Glue stick
- Markers and crayons
- Small paper circles for buttons
Step by step method
- Draw a sweater template with a rounded neckline, two sleeves, and a straight lower edge. Cut it out and trace several copies onto colored cardstock.
- Give each child a few sweaters to decorate. Use markers to draw stripes, diamonds, snowflakes, dots, and other winter patterns.
- Cut thin strips of paper and glue them across the sweaters to create raised stripes. Small pieces of corrugated cardboard can add a ribbed texture.
- Make paper collars and cuffs from contrasting colors. Add tiny paper circles as buttons and draw short lines to represent knitted stitches.
- Punch a hole near the shoulder of each sweater and thread yarn through the holes to create a miniature clothesline.
- Hang the sweater gallery on a wall or place it on a piece of cardstock with a title such as The Winter Wardrobe.
Children can design sweaters for imaginary characters, pets, or family members. Encourage them to give each sweater a name, such as Snowflake Sunday or Cozy Cabin, and describe when its owner would wear it.
16. Egg Carton Evergreen Trees With Layered Paper Snow
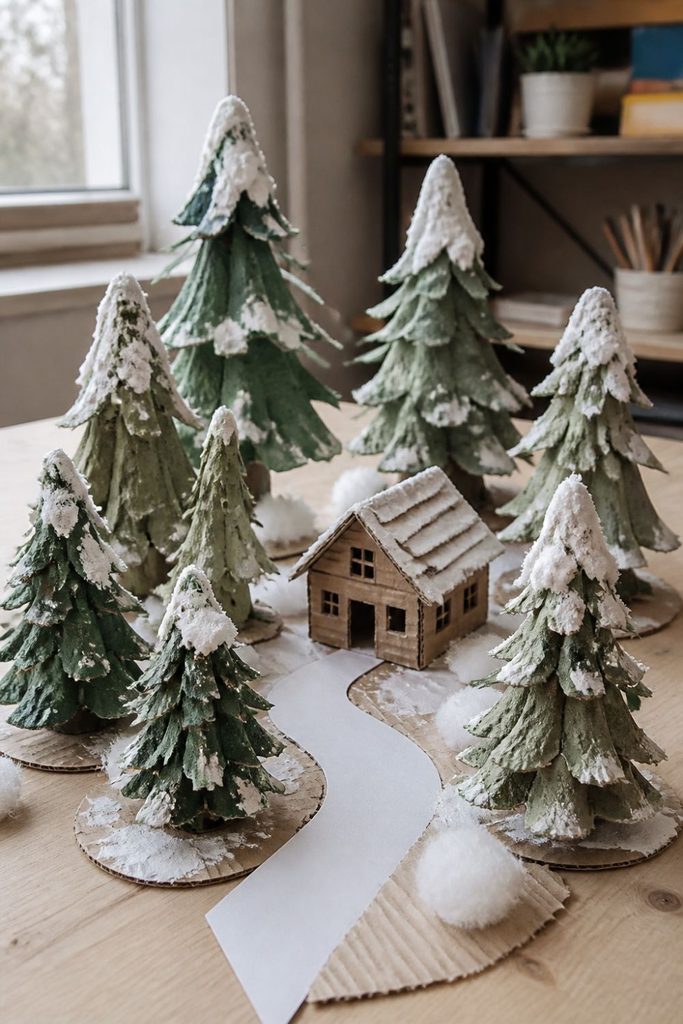
Egg cartons are useful for building small evergreen trees with a naturally bumpy shape. By adding green paint, paper branches, and layers of white snow, children can make a tiny winter forest using materials that might otherwise go into the recycling bin.
Materials needed
- Clean cardboard egg cartons
- Green and white washable paint
- White paper and green paper scraps
- Glue
- Child safe scissors
- Small cardboard bases
- Cotton balls or white tissue paper
- Paintbrushes
Step by step method
- Ask an adult to cut the egg carton into individual cups or pointed sections. Trim the edges so each piece can stand upright.
- Paint the carton pieces green and leave them to dry. Children can mix dark and light greens to make the trees look different.
- Cut small triangles or narrow strips from green paper. Glue them around the carton shape to create extra branches.
- Tear white tissue paper into small pieces and layer them around the upper edges of the branches. Add a little white paint to represent fresh snow.
- Glue each tree to a sturdy cardboard base. Place several trees together at different heights to make a miniature forest.
- Add a winding snowy path, tiny paper rocks, or a little brown paper cabin. White dots on the background can represent falling snow.
This activity is a good opportunity to talk about evergreen trees and why their leaves stay green through cold weather. Children can also count the trees, sort them by height, or arrange them into patterns. Use clean cartons only, and supervise any cutting.
17. Fold Open Woodland Burrow With a Sleeping Fox Inside
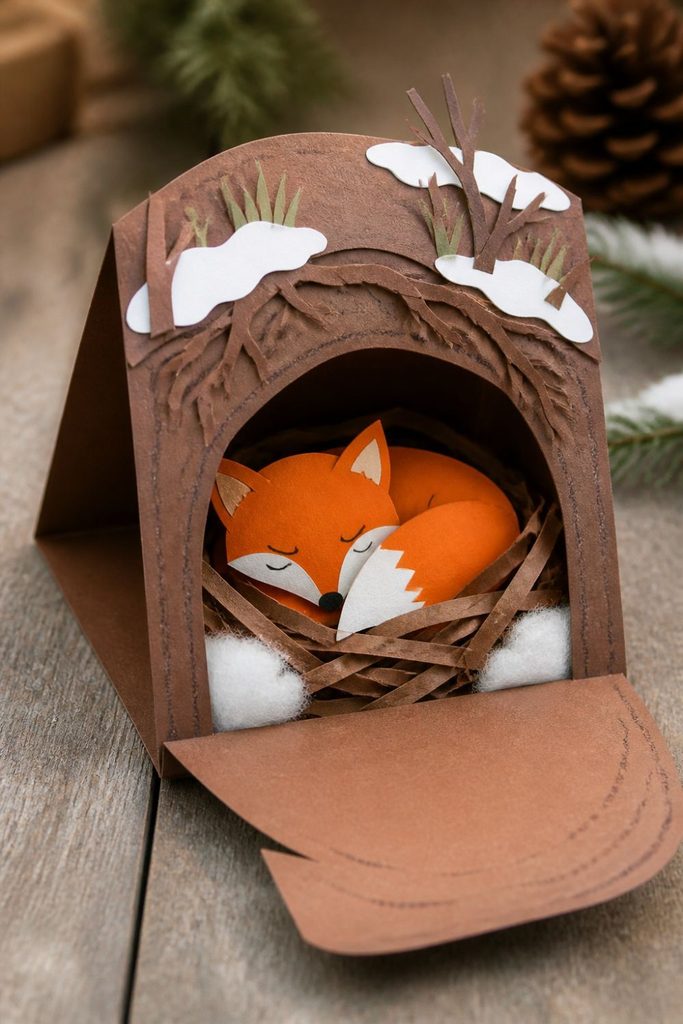
A fold open woodland burrow hides a tiny fox inside a paper den. Children first decorate the outside with snowy plants and tree roots, then open the folded flap to reveal a cozy sleeping animal tucked away beneath the ground.
Materials needed
- Brown, cream, white, and green cardstock
- Orange paper and white paper scraps
- Glue stick
- Child safe scissors
- Markers or crayons
- Cotton balls, optional
- Pencil and ruler
Step by step method
- Fold a sheet of brown cardstock in half like a book. Draw a rounded burrow opening on the front cover and cut along the curved top and sides, leaving one edge attached to act as a flap.
- Decorate the outside with paper roots, snowy grass, little branches, and patches of white snow. Use dark brown lines to suggest soil.
- Open the flap and draw the inside of the burrow on the page underneath. Add a nest made from paper strips or soft cotton.
- Cut an orange oval for the fox’s body and a smaller rounded shape for its head. Add pointed ears, white cheeks, a white chest, and a bushy tail.
- Glue the fox into the nest with its eyes closed and paws tucked beneath its body. Add a small cream paper blanket or a few leaves around it.
- Close the flap and decorate the front with a small sign reading Quiet, Sleeping Fox. Children can open the burrow to reveal their animal whenever they want to share the picture.
Encourage children to think about how woodland animals rest during winter and what their shelters might look like. They can add a second flap with a hidden rabbit or mouse, turning one paper burrow into a small woodland home.
18. Hanging Snow Cloud With Paper Icicles and Snowflakes
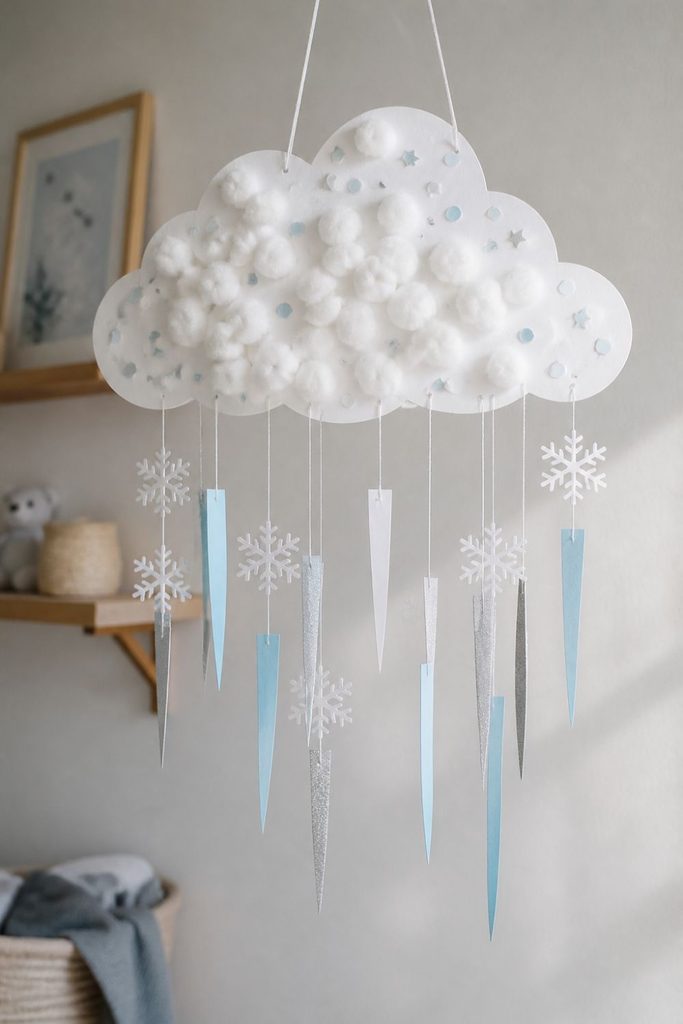
A hanging snow cloud adds movement to a child’s room or classroom. White cloud shapes, dangling blue icicles, and paper snowflakes sway gently when the air moves, creating a simple decoration that children can make in their favorite winter colors.
Materials needed
- White cardstock or paper plates
- Blue, white, and silver paper
- Cotton balls
- String or yarn
- Glue stick
- Child safe scissors
- Hole punch
- Markers
Step by step method
- Draw a large cloud with rounded edges on white cardstock and cut it out. Glue cotton balls onto the front to give the cloud a soft, fluffy appearance.
- Cut long triangles from pale blue and white paper to make icicles. Make some short and some long so the hanging decoration has different levels.
- Cut small snowflakes from folded white paper or use simple paper circles if younger children find snowflake cutting difficult.
- Punch small holes along the bottom of the cloud. Thread short lengths of string through the holes and attach an icicle or snowflake to each one.
- Decorate the cloud with tiny blue dots, silver stars, or a smiling face. Add a longer string at the top to create a hanging loop.
- Hang the cloud from a secure hook or a classroom display line, away from fans, heaters, and places where children might pull it down.
For a colorful version, use pale pink, lavender, and turquoise instead of traditional blue and white. Children can also make several small clouds and hang them together to create a soft winter sky display.
19. Northern Lights Silhouette Art With Layered Colored Paper
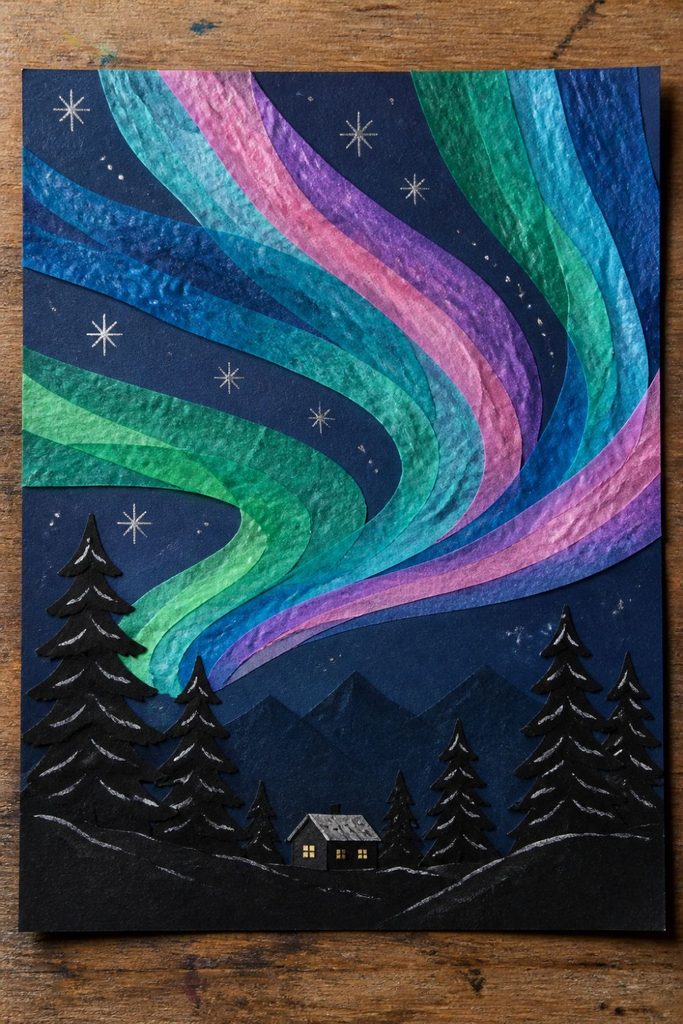
Northern lights art lets children play with flowing colors and dark silhouettes. Layers of green, purple, pink, and blue paper can suggest the glow of the night sky, while black paper trees or mountains create a bold foreground.
Materials needed
- Black or navy cardstock
- Green, purple, pink, and blue tissue paper
- White and black construction paper
- Glue stick
- Child safe scissors
- Silver or white crayons
- Pencil
Step by step method
- Place a dark sheet of cardstock on the table. Tear colored tissue paper into long strips with curved or wavy edges.
- Arrange the tissue paper across the upper half of the page, allowing colors to overlap. Glue the pieces down in flowing bands that resemble curtains of light.
- Cut a row of black pine trees from construction paper. Make some tall and narrow, and others short with broad branches.
- Glue the trees along the bottom edge of the picture. Add black mountain shapes or a small cabin between the trees.
- Use a white or silver crayon to add stars and tiny dots in the sky. A few narrow white lines can suggest snow resting on the branches.
- Finish by adding a small moon or a winding path in the foreground. Keep the dark shapes simple so the colored sky remains the main focus.
Talk with children about how the northern lights appear in the sky near the Earth’s polar regions. They can give their picture a title, such as Green Ribbons at Midnight, and use their own color choices to tell a winter night story.
20. Cardboard Loom Weaving: Tiny Scarves for Paper Snow People
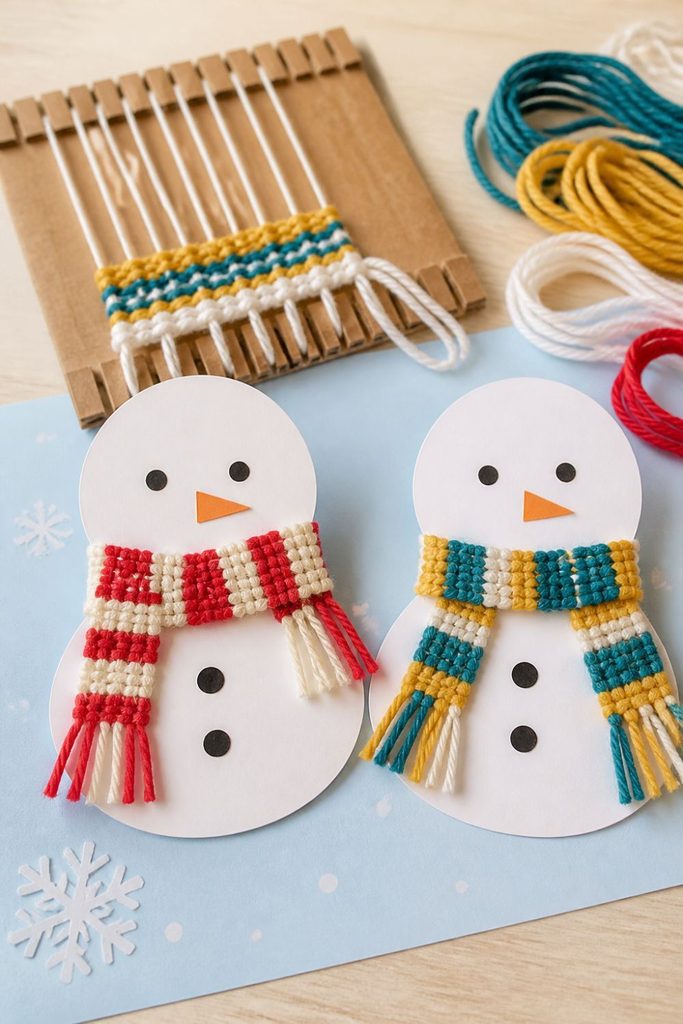
A small cardboard loom introduces children to weaving without requiring a large frame or complicated equipment. Once the weaving is complete, the colorful strips become tiny scarves for paper snow people, adding a soft texture to an ordinary winter picture.
Materials needed
- Sturdy cardboard
- Chunky yarn or thick wool
- Short lengths of colorful yarn
- Child safe scissors
- Tape
- White cardstock
- Markers
- Glue stick
Step by step method
- Cut a small rectangle from cardboard and make shallow notches along its top and bottom edges. An adult can prepare these notches before the activity begins.
- Stretch yarn vertically between the notches to create the loom’s base threads. Tape the yarn ends securely to the back of the cardboard.
- Cut a length of colorful yarn and weave it over and under the vertical threads. On the next row, reverse the pattern so the yarn passes under and over.
- Continue weaving until the scarf reaches the desired length. Gently push each row together with your fingers to create an even texture.
- Remove the woven piece carefully and trim the ends. Tie short yarn strands along the edges if you want to add fringes.
- Draw a snow person on cardstock and cut a narrow opening or make a paper loop around its neck. Slip the woven scarf through the loop and glue the snow person onto a background decorated with snowflakes.
Children can make scarves in stripes, checks, or alternating colors. This activity supports hand coordination and pattern recognition, while the finished scarves give their paper snow people a cozy, handmade look. Keep yarn lengths manageable to reduce tangles.
21. Pop Up Winter Storybook With a Deer Under a Giant Paper Moon
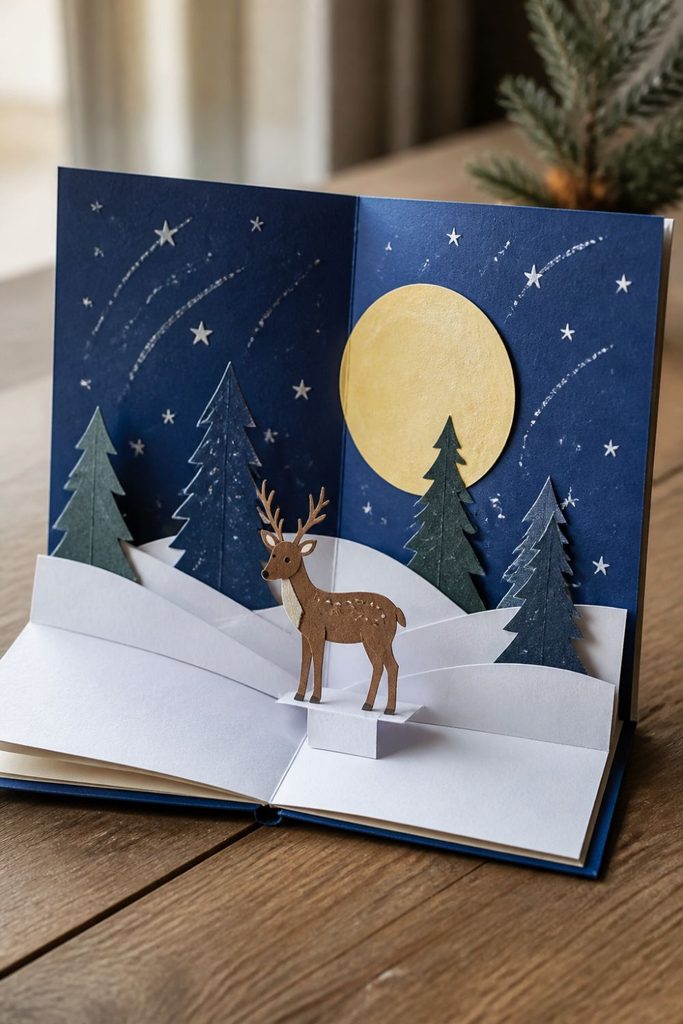
A pop up winter storybook combines drawing, folding, and storytelling in one project. When the pages open, a little deer appears beneath a large paper moon, surrounded by snowy trees and a quiet woodland scene.
Materials needed
- White and blue cardstock
- Dark blue, silver, brown, and cream paper
- Glue stick
- Child safe scissors
- Markers or crayons
- Pencil and ruler
- Optional cotton balls or star stickers
Step by step method
- Fold two sheets of cardstock in half to make a front cover and an inside spread. Use the blue sheet for the main winter scene.
- Cut a large pale yellow or silver moon from paper. Glue it near the top of the inside page, leaving room below for trees and animals.
- Make a pop up support by folding a small rectangle of paper into a tab. Cut two short parallel slits across the folded center of the page, then gently push the section inward to create a step. An adult can help with the cuts.
- Draw or cut a small deer from brown paper. Add cream patches, tiny antlers, and dark eyes, then glue it to the front of the pop up tab.
- Add paper pine trees, white snowbanks, and tiny stars around the deer. Keep the shapes clear of the center fold so the book can close without bending them.
- Decorate the cover with a title and write a short story inside. Children might describe the deer searching for its family or resting beneath the moon after a snowy evening walk.
Test the book by opening and closing it slowly. If a tree or animal catches on the opposite page, trim the shape or reposition it. The finished storybook can be read aloud, displayed on a shelf, or given as a handmade winter gift.