Camping is a wonderful way to introduce toddlers to nature while creating happy family memories. Even if you are staying in your backyard or spending a rainy afternoon indoors, simple camping themed activities can bring plenty of smiles without spending much money.
The best part is that many fun projects can be made with everyday items already sitting around your home. Paper plates, cardboard tubes, leaves, rocks, and other inexpensive supplies can turn into playful creations that keep little hands busy while encouraging creativity, fine motor skills, and imaginative play. Each idea below is easy enough for young children with a little adult help, making them perfect for parents, grandparents, daycare providers, and preschool teachers.
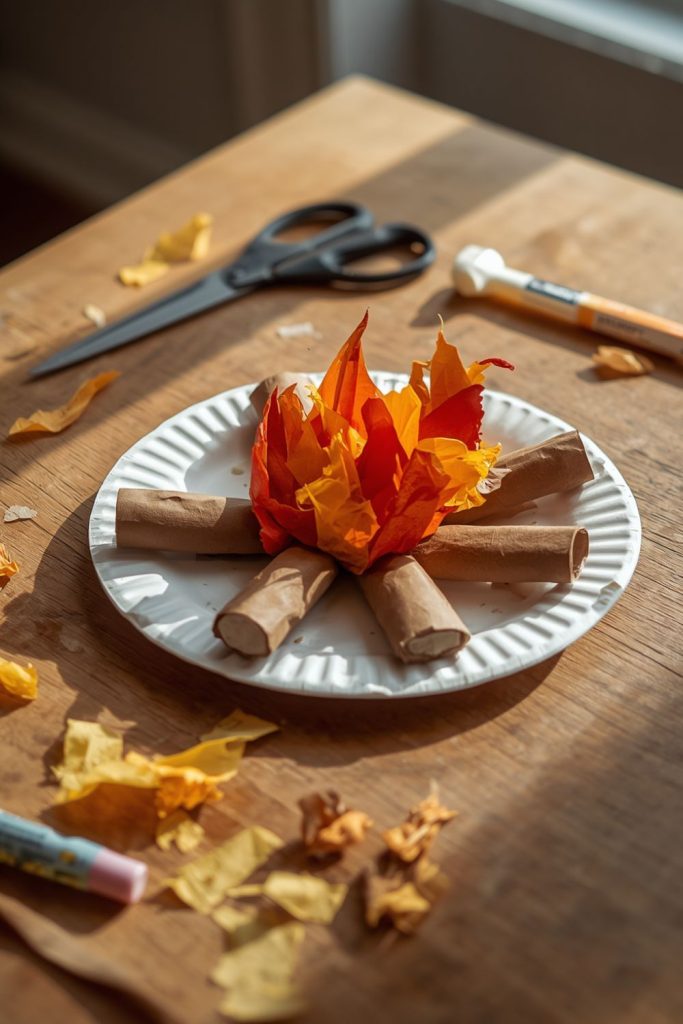
1. Paper Plate Campfire with Tissue Paper Flames
Nothing says camping like gathering around a warm campfire. This colorful paper plate version gives toddlers a safe way to enjoy the camping theme while practicing cutting, gluing, and color matching. The bright tissue paper flames also make the finished project look cheerful enough to display on a bedroom wall or refrigerator.
Supplies
- Paper plate
- Brown construction paper
- Red tissue paper
- Orange tissue paper
- Yellow tissue paper
- Child safe glue
- Safety scissors
- Black marker
Step by Step Method
Step 1: Turn the paper plate upside down so it becomes the base of your campfire.
Step 2: Cut brown construction paper into several long strips that look like logs.
Step 3: Glue the paper logs in a crisscross pattern near the bottom center of the plate.
Step 4: Tear the red, orange, and yellow tissue paper into small pieces. Toddlers usually enjoy tearing paper, so let them help with this part.
Step 5: Crumple each tissue paper piece into loose balls.
Step 6: Glue the tissue paper above the logs, mixing the colors together to create bright flames.
Step 7: Use a black marker to draw small stones around the fire if you like.
Step 8: Allow the project to dry completely before displaying it.
This activity helps strengthen little fingers through tearing and gluing while giving children a chance to talk about camping safety. Parents can also use the finished campfire during pretend camping games with stuffed animals or toy tents.
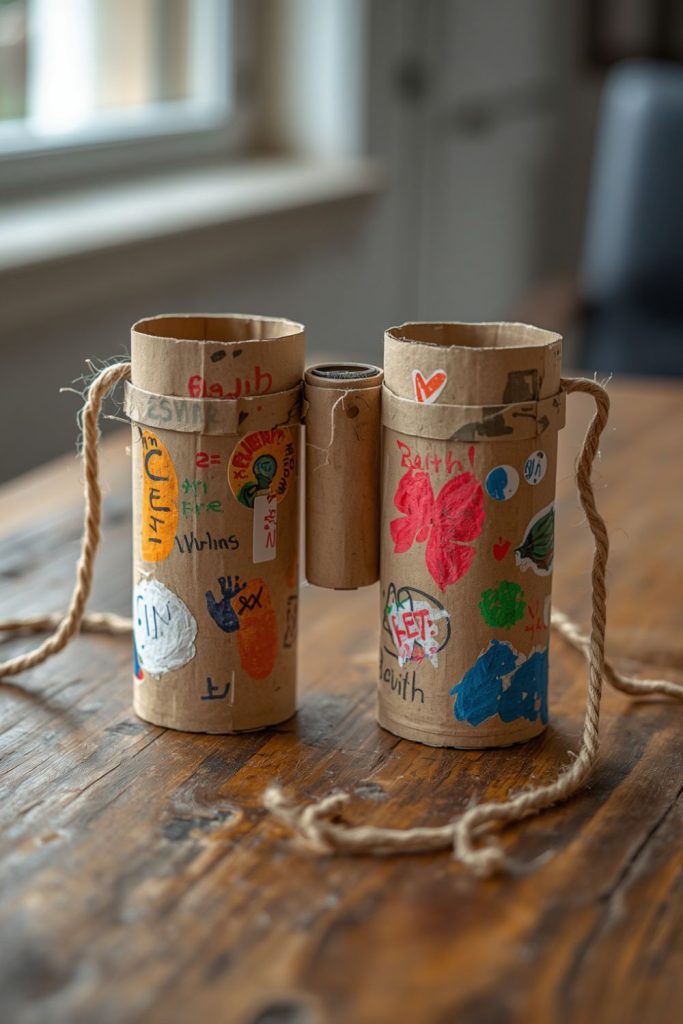
2. Cardboard Tube Camping Binoculars
Pretend play becomes much more exciting with homemade binoculars. Instead of throwing away empty paper towel or toilet paper rolls, turn them into a fun camping accessory. Toddlers love pretending to spot birds, squirrels, butterflies, and other outdoor friends, making this project both entertaining and educational.
Supplies
- Two cardboard tubes
- Glue or tape
- Paint or crayons
- Stickers
- Hole punch
- String or yarn
Decorate each tube with paint, crayons, or colorful stickers. Once dry, glue the tubes side by side so they resemble real binoculars. Punch one hole on each outside edge and tie a piece of yarn through both holes so the binoculars can hang around your child’s neck. Keep the string short enough for safe adult supervised play.
Take the binoculars outside and encourage your toddler to look for birds, clouds, flowers, insects, or tree branches. Even a walk around the backyard becomes much more exciting with homemade camping gear. The activity also encourages observation skills and imaginative storytelling as children describe what they “see.”
- Related post 21 Inspiring Camping Crafts for Adults That Turn Every Outdoor Adventure Into a Creative Escape
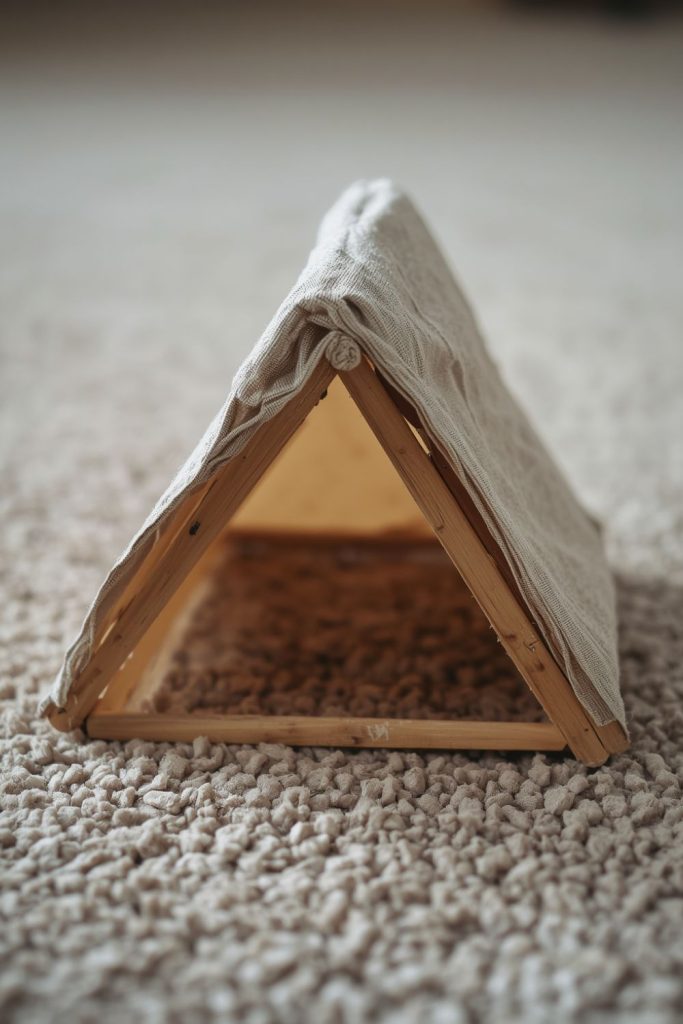
3. Mini Popsicle Stick Camping Tent
A tiny camping tent is a fun decoration that also works well with toy animals and dolls. Children enjoy building something that looks like the tents they see at campgrounds, and the finished piece can become part of pretend adventures for weeks afterward.
Supplies
- Popsicle sticks
- School glue
- Small piece of felt or fabric
- Brown paint
- Small twigs
Glue popsicle sticks together to make two triangle shapes. Connect the triangles using more sticks across the top and bottom until the frame stands on its own. Once dry, drape a small piece of felt or fabric across the top to create the tent covering.
Small twigs placed around the tent make the finished project even more realistic. Add tiny toy animals or plastic people nearby to create a little campsite. Parents can encourage storytelling by asking questions such as who lives inside the tent or what everyone plans to do during their camping trip.
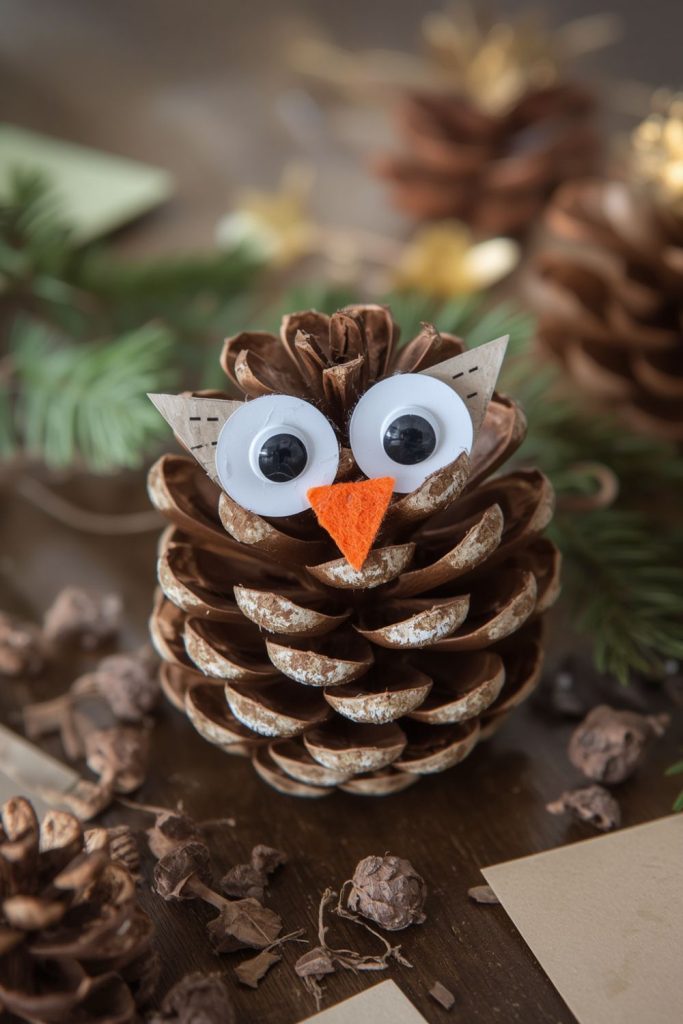
4. Pinecone Woodland Owl
Pinecones are one of nature’s best free art supplies. Their texture already resembles feathers, making them perfect for adorable woodland owls. Collecting pinecones during a walk also gives toddlers another fun outdoor activity before the project even begins
.
Supplies
- Pinecone
- Googly eyes
- Orange felt
- Brown construction paper
- Glue
Cut two simple wings from brown paper and a small triangle beak from orange felt. Glue the wings onto each side of the pinecone before attaching the eyes and beak near the top. Allow everything to dry before handling the owl.
Children enjoy giving their owl a name and placing it among bookshelves or bedroom decorations. This activity opens simple conversations about forest animals, where owls live, and the sounds they make. Every pinecone has a different shape, so each owl comes out looking slightly different, which makes the project even more fun.
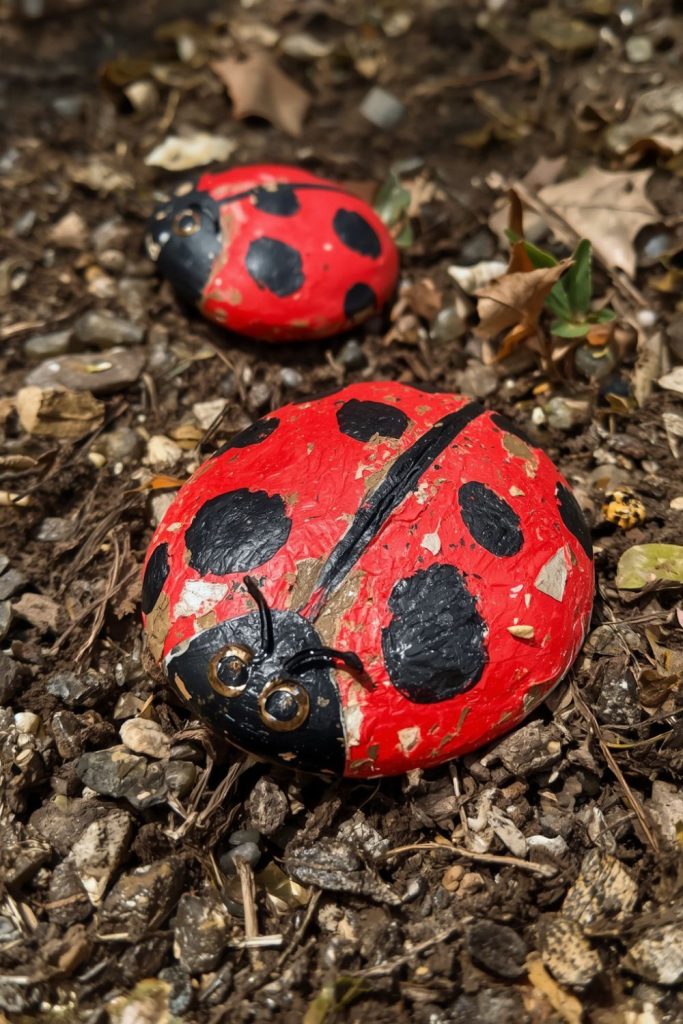
5. Painted River Rock Ladybugs
Smooth rocks become tiny works of art with just a little paint. Ladybugs are easy enough for toddlers because the shapes are simple, and the bright red color instantly grabs attention. Finished rocks also make cute garden decorations or paperweights.
Supplies
- Smooth river rocks
- Red paint
- Black paint
- White paint
- Paintbrushes
- Clear sealer optional
Wash and dry each rock before painting. Cover the top with red paint and allow it to dry. Add a black line down the center, paint the head black, then use the end of a brush to make small black spots. Finish by adding tiny white dots for the eyes.
Children can line their painted ladybugs along flower pots, garden paths, or windowsills. This project also provides a simple opportunity to count the ladybug spots while practicing number recognition.
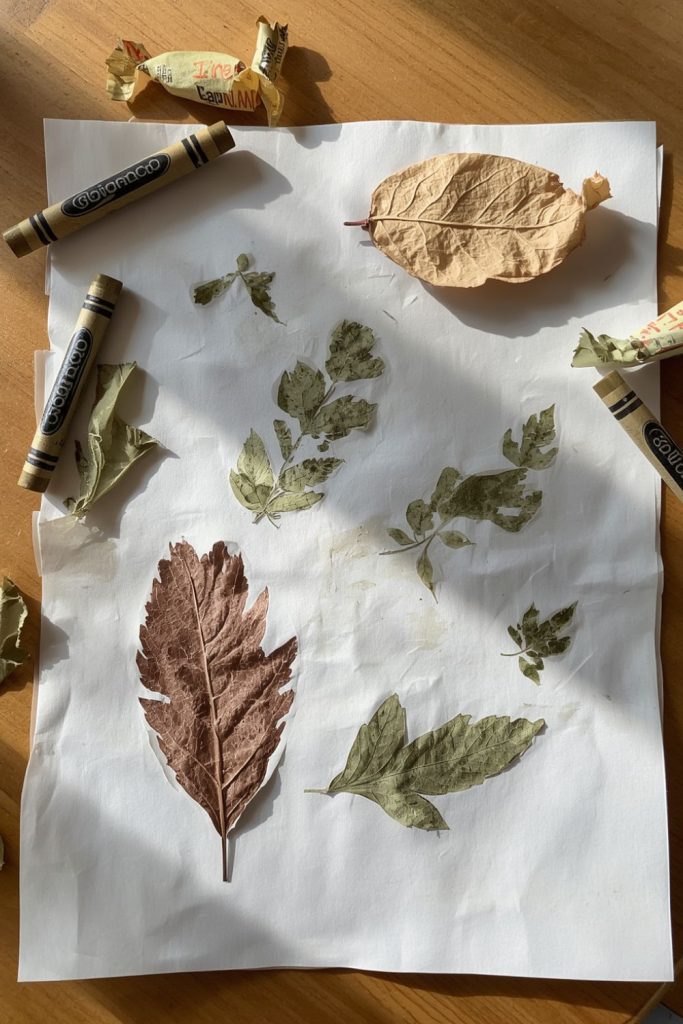
6. Leaf Rubbing Nature Art
Leaf rubbings are simple enough for very young children while still producing beautiful pictures. Every leaf creates a different pattern, helping toddlers notice the many shapes and textures found outdoors.
Supplies
- Fresh leaves
- White paper
- Crayons with wrappers removed
- Tape
Tape several leaves underneath a sheet of paper so they stay in place. Hold a crayon sideways and gently rub across the paper. As the color spreads, the leaf veins slowly appear underneath.
Try using green, yellow, orange, and brown crayons to resemble different seasons. Children often become excited to compare which leaf made the prettiest print. This activity pairs nicely with a short nature walk where everyone collects leaves before returning home to create their artwork.
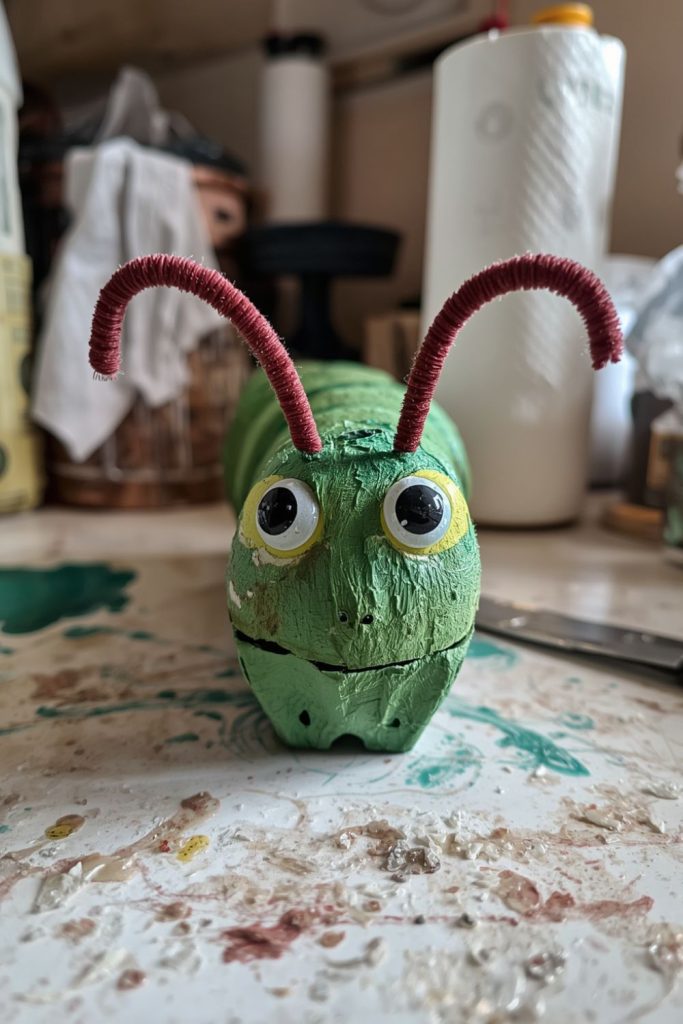
7. Egg Carton Caterpillar
Empty egg cartons are perfect for creating cheerful caterpillars. The rounded sections already resemble the body, making this one of the easiest projects for toddlers.
Supplies
- Egg carton
- Green paint
- Pipe cleaners
- Googly eyes
- Glue
- Safety scissors
Cut a strip of four or five connected egg carton cups. Paint the entire strip green and allow it to dry. Glue googly eyes onto the front section. Twist a pipe cleaner into two short antennae and attach them near the head.
Toddlers can decorate their caterpillar with colorful dots, tiny paper flowers, or simple smiley faces. After the paint dries, the caterpillar becomes a fun toy for pretend garden adventures. Parents can also read a caterpillar themed story afterward, helping children connect their project with nature while encouraging imagination and conversation.
8. Paper Bag Bear Puppet
A friendly bear puppet is a fun way to bring camping stories to life. Since bears are often one of the first animals children think about when they hear the word “camping,” this project fits the theme perfectly. A simple paper lunch bag becomes an adorable puppet that toddlers can use for pretend campfire stories or short puppet shows with family members.
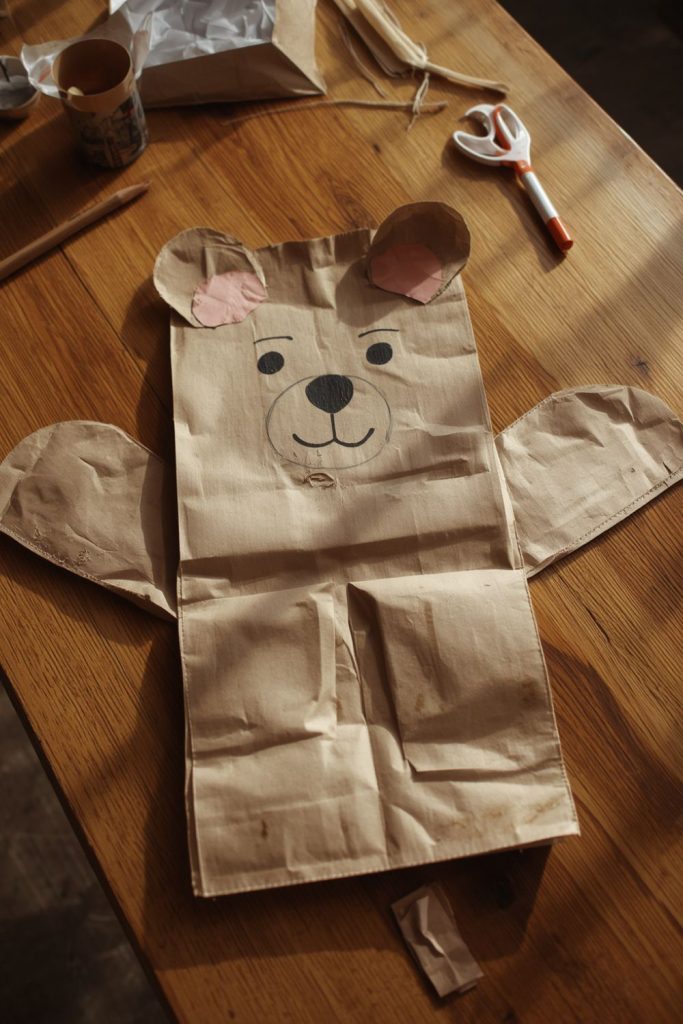
Supplies
- Brown paper lunch bag
- Brown and black construction paper
- Googly eyes
- Glue
- Safety scissors
- Black marker
Start by placing the paper bag flat with the folded flap facing upward. Cut two round ears from brown paper and glue them near the top corners. Glue on the googly eyes, then add a black paper circle for the nose. Draw a smiling mouth with the marker. Small pink circles inside the ears make the bear look even cuter.
After the glue dries, slip a hand inside the bag and move the flap to make the bear “talk.” Toddlers often enjoy pretending the bear is roasting marshmallows, singing songs, or walking through the forest. The puppet also gives parents an easy way to teach simple camping safety, such as watching wildlife from a distance instead of getting too close.
9. DIY Mason Jar Tissue Paper Lantern
A glowing lantern is one of the most memorable parts of camping. This colorful version looks beautiful sitting on a table or windowsill and adds a cozy camping feeling without using a real flame. Adult supervision is needed if placing a battery powered tea light inside.
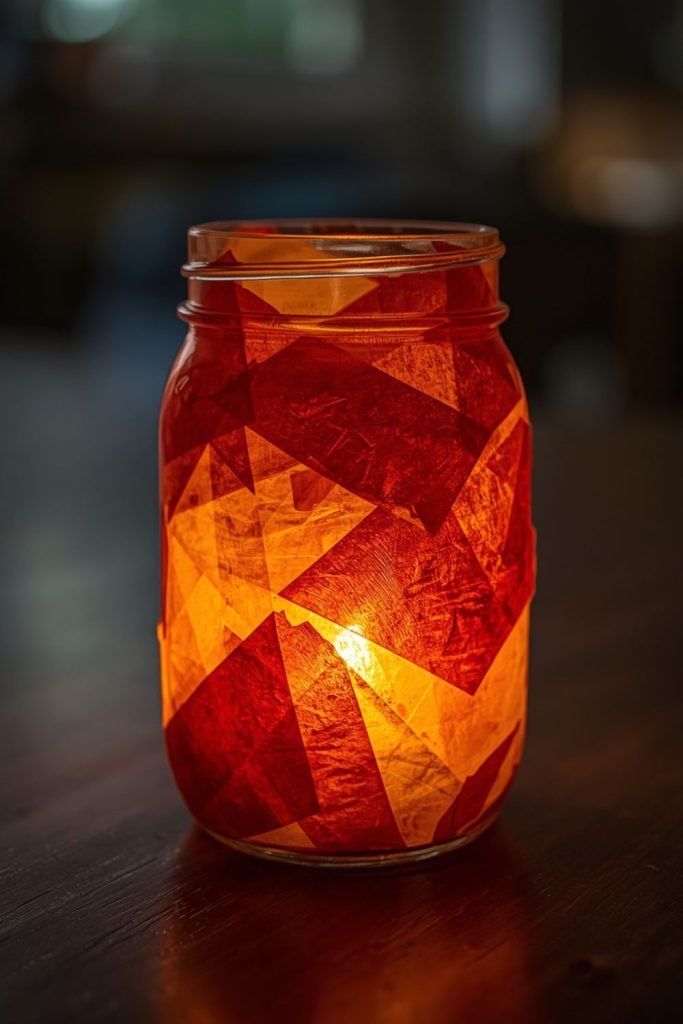
Supplies
- Clean mason jar
- Tissue paper
- White school glue
- Small paintbrush
- Battery powered tea light
Tear tissue paper into small squares using several bright colors. Brush a thin layer of glue onto the outside of the jar before pressing the tissue paper pieces onto the glass. Continue until most of the jar is covered. Brush another thin layer of glue over the top to hold everything in place.
Allow the lantern to dry completely before placing the battery operated tea light inside. As the light shines through the tissue paper, the colors become soft and cheerful. Children love carrying their lantern around during pretend camping at home, though an adult should always supervise.
10. Stick and Twig Picture Frame
Nature provides plenty of free decorating supplies. Twigs collected during a walk can turn an ordinary picture frame into a lovely keepsake that reminds families of time spent outdoors together.
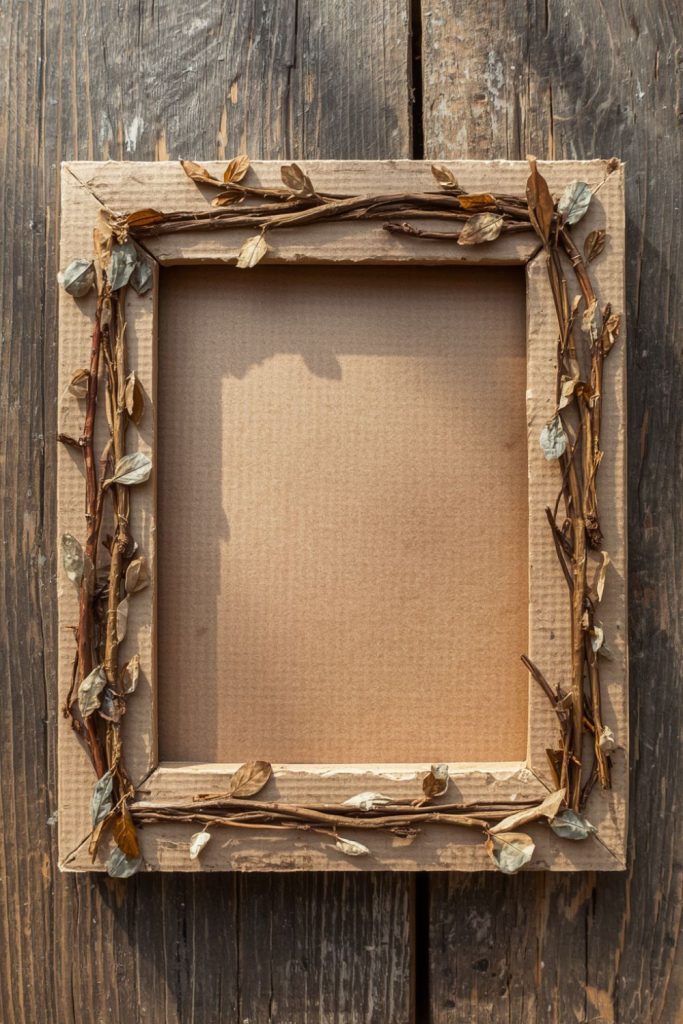
Supplies
- Cardboard
- Twigs
- School glue
- Family photo
- Safety scissors
- Small leaves or tiny pinecones optional
Cut two rectangles from cardboard, leaving a window in the front piece for the photo. Glue the pieces together while leaving one side open so the picture can slide inside later.
Next, glue twigs around the outside edges to create a rustic border. Add a few tiny leaves or pinecones if you have them available. Once dry, place a favorite camping photo or family picture inside the frame.
Children enjoy helping collect the twigs before making the project. Every frame turns out a little different, making it a nice memory that can stay on display for years.
11. Coffee Filter Sunset Painting
Camping evenings often end with beautiful sunsets. This simple painting activity lets toddlers create colorful skies while learning how colors blend together on paper.
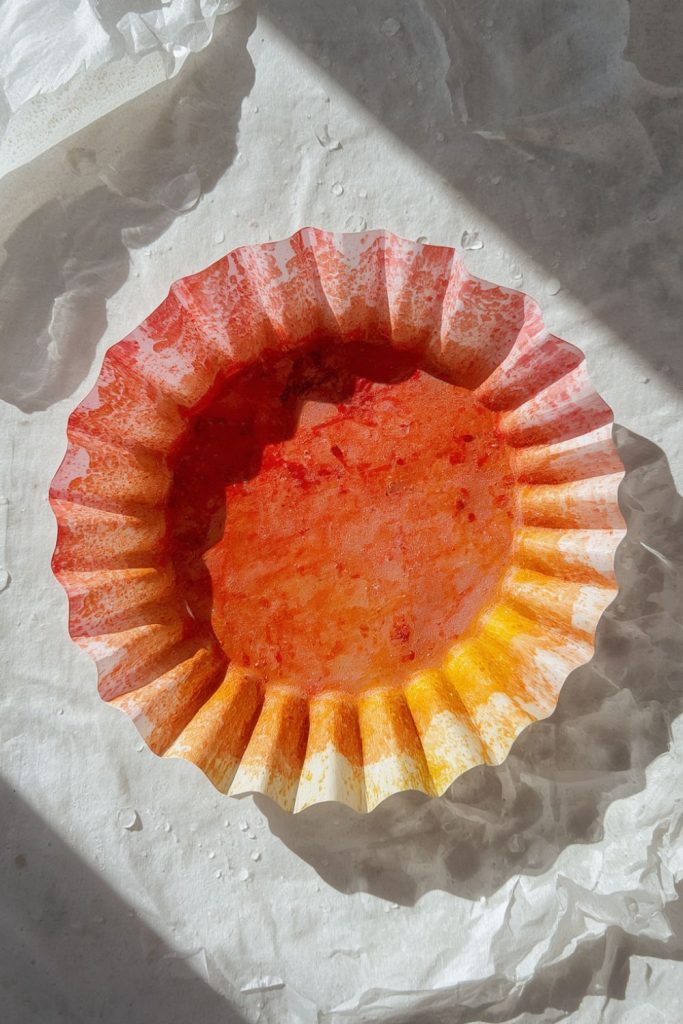
Supplies
- Coffee filters
- Washable markers
- Spray bottle with water
- Wax paper
Flatten a coffee filter and color it using red, orange, yellow, and a little pink marker. There is no wrong way to color because the water will blend everything together.
Place the coffee filter on wax paper and lightly spray it with water. Watch as the colors slowly spread across the paper. Leave it flat until completely dry.
The finished artwork resembles a warm sunset over a campsite. Hang several coffee filter paintings together in a window where the sunlight can shine through them for an extra pretty display.
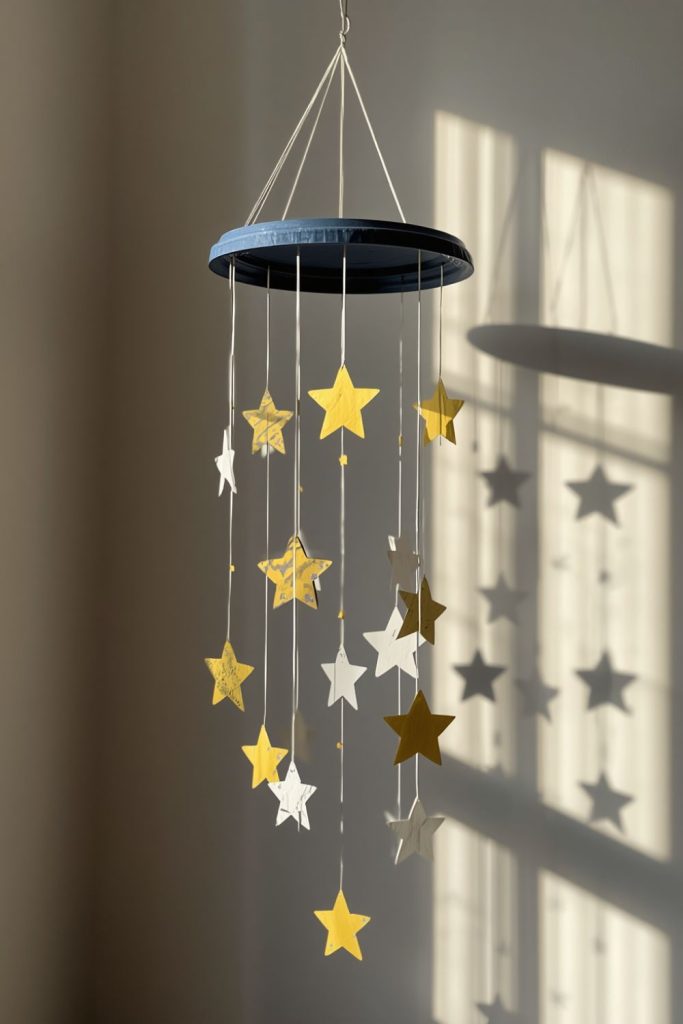
12. Paper Plate Moon and Stars Mobile
Camping gives children the chance to notice the night sky. A moon and stars mobile brings that peaceful feeling indoors and makes a charming bedroom decoration.
Supplies
- Paper plate
- Yellow and white construction paper
- String
- Hole punch
- Glue
- Crayons or paint
Paint the paper plate dark blue or black to represent the night sky. Cut a large crescent moon and several stars from construction paper before gluing them onto the plate.
Punch holes around the bottom edge and tie short pieces of string through them. Attach extra stars to the ends of the strings so they dangle beneath the plate.
Hang the finished mobile near a window or above a reading corner. It gently moves with the air, making the stars appear to float.
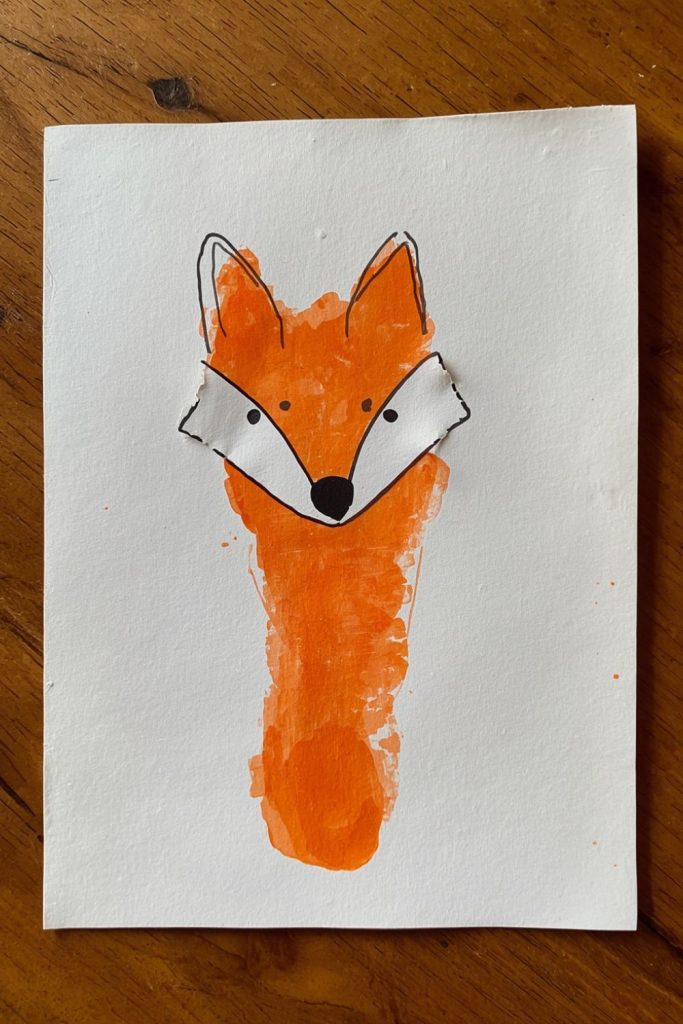
13. Footprint Fox Keepsake
Footprint projects are always popular because they capture a child’s tiny feet while creating a cute animal at the same time. This fox keepsake becomes something parents will enjoy looking back on years later.
Supplies
- White cardstock
- Orange washable paint
- Black marker
- Black and white paper
- Glue
Paint the bottom of your toddler’s foot with orange paint and gently press it onto the cardstock. Allow the print to dry before adding details.
Use the heel as the fox’s face. Glue on paper ears, small eyes, and a tiny black nose. Draw a fluffy tail beside the footprint with a marker, then finish with little whiskers.
Write your child’s name and the date underneath. It becomes a sweet reminder of how small those little feet once were, and children usually enjoy comparing their footprints as they grow older.
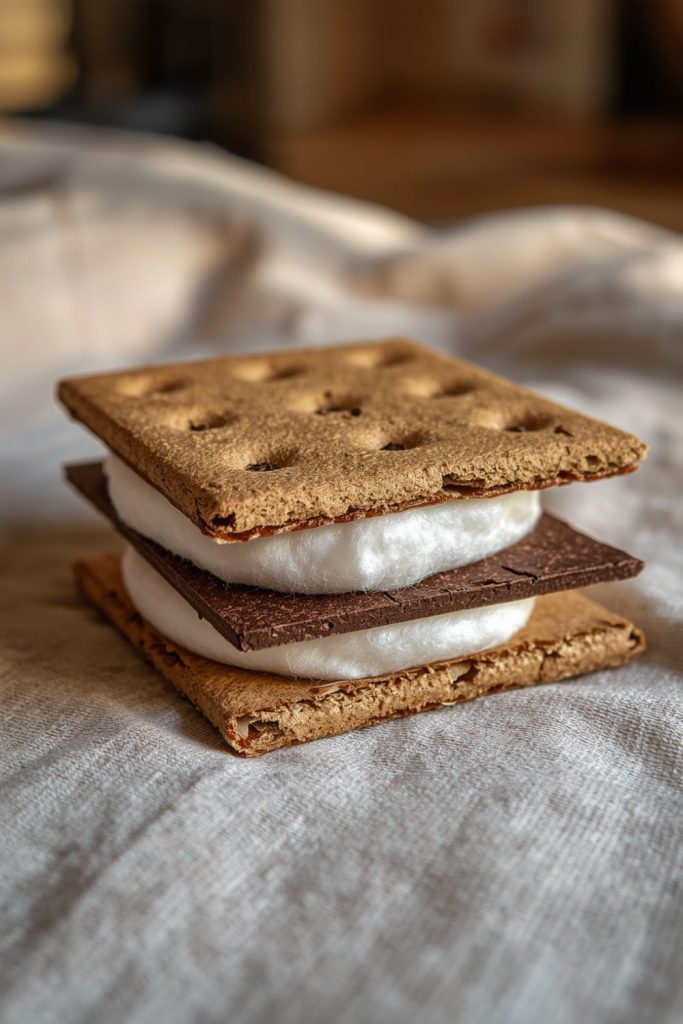
14. Cardboard S’mores Craft
No camping trip feels complete without s’mores. While toddlers may not always roast marshmallows over a real fire, they can still enjoy making their own pretend version from cardboard and felt.
Supplies
- Cardboard
- Brown paint
- White felt
- Dark brown paper
- Glue
- Safety scissors
Cut two rectangles from cardboard for the graham crackers and paint them light brown. Once dry, glue a piece of dark brown paper between them to represent chocolate. Add a fluffy white felt square for the marshmallow before gluing the second graham cracker on top.
Toddlers can stack, pretend to eat, or serve their cardboard treats during indoor camping games. Parents can even make several sets so children can play picnic or campsite restaurant. The finished pieces are sturdy enough to enjoy again and again without making any sticky mess.
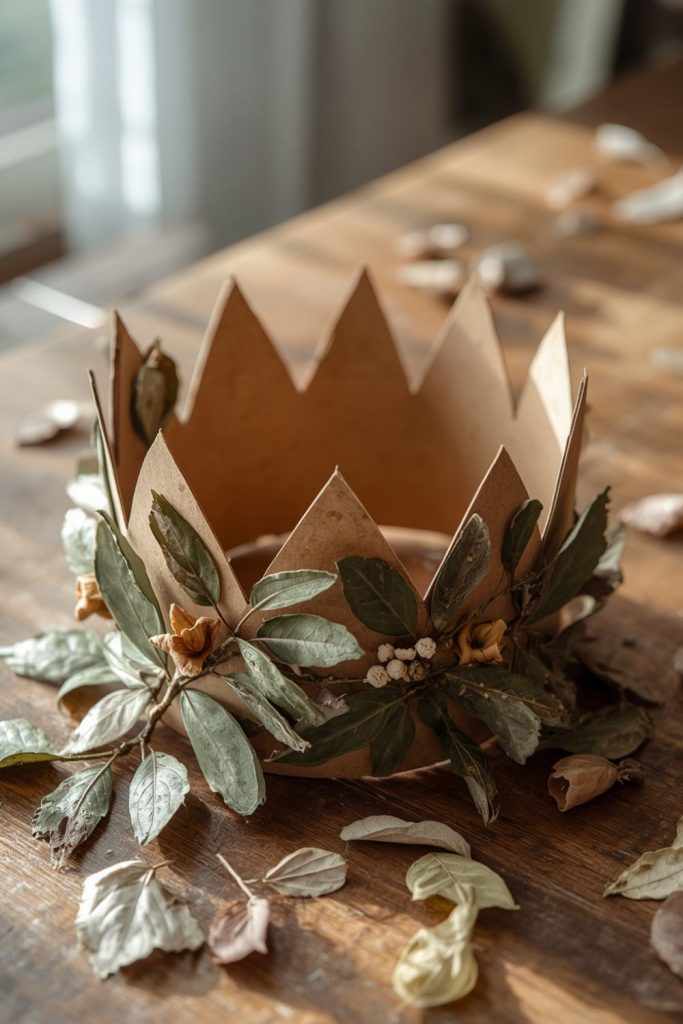
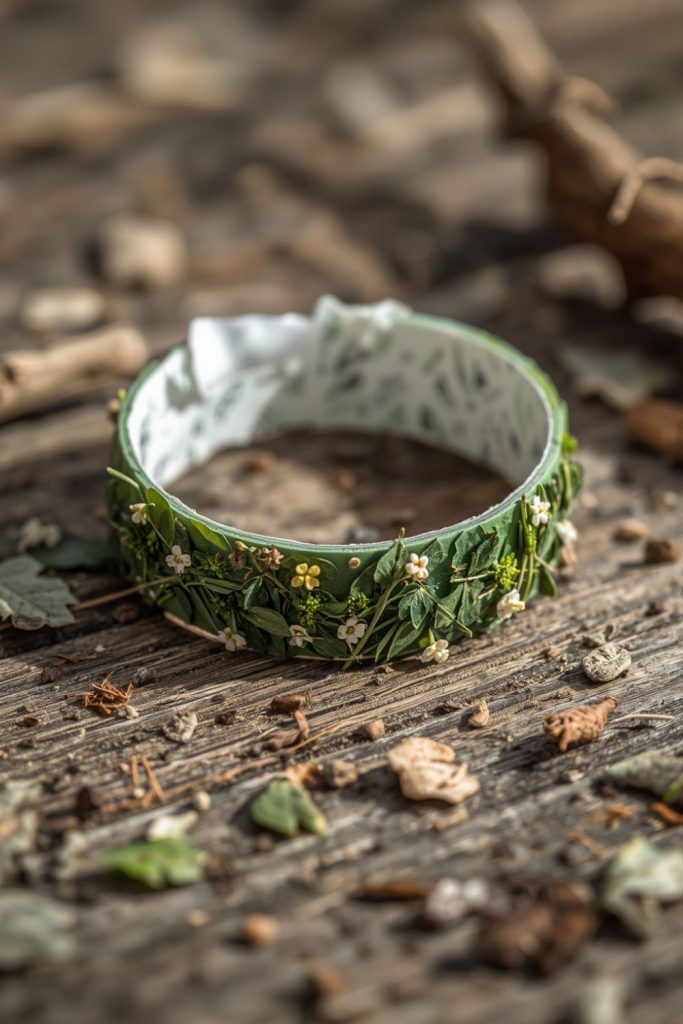
15. Nature Leaf Crown
A leaf crown helps toddlers feel like little forest explorers during backyard camping or a walk through the park. Since the decorations come straight from nature, this project costs very little while giving children another reason to look closely at leaves, flowers, and tiny plants around them. Every crown turns out a little different, making it even more fun.
Supplies
- Cardstock
- Tape or stapler
- Glue
- Leaves
- Small flowers
- Ferns
- Crayons optional
Measure a strip of cardstock around your child’s head, then tape or staple the ends together to form a crown. Gather a small collection of leaves, ferns, and flowers that have already fallen to the ground or can be picked safely with permission.
Spread glue across the front of the crown and let your toddler arrange the leaves however they like. There is no right or wrong pattern, which makes this activity relaxing for little ones. After the glue dries, children can wear their crowns during pretend camping, nature walks, or family photos. It often becomes their favorite part of the afternoon, even if a leaf falls off here and there.
16. Shoebox Campground Diorama
Turning an old shoebox into a tiny campground is a fun project that encourages imagination. Toddlers enjoy building their own little campsite, then returning to it later for pretend play. The finished scene can stay on a shelf for days without taking up much space.
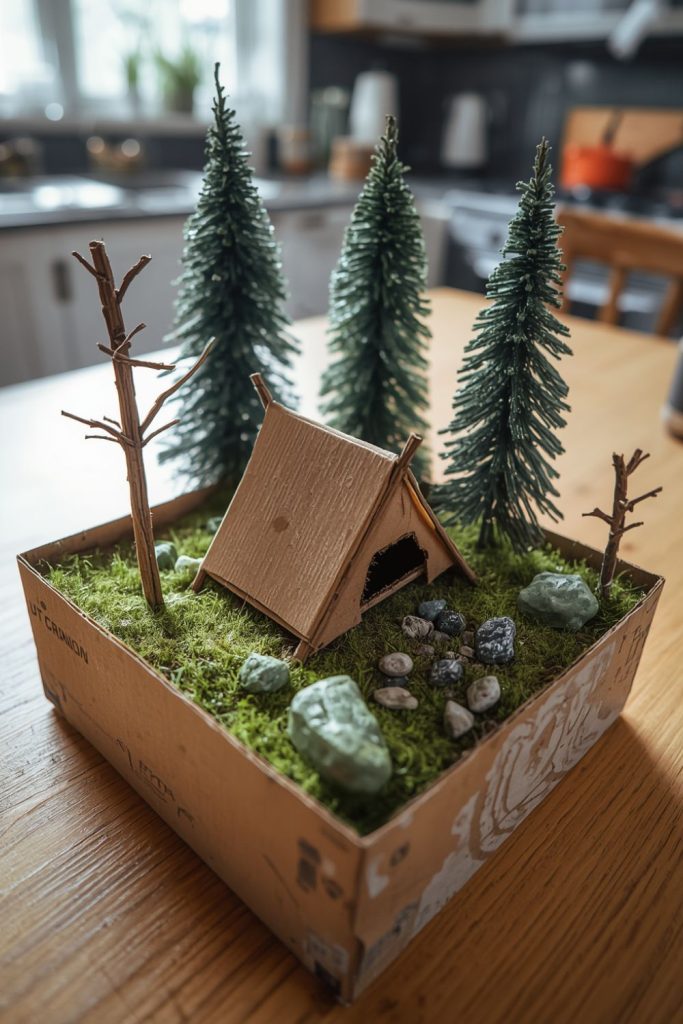
Supplies
- Empty shoebox
- Construction paper
- Glue
- Popsicle sticks
- Small twigs
- Pebbles
- Green tissue paper
- Toy animals optional
Cover the inside bottom of the shoebox with green paper to create grass. Add blue paper for a small lake if you like. Build a simple tent from folded construction paper and glue it inside the box. Arrange small twigs as trees and place a few pebbles around the campsite. Green tissue paper can become bushes or small plants.
If your child has tiny animal figures, place them around the campsite to complete the scene. They can pretend the animals are camping, fishing, or roasting marshmallows. This project also encourages storytelling as children create little adventures inside their miniature campground.
17. Paper Camping Backpack Craft
Every camper needs a backpack, and toddlers love pretending to pack for an outdoor trip. This paper version gives them something colorful they can decorate while talking about what they would bring on a camping adventure.
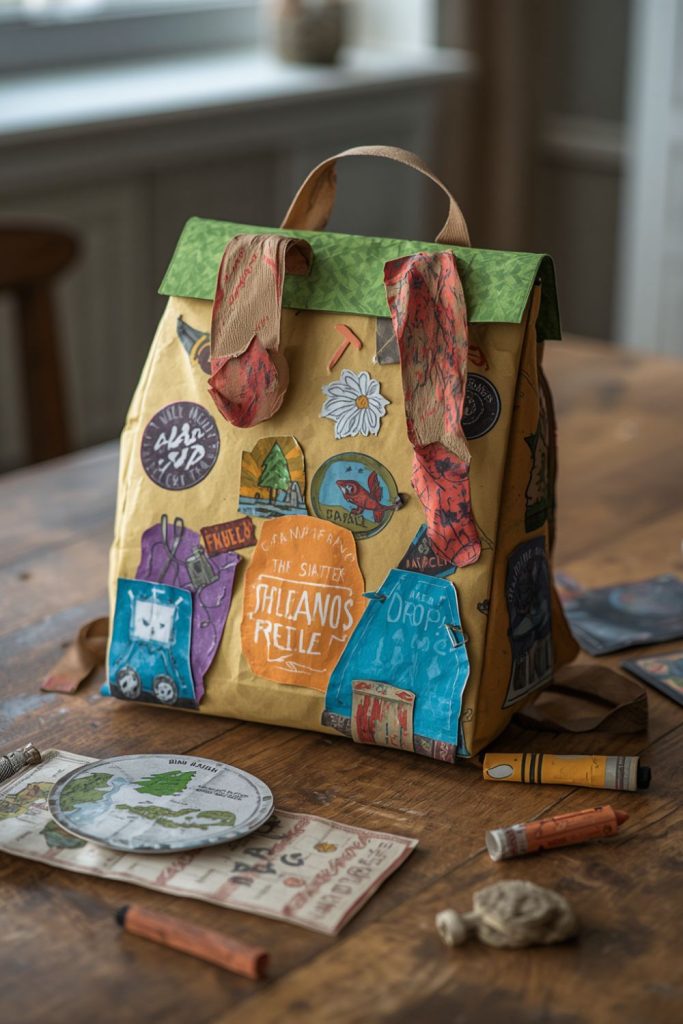
Supplies
- Colored cardstock
- Glue
- Markers
- Stickers
- Safety scissors
- Brown paper
Cut a large backpack shape from cardstock. Add two paper straps, a front pocket, and a handle using contrasting colors. Let your child decorate the backpack with stickers, drawings, or their name written across the front.
For extra fun, cut out tiny paper items such as a flashlight, water bottle, sleeping bag, snack, or map. Children can place these inside the paper pocket and pretend they are packing for their trip. This activity also helps toddlers learn about planning and identifying useful camping supplies in a playful way.
18. Cardboard Canoe with Paper Paddle
Many campgrounds have lakes or rivers, making a canoe another fun camping themed project. Using recycled cardboard keeps the cost low while giving children another toy for pretend adventures.
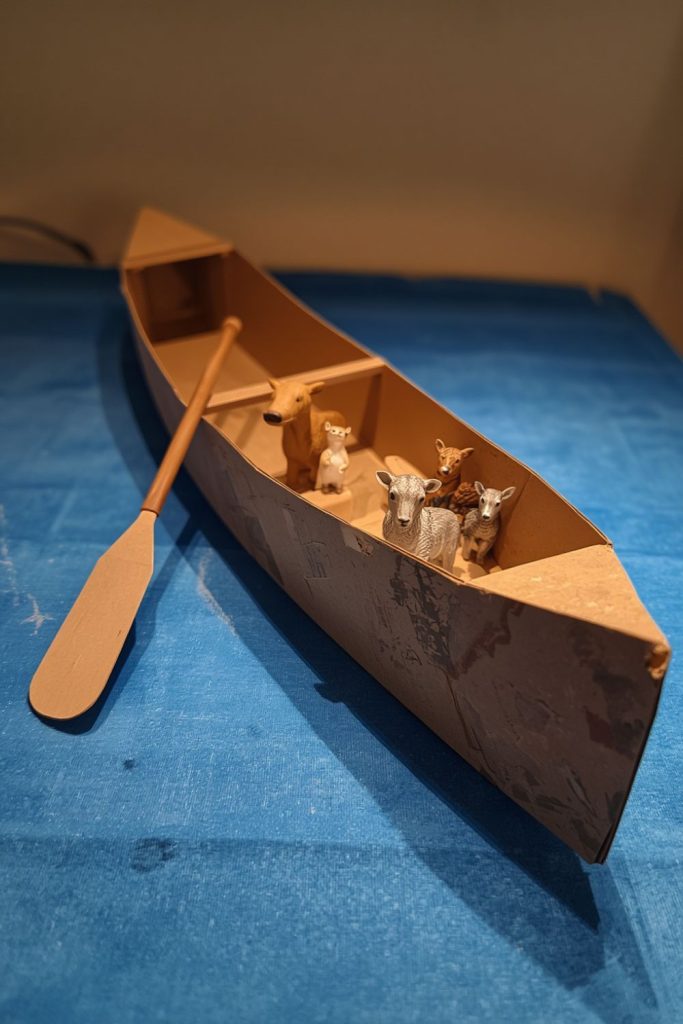
Supplies
- Cardboard
- Brown paint
- Construction paper
- Glue
- Safety scissors
- Marker
Cut a simple canoe shape from cardboard and paint it brown. Allow it to dry before drawing wood lines with a marker. Cut a paddle from sturdy construction paper and decorate it with simple patterns or colorful dots.
Children can float small toy animals inside the canoe during pretend play on the floor or use a blue blanket as their imaginary lake. Parents can also talk about water safety and wearing life jackets while children enjoy their homemade canoe.
19. Pine Tree Sponge Painting
Trees are one of the first things children notice while camping. Sponge painting makes it easy for toddlers to create fluffy pine trees without worrying about painting tiny details.
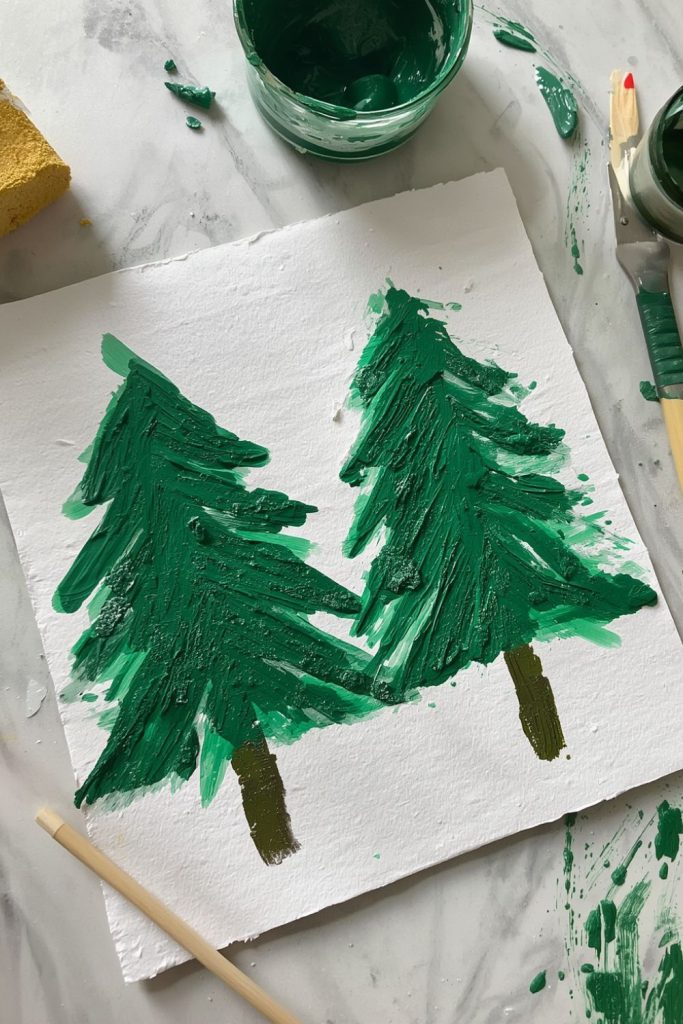
Supplies
- Kitchen sponge
- Green paint
- Brown paint
- White paper
- Clothespin optional
Cut the sponge into a triangle shape. Clip it with a clothespin if you want an easy handle for little hands. Dip the sponge into green paint and gently press it onto the paper several times to make tree branches.
Once the paint dries slightly, use brown paint to add trunks underneath each tree. Children can paint as many trees as they like, creating an entire forest. A bright blue sky, smiling sun, or paper camping tent can be added later to finish the picture.
20. Nature Bracelet Using Masking Tape and Found Leaves
This simple activity combines a short nature walk with a fun wearable project. Instead of collecting leaves just to bring them home, toddlers turn their finds into colorful bracelets they can proudly wear.
Supplies
- Wide masking tape
- Scissors
- Leaves
- Tiny flowers
- Grass
- Small feathers
Wrap a strip of masking tape around your child’s wrist with the sticky side facing outward. Press the ends together gently so it stays in place without feeling too tight.
Head outside and invite your toddler to collect interesting leaves, flower petals, blades of grass, or tiny feathers. Stick each item directly onto the tape until the bracelet is full. Every bracelet looks different because children choose their own decorations. The activity also encourages observation while helping children appreciate the little things they find outdoors.
21. Paper Camping Map with Sticker Trails
A pretend camping map encourages imagination while introducing toddlers to simple directions and symbols. They enjoy following their own trails just like real campers exploring a park.
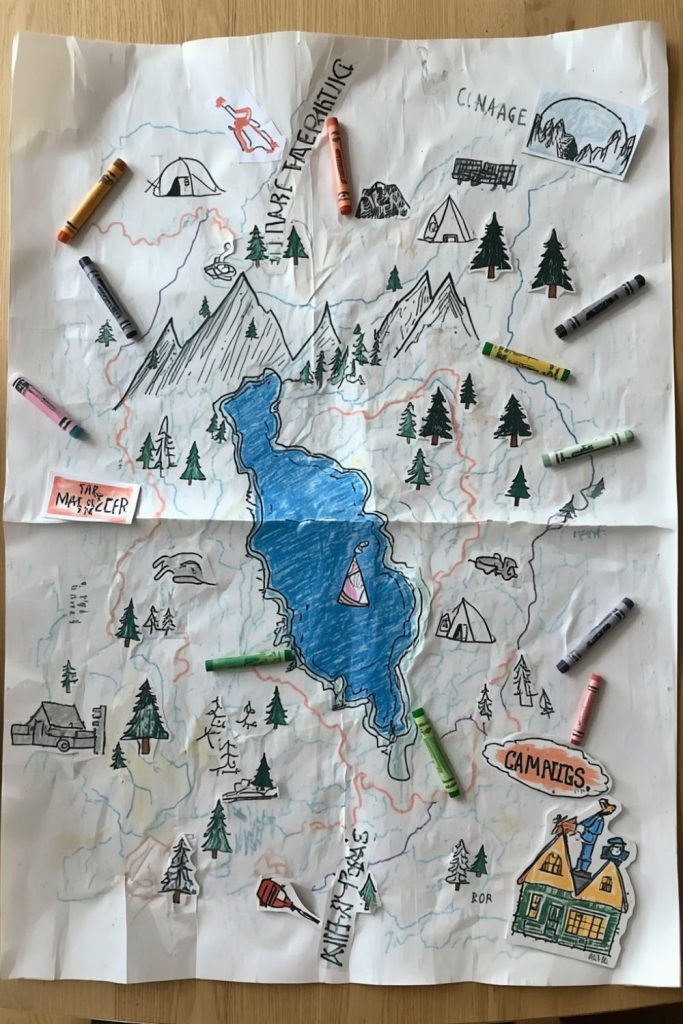
Supplies
- Large sheet of paper
- Washable markers
- Camping themed stickers
- Crayons
- Ruler optional
Draw simple paths across the paper with thick marker lines. Add easy landmarks such as a tent, lake, trees, mountains, picnic table, and campfire. Use camping stickers if you have them, or draw everything by hand.
Invite your toddler to color the map before placing stickers along the trail to show where they have “traveled.” Small toy figures can move from one place to another as children create little camping stories. Parents can ask questions like, “Where should we stop for lunch?” or “Which path goes to the lake?” making the activity both fun and educational.