A Christmas door decorating contest at work is a fun way to bring coworkers together, show off creative skills, and add holiday cheer to the office. Whether your team wants to build a giant gingerbread house, create a snowy Christmas village, or turn an ordinary doorway into Santa’s workshop, the right design can make your entry stand out. The best part is that you don’t need a huge budget or professional decorating skills to create something memorable.
Winning takes more than hanging a few ornaments and stringing up lights. Your team needs a clear theme, a thoughtful color scheme, well placed decorations, and a plan that fits the contest rules. Every part of the door should support the same idea, from the main decoration to the smallest finishing touches. It also helps to divide tasks among coworkers so everyone can contribute without creating a last minute rush.
This guide covers the judging criteria, decoration techniques, common mistakes, and 21 Christmas door decorating contest ideas for the office. Each idea includes materials and practical steps to help your team turn a simple office door into a festive display that catches the judges’ attention.
What Are the Key Rules and Judging Criteria for Winning a Christmas Door Decorating Contest at Work?
Before your team starts decorating, find out exactly how the Christmas door decorating contest will be judged. Some workplaces reward the most creative design, while others give equal attention to teamwork, holiday spirit, presentation, and the cost of materials. Knowing the scoring rules helps your team spend time and money on the parts that matter most.
Check the contest rules before decorating
Ask the organizer about the decorating deadline, permitted materials, size restrictions, and whether decorations must be removed immediately after the contest. Find out if your team can decorate the doorframe, nearby wall, or floor area. Some offices only allow decorations on the door itself, so confirm this before building anything that extends beyond its edges.
Safety rules deserve attention too. Keep door handles, locks, hinges, exit signs, and required access routes clear. Avoid blocking vision panels or covering fire safety notices. Use approved adhesives that won’t damage paint, and never attach decorations to sprinkler heads, alarms, or other safety equipment.
Learn what the judges value most
A Christmas door decorating contest may use a scoring sheet or informal judging. Ask whether originality, visual appeal, holiday spirit, teamwork, and presentation receive equal marks. If creativity carries more weight than cost, a clever design with simple materials could perform better than an expensive display.
A strong entry should have one clear theme. The decorations need to work together rather than compete for attention. Judges should be able to recognize the main concept quickly, even from across the hallway.
Create a team plan and divide responsibilities
Choose one person to coordinate the project, then assign jobs according to each coworker’s strengths. One teammate can manage the design, another can prepare the materials, while others handle construction, lighting, and finishing touches. Set a shared deadline before the official submission date to leave time for corrections.
Agree on a budget before buying supplies. Cardboard, recycled packaging, paper, fabric scraps, and reusable ornaments can produce impressive results at a low cost. A clear plan also prevents team members from buying duplicate supplies or adding decorations that don’t match the design.
Aim for a polished finish
Judges often notice neat edges, balanced layouts, secure attachments, and attention to detail. Keep the main subject easy to recognize and avoid leaving large gaps unless they are part of the design. Check the door from several steps away to see how it looks from a judge’s usual viewing distance.
A finished display should look intentional from top to bottom. Even a simple design can score well when the colors match, the decorations stay in place, and the entire team contributes to a consistent presentation.
How to Use Lights, Colors, and Ornaments to Win Your Christmas Door Decorating Contest
Lights, colors, and ornaments can turn an ordinary office door into a memorable Christmas display. The trick is to give each decoration a purpose instead of adding as many items as possible. A clear focal point, a coordinated palette, and well placed lighting can make your entry look more professional without requiring expensive supplies.
Choose a coordinated color palette
Start with two or three main colors and use them throughout the design. Red, green, and gold create a traditional Christmas look, while white, silver, and icy blue suit snowy scenes and frozen castles. Gold and cream work well for an elegant display, while bright pink, turquoise, and red can support a candy themed design.
Use one color as the main background, another for the largest decorations, and a third for small accents. This helps the display feel balanced. If your theme already contains many colors, keep the surrounding decorations simpler so the door doesn’t look crowded.
Use lights to guide the viewer’s attention
Battery powered fairy lights can outline a doorway, highlight a Christmas tree, or add a soft glow to a snow globe design. Warm white lights work well with gingerbread houses, fireplaces, and traditional Christmas scenes. Cool white lights can create an icy appearance for a snow covered village or frozen palace.
Position lights around the outer border or near the central feature. Avoid placing them everywhere, because too many bright points can distract from the main design. Secure every wire, keep batteries accessible, and follow workplace rules for electrical decorations. Never run loose cords across walkways or interfere with the door’s operation.
Add depth with layered decorations
Flat paper decorations are useful, but layering can make a door look more impressive. Attach lightweight cardboard shapes at different heights to create depth. Folded paper, foam sheets, tissue paper, and layered garlands can form snowy roofs, candy cane columns, tree branches, or oversized bows.
Keep heavier pieces firmly supported and use materials that won’t damage the door. Decorations should not swing into people or prevent the door from opening fully. Test the door before the contest begins.
Make ornaments support the theme
Choose ornaments that belong to the design rather than adding random decorations. Large baubles can become the center of a giant Christmas tree, while small bells and wrapped boxes can complete Santa’s workshop. Candy shapes work well with gingerbread houses, and paper snowflakes suit an icy winter scene.
Vary the size of the ornaments to create visual interest. Place the largest pieces near the focal point and use smaller ones around the edges. Step back during decorating to check the balance, then remove anything that distracts from the main concept.
Finish with a careful inspection
Before the judges arrive, check that the lights work, the ornaments are secure, and the colors look consistent under the office lighting. Photograph the door from the hallway to spot uneven areas you may have missed while standing close to it. Make sure the decorations don’t cover the handle, block visibility, or interfere with access.
A clean finish can make a bigger difference than adding another bag of ornaments. Give your team enough time for this final check instead of decorating until the last minute.
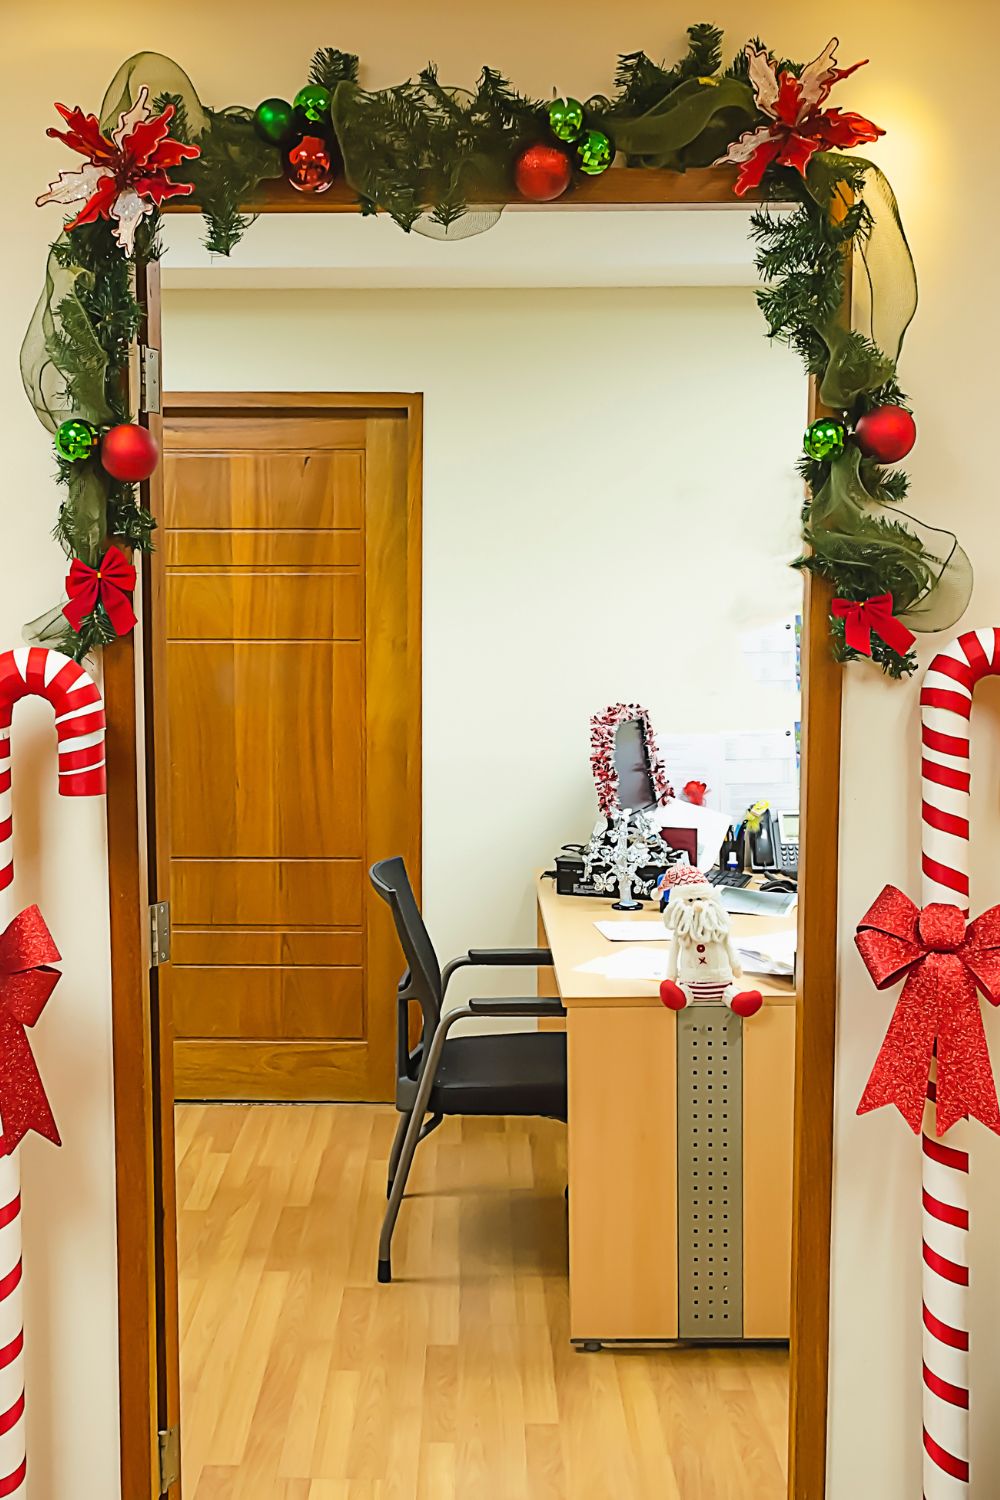
- Related post The Secret to Sophisticated Christmas Archway Decor Indoor (That Looks Professionally Done)
What Common Mistakes Should Your Team Avoid to Win a Christmas Door Decorating Contest at Work?
Even a creative Christmas door decorating contest entry can lose its impact if the design is rushed or difficult to recognize. Teams sometimes spend too much time adding decorations and too little time checking the layout, following safety rules, or coordinating their work. Avoiding a few common mistakes can help your display look more polished and make the decorating process easier for everyone.
Avoid adding too many unrelated decorations
A door covered with Santa figures, snowmen, candy canes, reindeer, stars, and unrelated signs can look messy if there is no shared theme. Choose one main concept and make every decoration support it. If your team is building a gingerbread house, use candy, icing effects, and cookie shapes rather than adding objects from several unrelated Christmas scenes.
Don’t leave planning until the last day
Rushing often leads to missing supplies, uneven cutting, loose decorations, and unfinished details. Begin by measuring the door, sketching the layout, and checking the contest rules. Prepare the pieces ahead of time, then schedule a decorating session when the team can work together.
Allow extra time for drying glue, testing lights, and fixing loose parts. A simple schedule will help the team avoid unnecessary stress.
Don’t spend the entire budget on decorations
Expensive supplies don’t automatically produce a winning display. Before shopping, list the materials you already have in the office or at home. Reuse cardboard boxes, old ribbons, leftover wrapping paper, and ornaments from previous celebrations.
Spend money on a few items that make a clear visual difference, such as battery powered lights or a large central decoration. Keep the rest of the design affordable and consistent.
Avoid blocking doors or creating safety hazards
Never cover handles, locks, glass panels required for visibility, exit signs, or safety instructions. Avoid sharp wire ends, heavy unsecured pieces, open flames, and loose electrical cables. Check the workplace’s rules before using spray products, glitter, artificial snow, or adhesives that may damage surfaces.
Make sure the door can open and close normally. If the design includes a large three dimensional feature, test it before the contest and remove anything that could catch on clothing or obstruct people passing through the hallway.
Don’t let the team work without coordination
When everyone adds decorations independently, the final design may look inconsistent. Agree on the theme, colors, and layout before anyone starts attaching pieces. Ask one teammate to approve changes so extra decorations don’t crowd the main feature.
Invite suggestions from everyone, but keep the final design focused. Teamwork should make the process smoother, not turn the door into a collection of competing ideas.
Don’t forget the final presentation
A strong design can lose its impact if pieces are crooked, tape is visible, or decorations are falling off. Inspect the door from the front and from a distance. Replace damaged pieces, straighten the borders, hide visible attachment points where practical, and remove scraps from the surrounding area.
The goal is to present a complete design that looks good from the moment judges enter the hallway.
21 Winning Christmas Door Decorating Contest Ideas for the Office
1. Santa’s Sleigh Crashing Through a Snow Covered Office Door
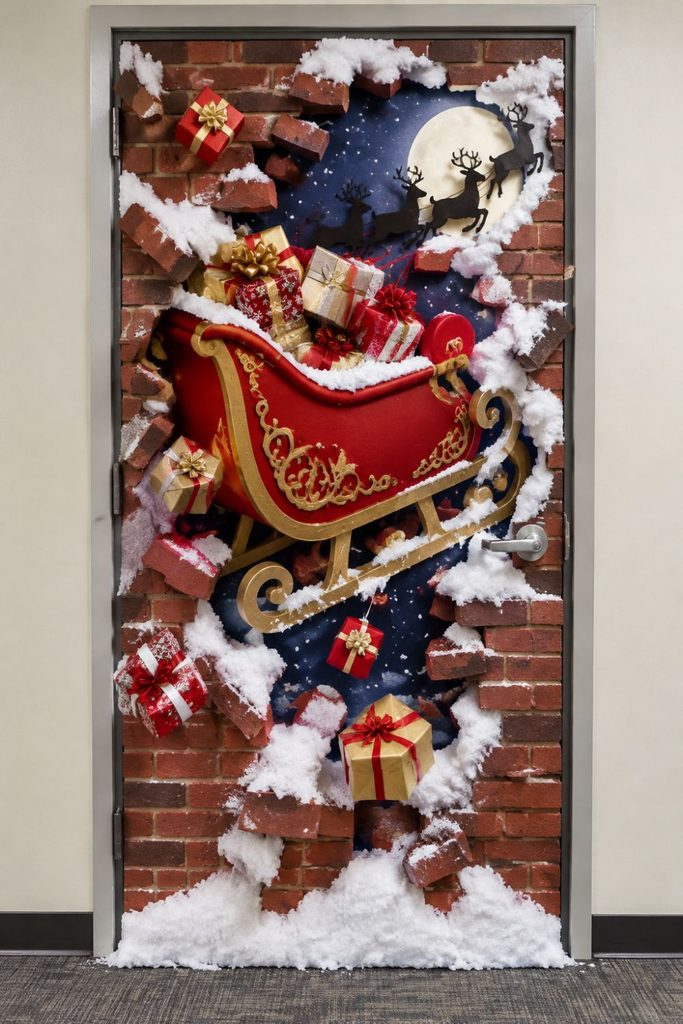
Turn your office entrance into a dramatic Christmas scene where Santa’s sleigh appears to burst through a snowy wall. The raised pieces and scattered presents create a strong focal point that can catch the judges’ attention.
Materials needed
- White and blue poster board
- Brown cardboard sheets
- Red and gold craft paper
- Cotton batting or white felt
- Lightweight toy presents
- Double sided tape and removable adhesive
Step by step method
- Cover the door with blue paper to create a winter sky.
- Cut cardboard pieces to form the broken wall around the center.
- Create a sleigh from red cardboard and add gold trim.
- Position the sleigh diagonally across the door to suggest movement.
- Add cotton snow, small presents, and white paper snowflakes around the edges.
- Check that every piece is secure and the door opens freely.
2. Giant Gingerbread House with 3D Candy Cane Columns
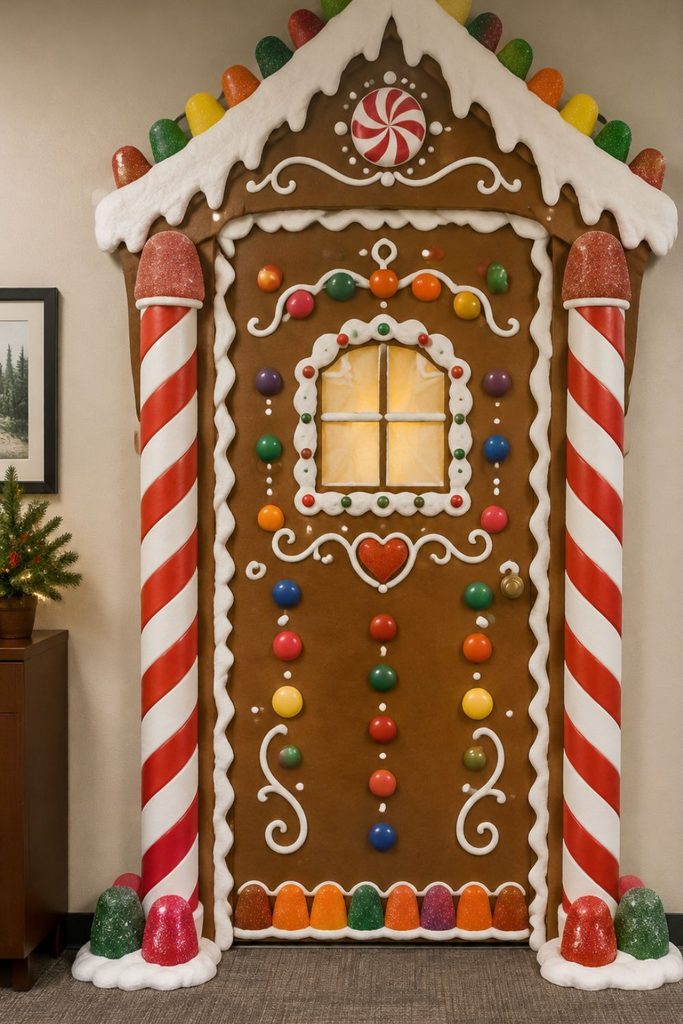
Give your office door the appearance of a giant gingerbread house with cookie brown walls, icing borders, and oversized sweets. The raised columns and decorative roof make this design stand out from ordinary flat paper decorations.
Materials needed
- Brown kraft paper or cardboard
- White foam sheets
- Red and white striped paper
- Colored cardstock
- Large cardboard circles
- Removable adhesive and scissors
Step by step method
- Cover the door with brown paper.
- Cut a peaked roof shape from cardboard and position it above the doorway if permitted.
- Create white icing borders with wavy strips of foam.
- Roll red and white paper into lightweight candy cane columns.
- Add large gumdrop shapes, cookie cutouts, and candy decorations.
- Finish with white icing patterns and inspect the door edges for gaps.
3. Oversized Christmas Snow Globe Surrounding the Door
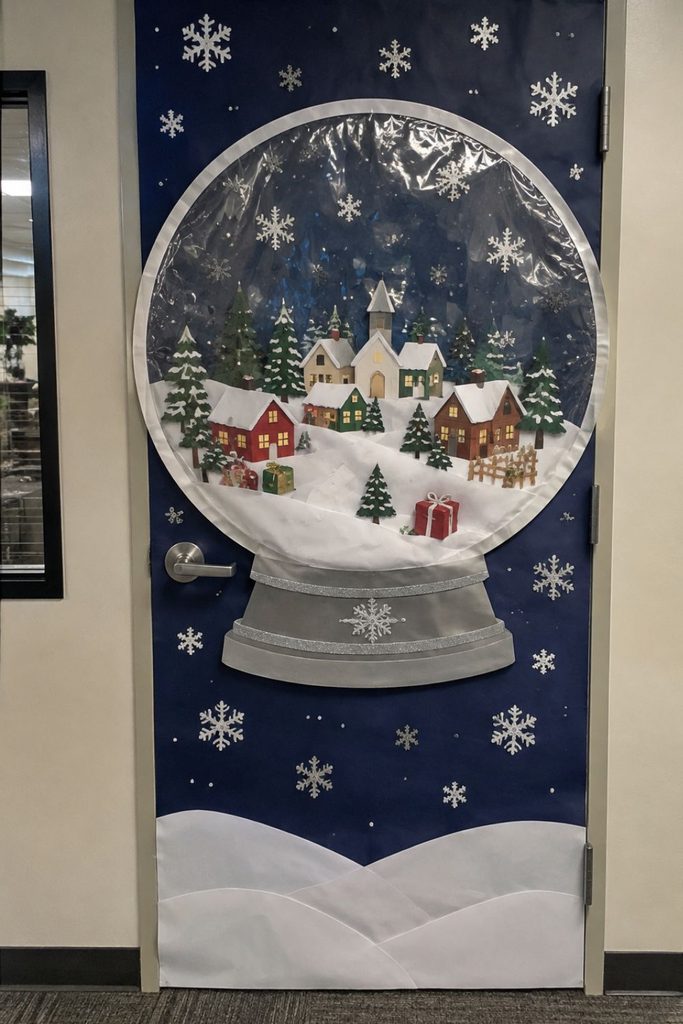
Create the appearance of a giant snow globe with a Christmas village inside. A curved outer frame and layered scenery give the display depth, while white snowflakes and silver accents suggest falling snow.
Materials needed
- Blue and white poster board
- Clear lightweight plastic sheets, if permitted
- White felt or paper snowflakes
- Miniature cardboard houses
- Small artificial trees
- Silver cardstock and removable adhesive
Step by step method
- Cover the door with a dark blue background.
- Cut a large circular frame from lightweight cardboard.
- Place miniature houses and trees in the lower half of the design.
- Add white snowflakes at different heights to suggest falling snow.
- Use silver and white paper to create a snowy globe border.
- Add a curved base beneath the circle and check that no decoration obstructs the handle.
4. Enchanted Christmas Portal with Glowing Evergreen Arches
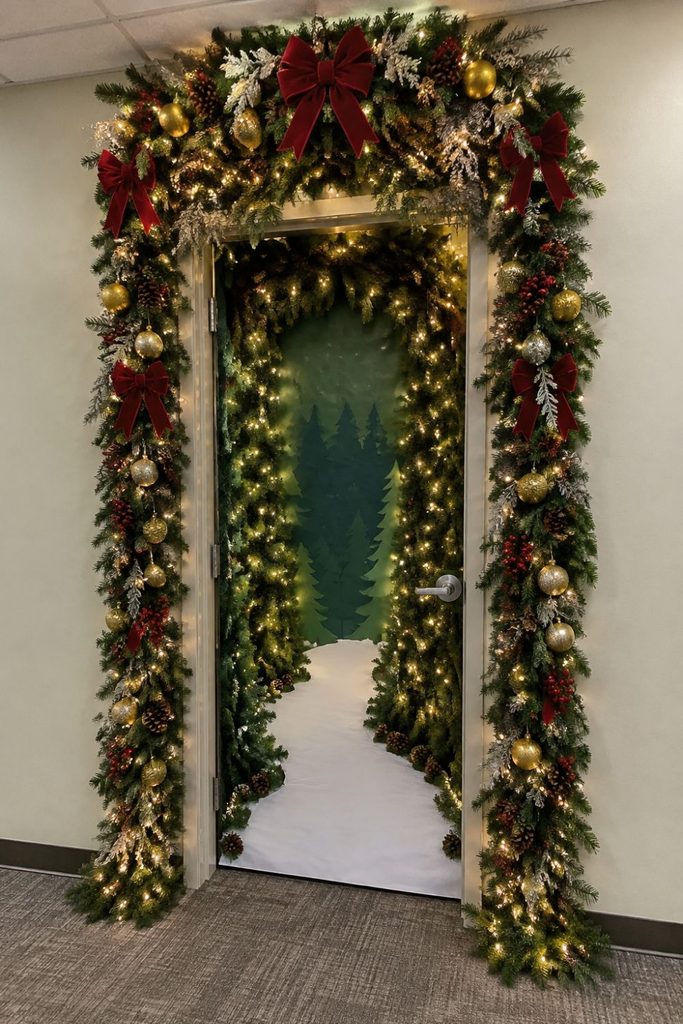
Create a doorway that looks like an entrance to a Christmas forest. Layered greenery, warm fairy lights, and metallic ornaments give the entrance a rich appearance without covering every inch of the door.
Materials needed
- Artificial evergreen garlands
- Battery powered fairy lights
- Red and gold ornaments
- Lightweight cardboard arches
- Green ribbon
- Removable hooks or approved fasteners
Step by step method
- Measure the doorway and plan an arch that stays clear of the door’s moving parts.
- Attach lightweight cardboard supports where permitted.
- Wrap the supports with evergreen garlands.
- Position battery powered lights along the outer edge.
- Add red bows and gold ornaments at regular intervals.
- Secure the battery pack and test the door before presenting the design.
5. Giant Christmas Present with a Sculpted 3D Ribbon
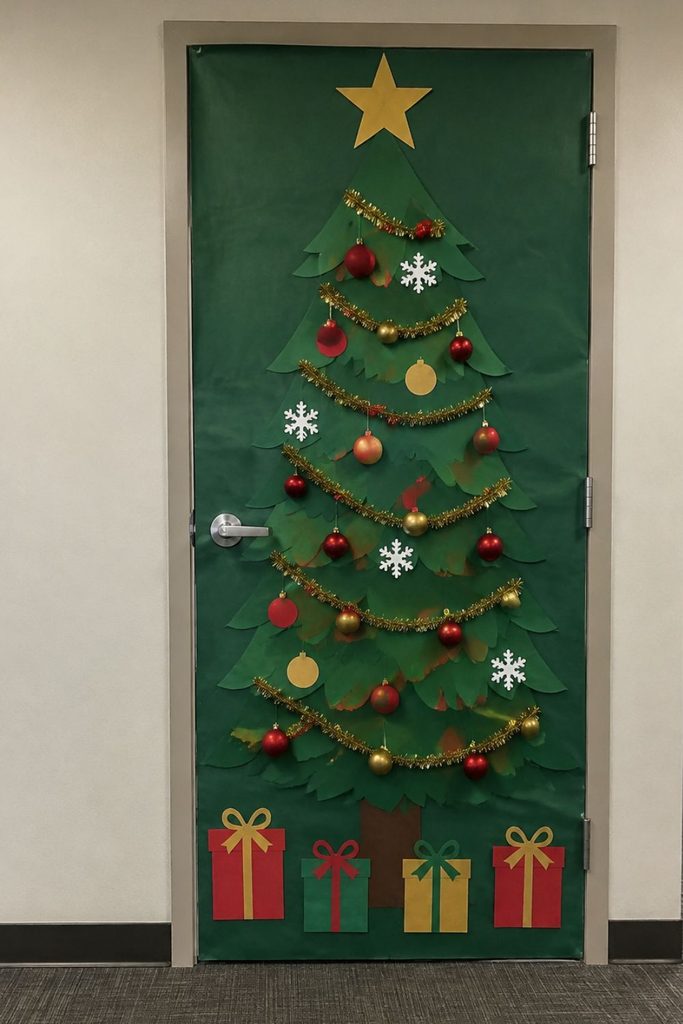
Make the entire door resemble a giant wrapped Christmas present. Oversized ribbon and a sculpted bow give the display a clean, recognizable shape that works well for teams with a modest decorating budget.
Materials needed
- Large sheets of red or green wrapping paper
- Wide fabric ribbon
- Lightweight cardboard
- Gold cardstock
- Removable tape
- Scissors and a ruler
Step by step method
- Cover the door with one solid color of wrapping paper.
- Attach two wide ribbon strips vertically and horizontally.
- Cut two large bow loops from lightweight cardboard.
- Cover the loops with ribbon or metallic paper.
- Attach the bow near the upper center of the door.
- Add a narrow contrasting border and smooth out wrinkles in the wrapping paper.
6. Santa Stuck Upside Down in a Brick Chimney
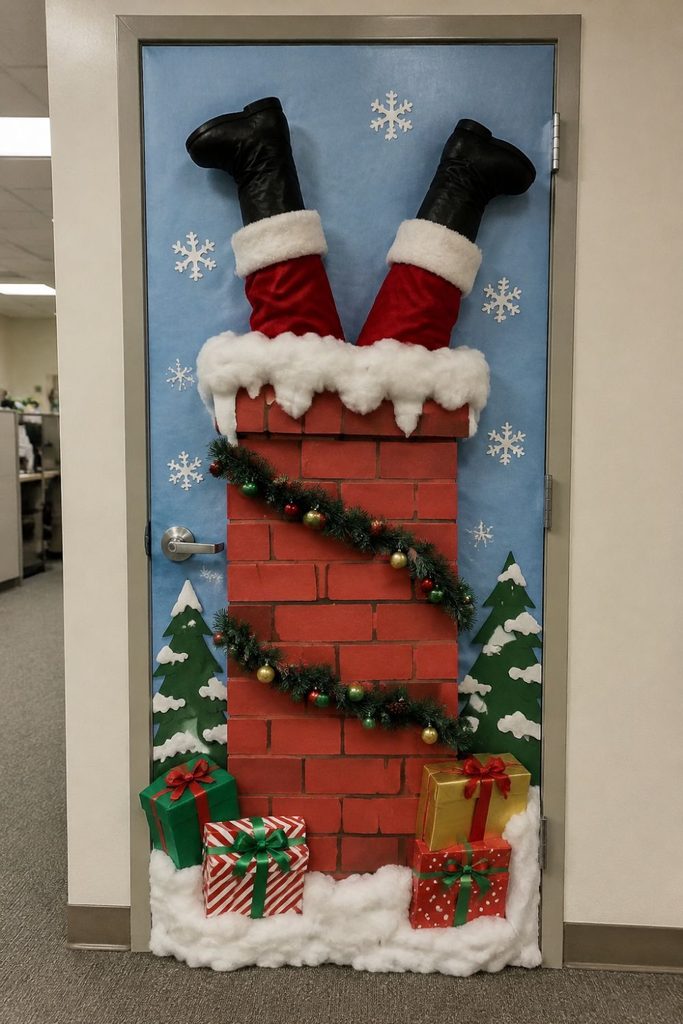
Give coworkers a reason to smile with a scene showing Santa’s legs sticking out of a chimney. The humorous pose creates a clear story, while the brick pattern and snowy roof make the scene easy to recognize.
Materials needed
- Red and brown cardstock
- Gray cardboard
- White cotton batting
- Black boots made from paper or lightweight foam
- Black marker
- Removable adhesive
Step by step method
- Cover the door with a dark background.
- Build a rectangular chimney from red and brown paper.
- Draw horizontal and vertical lines to create a brick pattern.
- Cut two boot shapes and attach them upside down near the chimney opening.
- Add white snow along the chimney top.
- Place a few wrapped presents near the bottom to complete the scene.
7. Frozen Ice Palace Entrance with Icicle Drapes
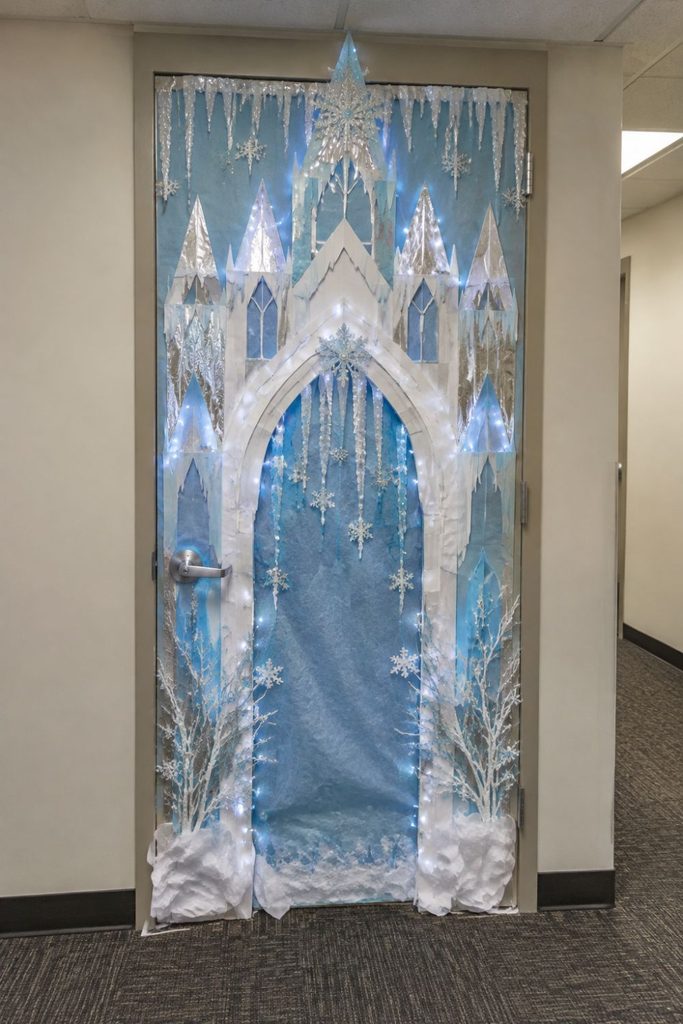
Create a palace inspired by snowy castles, with icy blue walls, silver arches, and hanging icicle shapes. This design works especially well under cool white lighting and creates a crisp winter appearance.
Materials needed
- Pale blue and white cardstock
- Silver foil paper
- Transparent craft sheets
- White ribbon
- Battery powered cool white lights
- Removable adhesive
Step by step method
- Cover the door with pale blue paper.
- Cut tall pointed arches from white and silver cardstock.
- Arrange the arches around the center of the door.
- Cut long triangular icicles from transparent sheets or white paper.
- Attach the icicles along the upper border.
- Add cool white lights where permitted and check that the pointed pieces are firmly attached.
8. Polar Express Train Bursting Through a Snowy Tunnel
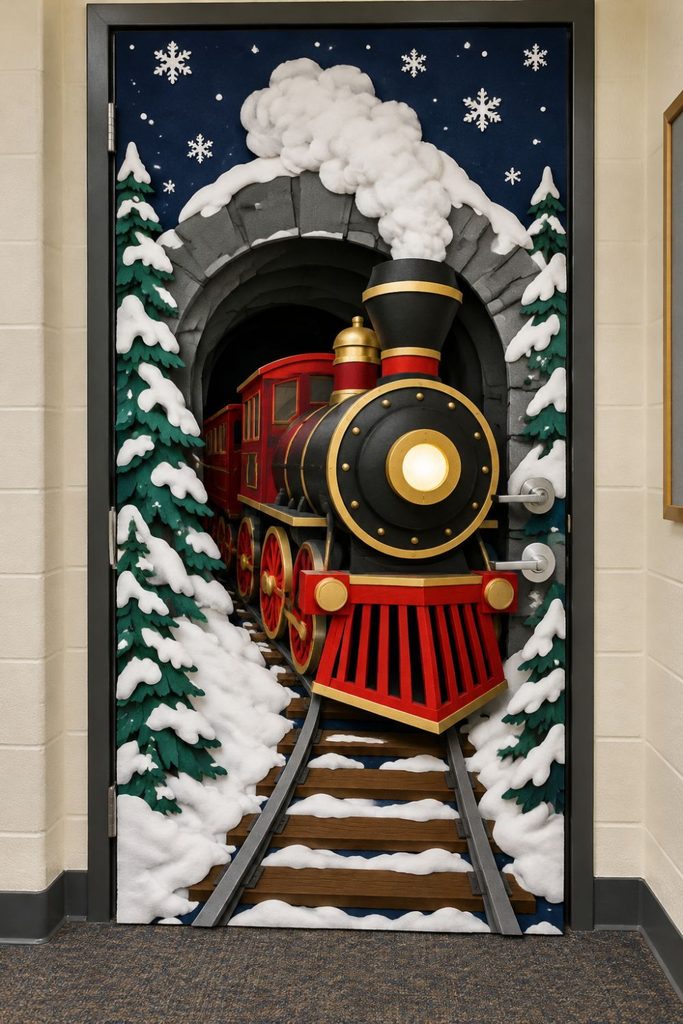
Turn the doorway into a railway scene featuring a large Christmas train emerging from a snowy tunnel. The train’s front section becomes the main focal point, while tracks and snowy scenery lead the viewer toward it.
Materials needed
- Black, red, and gold cardstock
- Gray cardboard
- White felt
- Silver paper
- Small artificial snowflakes
- Removable tape and scissors
Step by step method
- Cover the door with dark blue paper.
- Create a tunnel using layered gray and black cardboard arches.
- Cut a large train engine shape from black cardboard.
- Add red panels, gold trim, and round paper wheels.
- Attach white felt around the tunnel to represent snow.
- Add railway tracks along the lower section and secure all pieces.
9. Three Dimensional Christmas Fireplace with Stockings
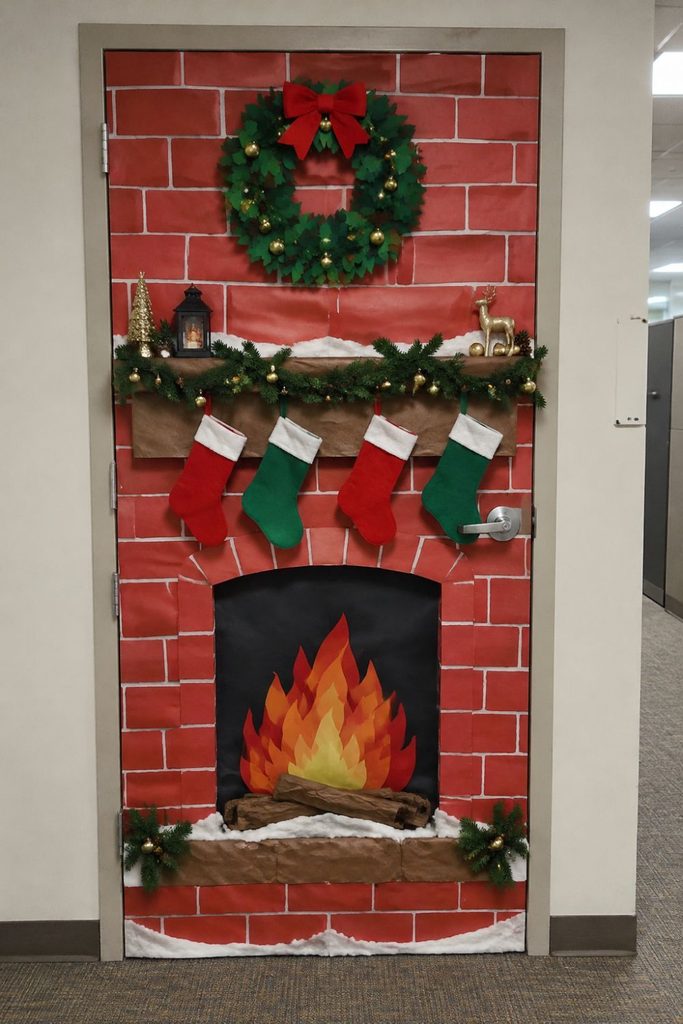
Give the office door the warm appearance of a Christmas fireplace, complete with a mantel, stockings, and a glowing looking fire effect. Layered paper creates depth without requiring a real flame or heating equipment.
Materials needed
- Red brick patterned paper
- Brown cardboard
- Red, orange, and yellow cardstock
- Felt stockings
- Green garland
- Lightweight paper ornaments
Step by step method
- Cover the door with a brick pattern.
- Build a mantel from lightweight cardboard covered in brown paper.
- Cut a dark rectangular fireplace opening.
- Layer red, orange, and yellow flame shapes inside the opening.
- Hang small felt stockings along the mantel.
- Add evergreen garland and paper ornaments, keeping the handle and hinges clear.
10. Giant Nutcracker Soldiers Guarding the Office Entrance
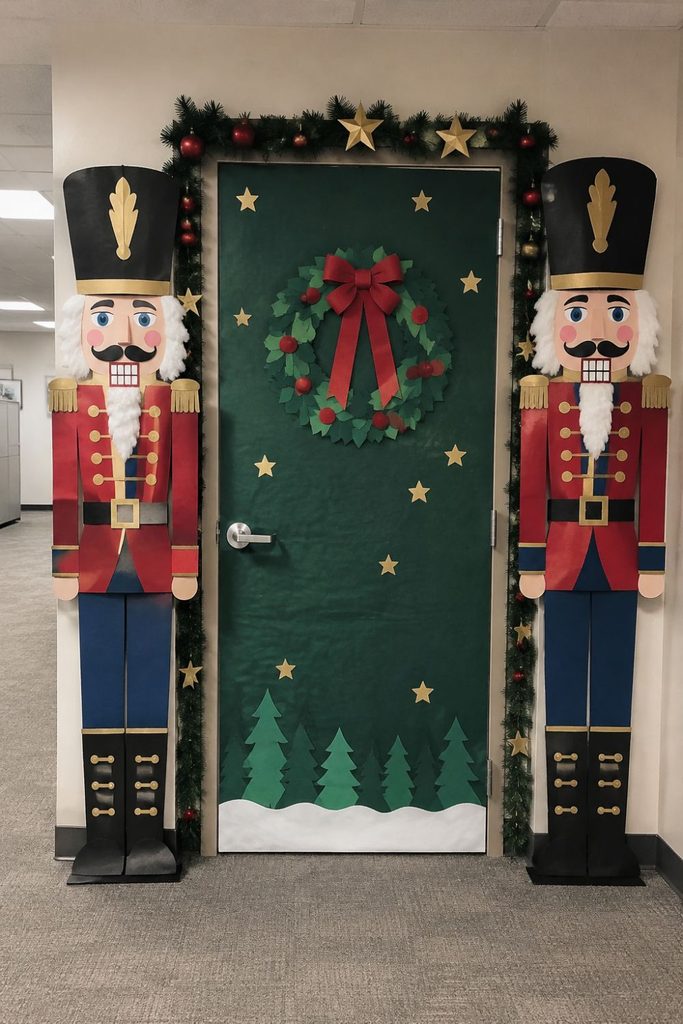
Create a grand Christmas entrance with two oversized nutcracker figures positioned on either side of the door. Matching uniforms and symmetrical placement make the display look orderly and impressive.
Materials needed
- Red, black, blue, and gold cardstock
- Lightweight cardboard
- White paper
- Gold ribbon
- Removable adhesive
- Scissors and markers
Step by step method
- Measure the available door area and plan two matching figures.
- Cut the bodies, arms, and legs from cardboard.
- Cover the figures with colored paper to create military style uniforms.
- Add black boots, gold buttons, white hair, and tall hats.
- Position the figures on opposite sides of the door.
- Check that both figures have matching heights and similar details.
11. Candy Land Christmas Door with Giant Lollipops
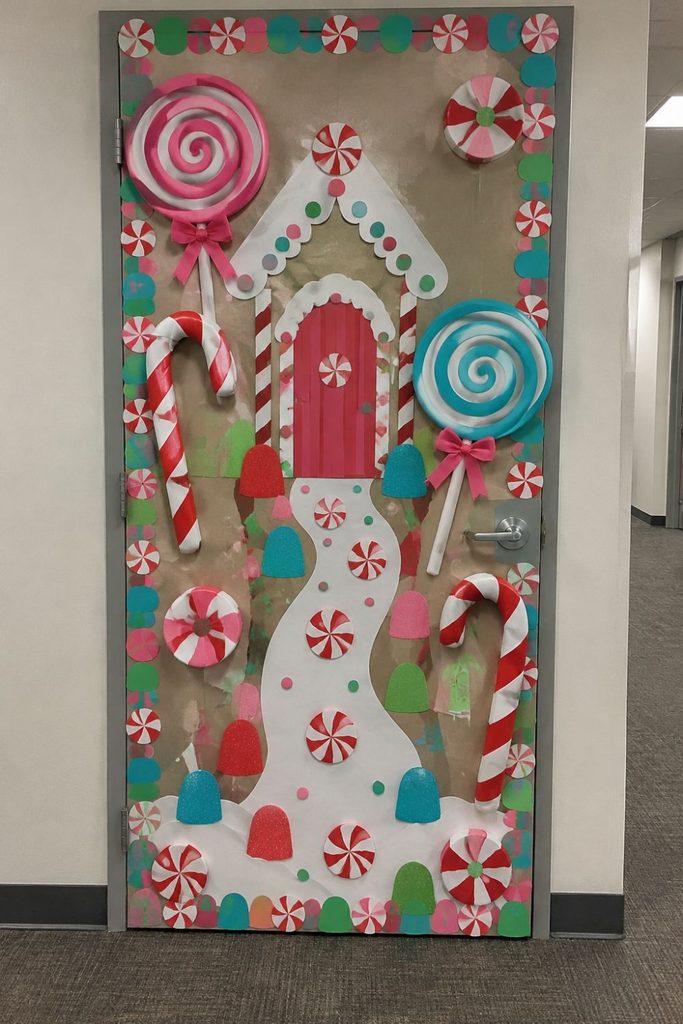
Build a sweet themed Christmas display filled with oversized lollipops, striped candy canes, and colorful candy shapes. The large decorations create strong visual contrast and work well in offices that prefer cheerful, playful designs.
Materials needed
- Bright cardstock
- White foam sheets
- Lightweight cardboard circles
- Wooden looking paper straws or paper rolls
- Red and white ribbon
- Removable adhesive
Step by step method
- Choose a bright background color such as pale pink or turquoise.
- Cut large circles from cardboard to form lollipops.
- Add spiral patterns with contrasting paper strips.
- Attach lightweight paper stems to each lollipop.
- Place giant candy canes around the outer border.
- Fill empty spaces with small candy shapes while keeping the layout balanced.
12. Whimsical Christmas Bakery with Oversized Gingerbread Cookies
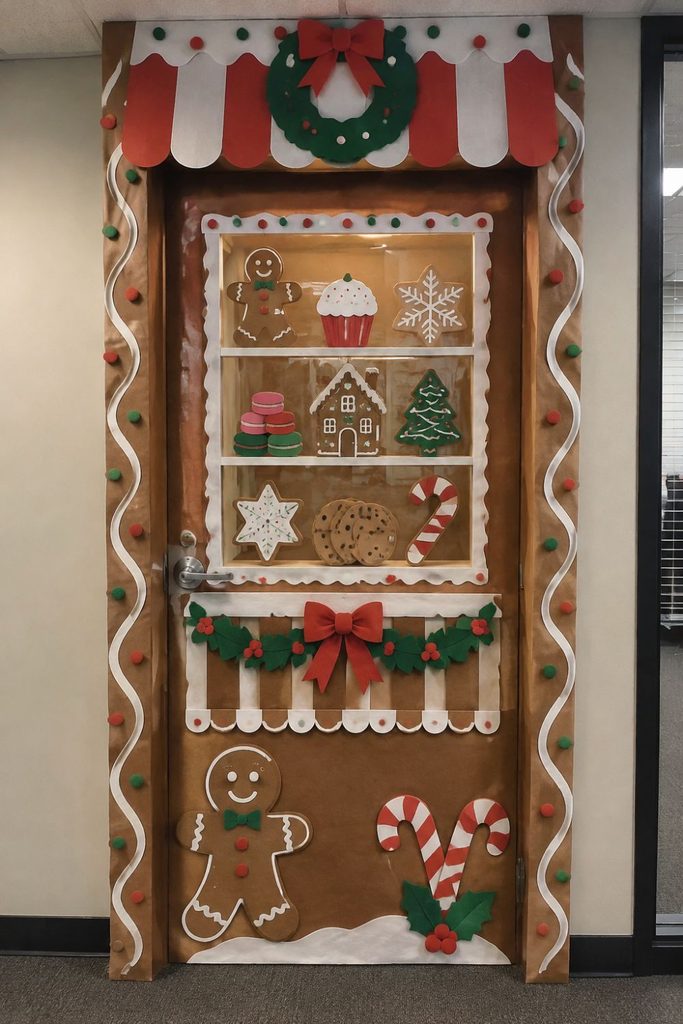
Make the door look like a Christmas bakery window filled with gingerbread cookies, frosted treats, and festive pastries. The design works well when the cookies have raised icing details and different shapes.
Materials needed
- Brown cardboard
- White foam sheets
- Red and green cardstock
- Colored paper circles
- White paint markers
- Removable adhesive
Step by step method
- Cover the door with a warm cream or brown background.
- Cut gingerbread people, stars, and cookie shapes from cardboard.
- Add white icing lines using foam strips or paint markers.
- Create a bakery window frame with contrasting cardstock.
- Arrange cookies at different heights to create a display case effect.
- Add small paper candy canes and festive pastry shapes around the edges.
13. Snowy Alpine Village with Miniature Houses and Warm Lights
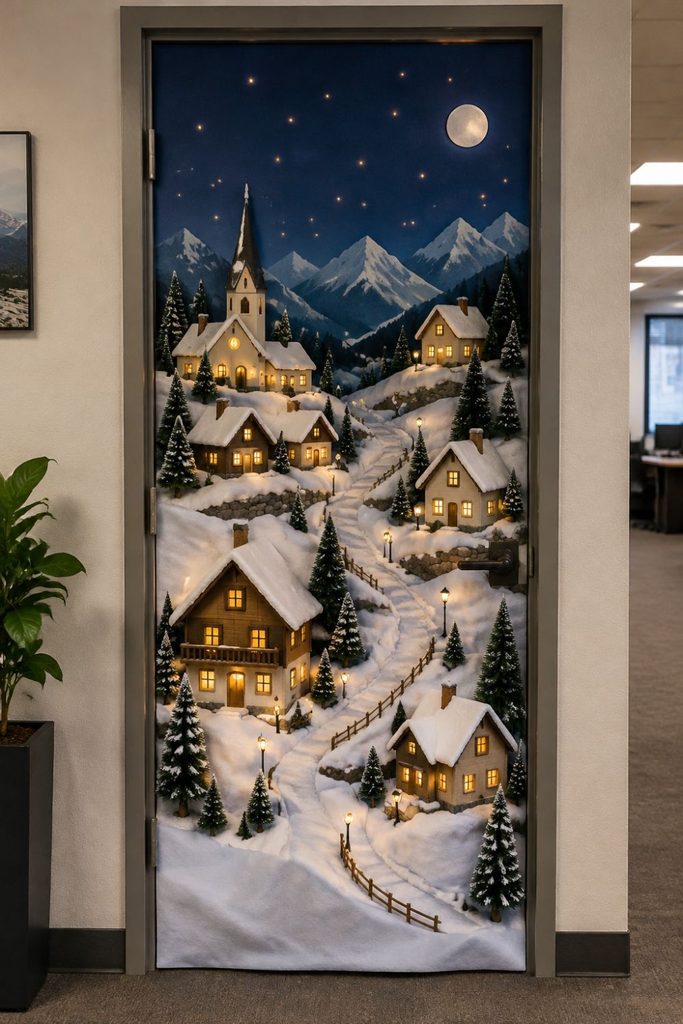
Create a miniature village scene with snow covered rooftops, small houses, pine trees, and glowing windows. The layered houses create depth and give the door a detailed appearance without making it feel overcrowded.
Materials needed
- Blue and white poster board
- Cardboard house templates
- Brown and cream cardstock
- Artificial evergreen branches
- Battery powered fairy lights
- Cotton batting
Step by step method
- Cover the door with a blue winter sky background.
- Cut houses in different sizes from cardboard.
- Add white rooflines and small window shapes.
- Arrange the houses along the lower half of the door.
- Place miniature trees between the houses and add cotton snow.
- Add battery powered lights around selected windows, keeping all wiring secure.
14. Giant Christmas Tree Made from Layered Evergreen Garlands
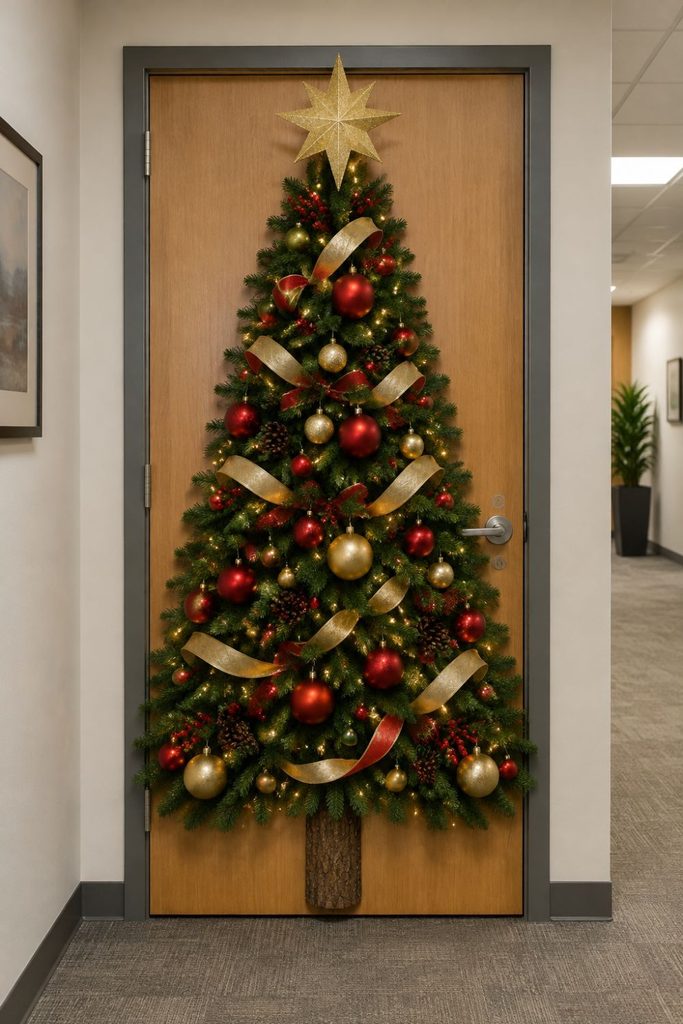
Build a full Christmas tree shape directly on the door using layered garlands. The triangular arrangement creates an instantly recognizable holiday display, while large ornaments and a bright star finish the design.
Materials needed
- Artificial evergreen garlands
- Red and gold baubles
- Wide ribbon
- Lightweight cardboard star
- Removable hooks
- Battery powered lights, if allowed
Step by step method
- Mark a large triangular tree outline on the door.
- Attach garlands in horizontal rows, starting near the top.
- Make each lower row slightly wider than the one above.
- Add ornaments in a balanced pattern.
- Place a large gold star at the top.
- Add a few lights and a paper tree trunk, then test the door’s movement.
15. Reindeer Stable with 3D Antlers and a Snow Covered Roof
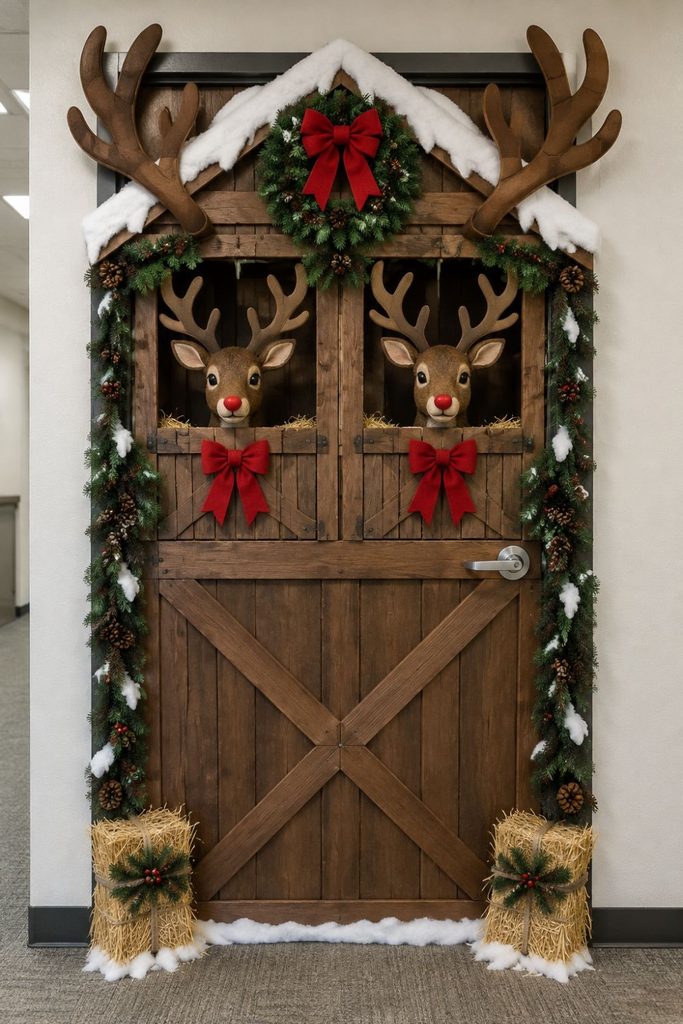
Give the doorway the appearance of a stable where Santa’s reindeer rest before Christmas Eve. Large antlers, a wooden style frame, and a snowy roof make this concept different from a standard reindeer decoration.
Materials needed
- Brown kraft paper
- Cardboard sheets
- White felt
- Brown and cream cardstock
- Green garland
- Removable adhesive
Step by step method
- Cover the door with brown paper to suggest wooden stable walls.
- Create a stable roof from cardboard and cover it with white felt.
- Cut large antler shapes from brown cardboard.
- Add reindeer faces or silhouettes to the stable openings.
- Decorate the frame with green garland and small red bows.
- Add a few paper hay bundles and snow details to finish the scene.
16. Giant Red Stocking Overflowing with Colorful Presents
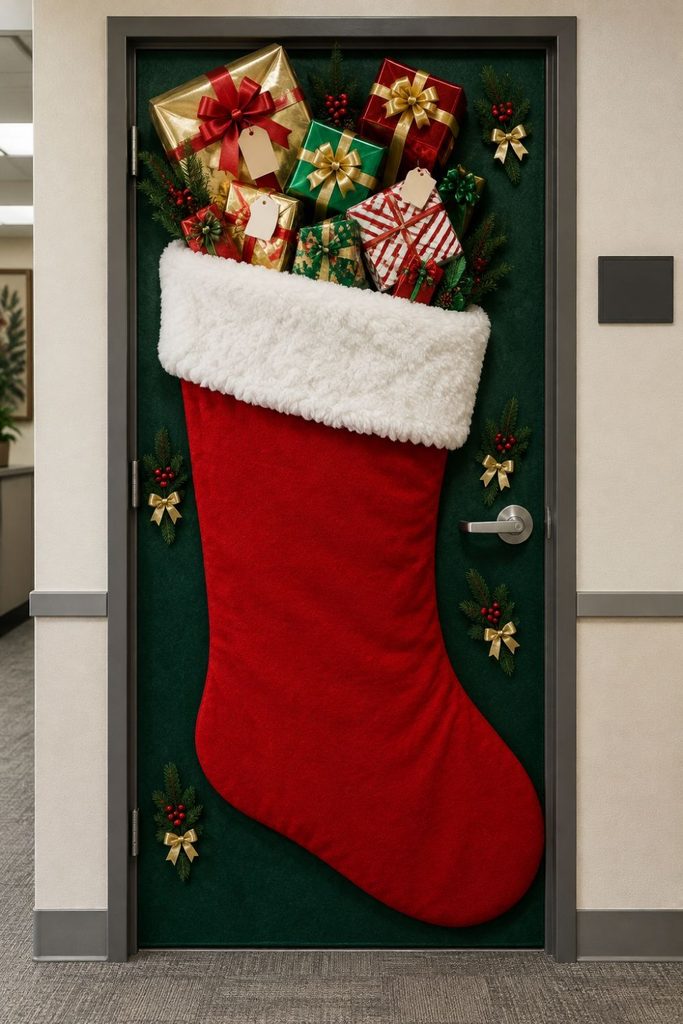
Turn the door into a giant Christmas stocking filled with small gifts. The curved stocking shape creates a strong visual focus, while the presents add color and dimension.
Materials needed
- Red felt or red poster paper
- White cotton batting
- Cardboard gift boxes
- Wrapping paper
- Fabric ribbon
- Removable adhesive
Step by step method
- Draw a large stocking outline on red felt or paper.
- Cut out the shape and attach it to the door.
- Add a wide white cuff near the top.
- Prepare lightweight empty gift boxes and wrap them in bright paper.
- Arrange the boxes so they appear to spill out of the stocking.
- Add bows and small paper stars, making sure nothing projects into the walkway.
17. Magical Winter Forest Entrance Inspired by Narnia
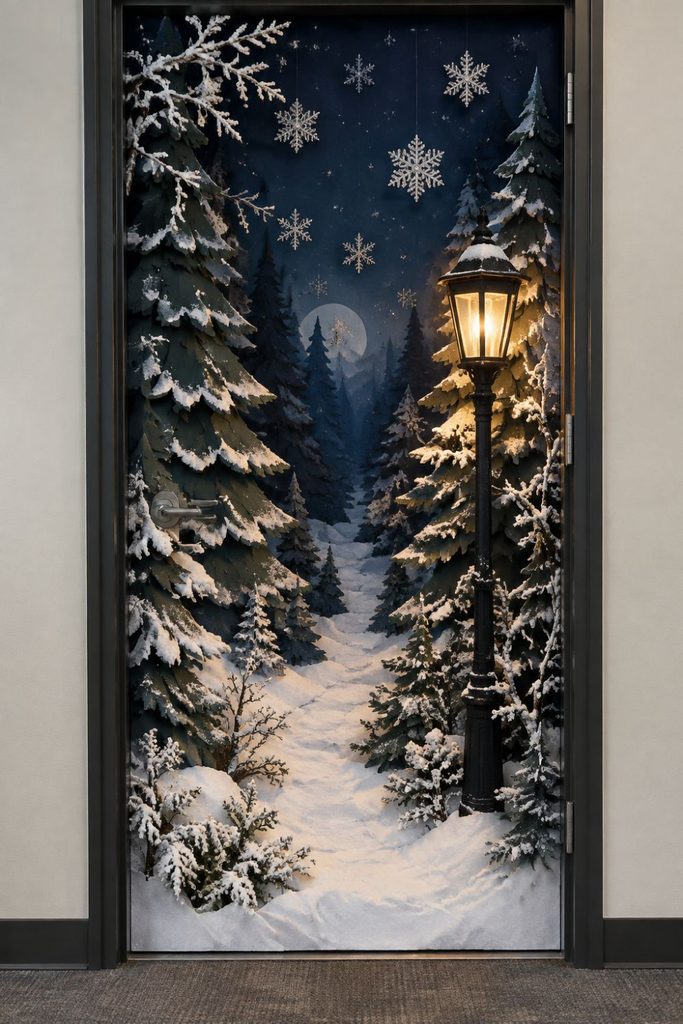
Create a snowy forest scene with tall pine trees, silver branches, and an old fashioned lamp post. The contrast between the dark trees and the snowy ground creates a dramatic winter entrance inspired by classic fantasy settings.
Materials needed
- Dark blue and white poster board
- Green cardstock
- Cardboard tree shapes
- Silver paper
- Battery powered lantern or paper lantern decoration
- Cotton batting
Step by step method
- Cover the door with dark blue paper.
- Cut tall evergreen tree silhouettes from green cardstock.
- Layer the trees along both sides of the door.
- Add white snow to the branches and ground.
- Create a lamp post from black cardboard and position it among the trees.
- Add silver snowflakes and a soft battery powered light, if permitted.
18. Christmas Gift Wrapping Station with Cascading Metallic Ribbons
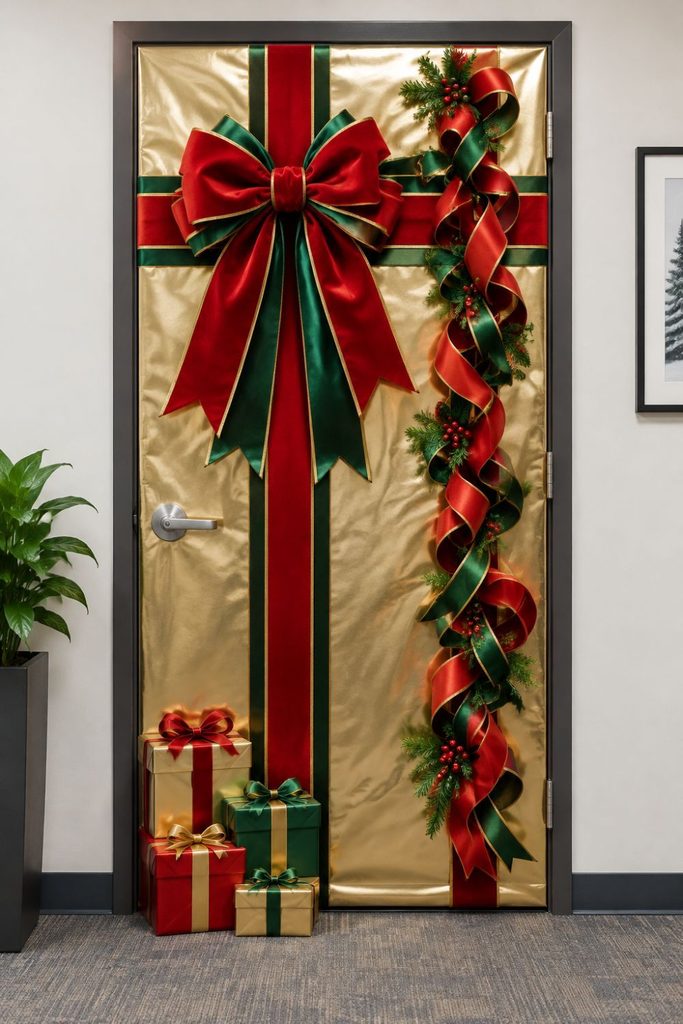
Create a door that resembles an extravagant gift wrapping station, with broad metallic ribbons and oversized bows. The design relies on strong shapes, reflective colors, and neat arrangement rather than many small decorations.
Materials needed
- Gold or silver wrapping paper
- Wide metallic ribbon
- Lightweight cardboard
- Red or green cardstock
- Removable tape
- Scissors and ruler
Step by step method
- Cover the door with gold or silver paper.
- Attach wide ribbon strips vertically and horizontally.
- Make several large bows from ribbon and lightweight cardboard.
- Place one main bow near the top center.
- Add cascading ribbon loops along one side of the door.
- Include a few small wrapped boxes near the bottom and smooth any uneven paper.
19. Penguin Igloo with a Sparkling Frozen Entrance
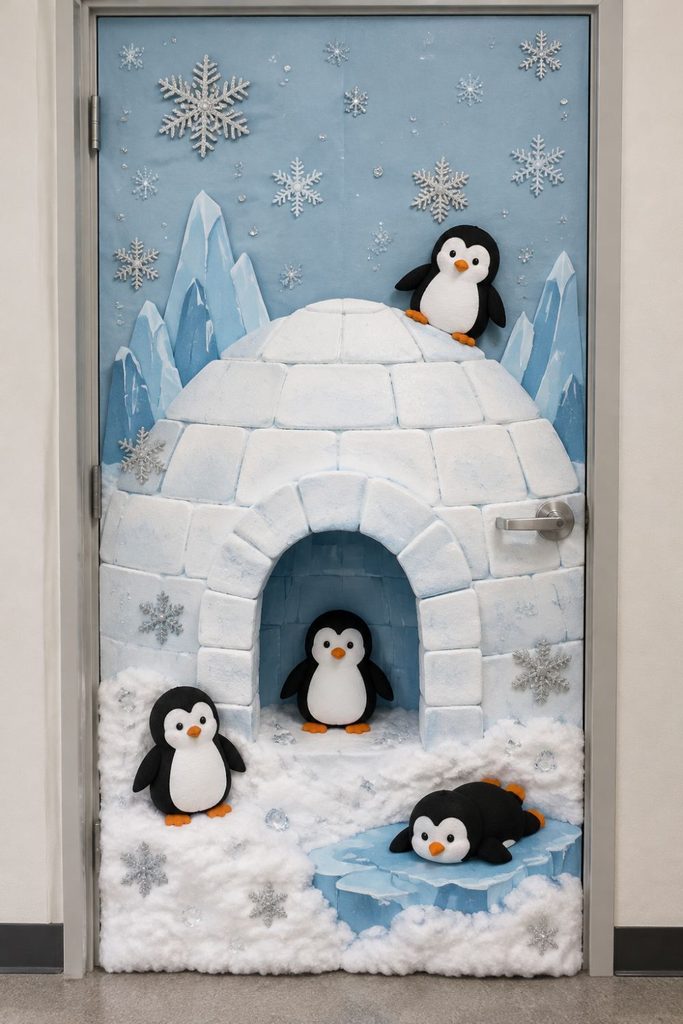
Create a cheerful snowy scene with an igloo entrance, little penguins, and icy blue details. The curved igloo shape and contrasting black and white figures make the design easy to recognize from a distance.
Materials needed
- White and pale blue cardstock
- Lightweight cardboard
- Black and white foam sheets
- Orange cardstock
- Silver paper
- Cotton batting
Step by step method
- Cover the door with pale blue paper.
- Cut a large igloo shape from white cardboard.
- Add curved lines to represent individual ice blocks.
- Make penguin figures using black and white foam shapes.
- Add orange beaks and feet, then place the penguins near the entrance.
- Decorate the ground with cotton snow and silver paper snowflakes.
20. Giant Gold Christmas Ornament with a Reflective Finish
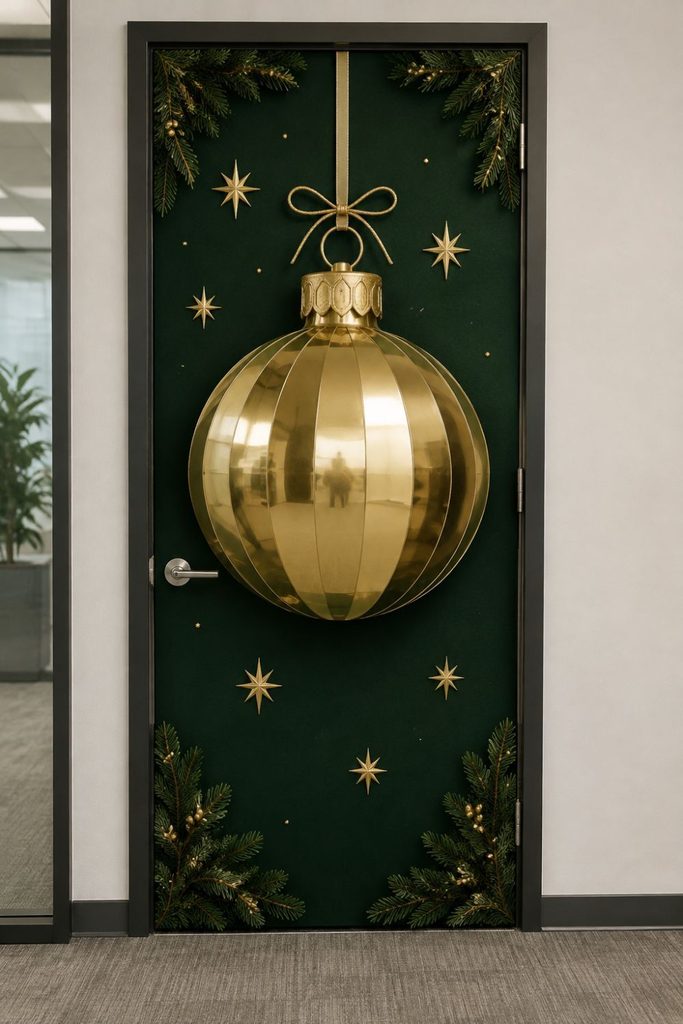
Create a bold, elegant display around one oversized gold ornament. Its rounded shape and metallic surface give the design a polished appearance, especially when paired with simple greenery and a contrasting background.
Materials needed
- Gold metallic cardstock or foil paper
- Large lightweight cardboard circle
- Black, cream, or dark green background paper
- Gold ribbon
- Green garland
- Removable adhesive
Step by step method
- Cover the door with a dark contrasting background.
- Cut a large circle from lightweight cardboard.
- Cover the circle with gold metallic paper.
- Add a small ornament cap and a gold hanging loop.
- Position the ornament in the center of the door.
- Add a simple evergreen border and a few small gold stars without distracting from the main shape.
21. Santa’s Workshop with a 3D Toy Conveyor Belt and Miniature Presents
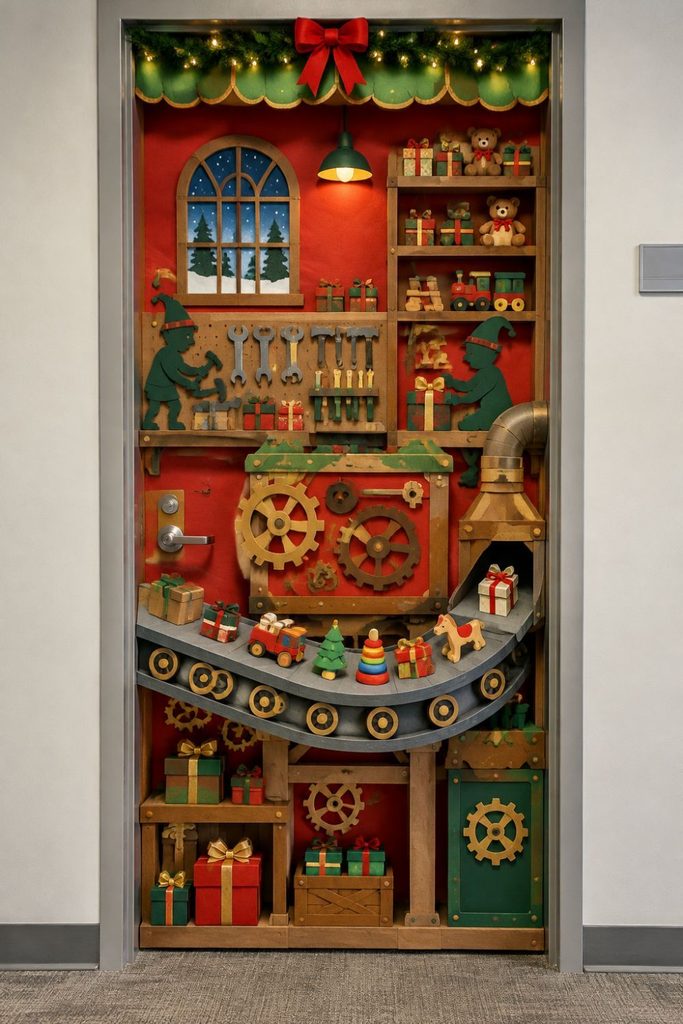
Turn the office entrance into Santa’s toy factory, featuring a conveyor belt carrying small gifts toward the packing area. The miniature boxes and workshop details create a layered scene that works well for a team project.
Materials needed
- Red, green, brown, and gray cardstock
- Lightweight cardboard strips
- Empty small gift boxes
- Paper rolls
- White poster board
- Removable adhesive
Step by step method
- Cover the door with a workshop themed background.
- Build a horizontal conveyor belt from gray cardboard strips.
- Add small cardboard rollers along the lower edge.
- Wrap empty boxes as miniature presents and place them on the belt.
- Create shelves, toy shapes, and a paper control panel around the scene.
- Add Santa or elf silhouettes near the conveyor belt and check that all decorations remain firmly attached.