

November can turn a classroom door into one of the happiest spots in the hallway. But that doesn’t mean you need to spend an entire weekend cutting paper leaves or building a complicated display.
The best Thanksgiving door decorations classroom ideas start with one large visual that people can recognize from several steps away. Add student names, drawings, gratitude notes, or little classroom details, and the door starts to feel like part of the class instead of a decoration placed over it.
For kindergarten through fifth grade, that personal touch matters. A child may walk past dozens of classroom displays without stopping, but they are much more likely to stop when they see their own name on a pumpkin or find a drawing they made hanging beside their classmates’ work.
You also don’t need expensive supplies. Most of the ideas below use construction paper, cardstock, markers, scissors, and removable adhesive. A few foam mounting squares can add some depth when you want certain pieces to stand away from the door.
Before decorating, check your school’s rules. Keep handles, windows, hinges, emergency signs, and required safety notices clear. If tape isn’t allowed directly on painted surfaces, use an approved removable adhesive.
Most importantly, don’t feel pressure to make every inch of the door busy. A giant centerpiece with plenty of breathing room will usually catch more attention than a door packed with tiny shapes.
Here are 19 Thanksgiving classroom door ideas that give students a visible place in the display.
The Giant Turkey Door With Student “Thankful Feathers” Surrounding the Classroom Name

Make one turkey the star instead of filling the door with lots of small turkeys. A giant brown body in the middle gives you a clear focal point, while student feathers spread behind it in a wide fan.
Materials Needed
- Brown construction paper or bulletin board paper
- Red, orange, yellow, green, and gold cardstock
- White paper
- Orange paper
- Black marker
- Scissors
- Removable adhesive
- Foam mounting squares, optional
Step by Step
- Cut a large turkey body for the center of the door.
- Make the head big enough to see from the end of the hallway.
- Add oversized eyes, a beak, feet, and red wattle.
- Cut one wide feather for every student.
- Write each child’s name near the top of their feather.
- Ask students to draw or write one thing they are thankful for.
- Place the classroom name across the turkey’s belly.
- Arrange the feathers in a fan behind the turkey.
- Alternate the colors so the tail doesn’t have large blocks of one color.
- Raise a few feathers with foam squares.
For kindergarten, a thankful drawing is easier than a written sentence. For older children, ask for a short sentence that says what they appreciate about their classroom.
Best for: Any grade, especially K to 2.
Make it faster: Precut all the feathers before the student activity.
The Pumpkin Patch Door Where Every Pumpkin Has a Student’s Name
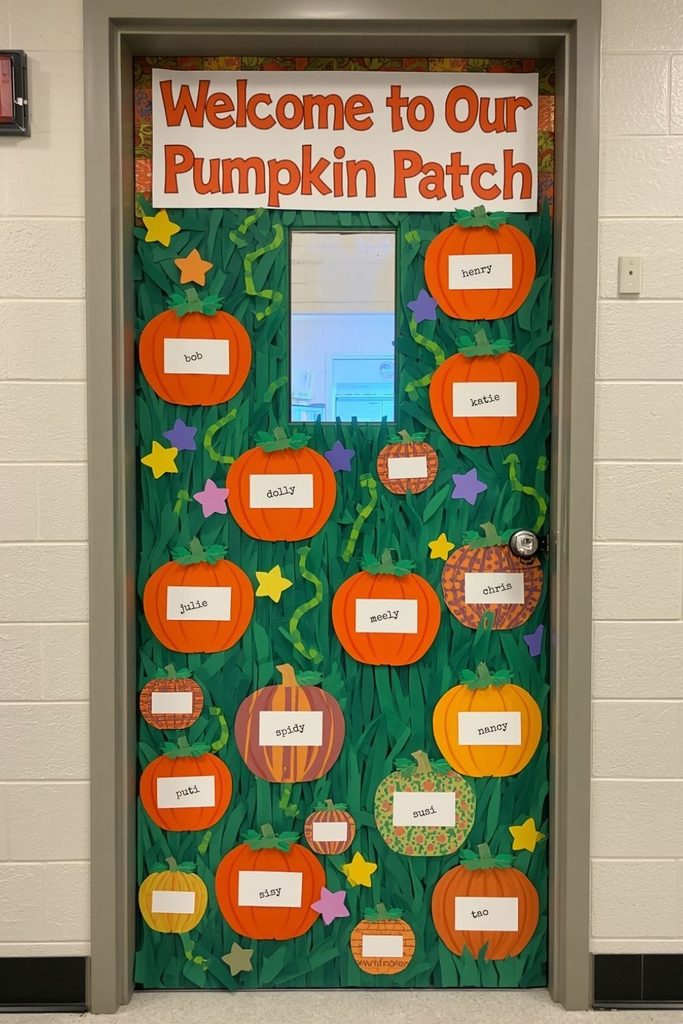
Turn the entire lower half of the door into a pumpkin patch. Instead of placing identical pumpkins in straight rows, use different sizes and overlap them so the display has some depth.
Materials Needed
- Orange cardstock
- Green construction paper
- Brown paper
- White or cream cardstock
- Black marker
- Scissors
- Removable tape
Step by Step
- Cover the bottom section of the door with green paper.
- Cut large, medium, and small pumpkins.
- Give each student one pumpkin.
- Put a child’s name across the middle.
- Add stems and leaves.
- Let students decorate their pumpkins with dots, stripes, stars, or simple drawings.
- Place large pumpkins along the bottom.
- Tuck medium pumpkins behind them.
- Fill open spaces with smaller pumpkins.
- Add green vines between the pumpkins.
- Write “Welcome to Our Pumpkin Patch” across the top.
Don’t worry about making every pumpkin identical. Small differences in shape and decoration will make the patch feel more like a collection made by children.
Hallway tip: Use dark lettering on orange pumpkins. Names need to be readable from several feet away.
The Cozy Cabin Door With a “Come On In” Thanksgiving Welcome Sign

For a softer fall look, turn the classroom door into a simple cabin entrance. Brown paper becomes the wooden background, while a small autumn wreath and a large welcome sign do most of the decorating.
Materials Needed
- Brown bulletin board paper
- Dark brown construction paper
- Cream cardstock
- Orange, red, and yellow paper
- Black marker
- Scissors
- Removable adhesive
- Optional yarn
Step by Step
- Cover the door with brown paper.
- Cut darker strips to resemble wooden boards.
- Run the strips horizontally across the door.
- Make a simple paper window near the top.
- Cut autumn leaves for a wreath.
- Arrange the leaves in a circle.
- Put the wreath above the center of the door.
- Make a large cream colored sign.
- Write “Come On In” in large letters.
- Add “Our Classroom Is Better With You Here.”
This one is especially useful if the hallway is already full of bright orange and red decorations. The brown and cream palette gives your door a calmer appearance.
Skip the paper window if your real door has one. Let the actual window become part of the cabin design.
The Turkey Tail Door Made From Colorful Student Portraits

Give each student a feather and let them turn it into a tiny self portrait. Once the feathers are assembled, the turkey tail becomes a collection of the children in your classroom.
Materials Needed
- Cardstock in several fall colors
- Brown construction paper
- White drawing paper
- Crayons or colored pencils
- Black marker
- Scissors
- Tape
Step by Step
- Cut a large turkey body.
- Make broad feather shapes from several colors.
- Give one feather to each student.
- Ask each child to draw themselves inside it.
- Have them write their name underneath.
- Add a small picture of something they enjoy at school.
- Arrange the feathers in a semicircle.
- Place the turkey body over the lower portion.
- Add the classroom name above the turkey.
Don’t worry if the portraits are simple. A collection of stick figures, curly hair, glasses, big smiles, and different skin tones will make the tail look far more personal than identical printed faces.
Best for: K to 5, especially when you want student artwork on the door.
The Giant Sweater Weather Door With Each Student as an Autumn Leaf

A giant sweater gives you a Thanksgiving season display without relying on the usual turkey. It can also stay up for most of November because the theme is fall rather than Thanksgiving Day alone.
Materials Needed
- Brown, cream, mustard, or rust colored paper
- Red, orange, yellow, and green cardstock
- Black marker
- Scissors
- Tape
- Optional yarn
Step by Step
- Cut one large sweater shape.
- Add a collar and cuffs.
- Draw simple knitted lines across the sweater.
- Cut leaves in several sizes.
- Put one student’s name on each leaf.
- Place some leaves directly on the sweater.
- Let other leaves appear to be falling around it.
- Add a few yarn lines to suggest stitching.
- Write “Sweater Weather Starts Here.”
- Add “So Glad You’re Part of Our Class.”
Keep the sweater large and the leaf shapes fairly simple. A hallway display needs bold shapes more than tiny details.
Student idea: Let each child choose their own leaf color. You’ll get a colorful mix without asking them to complete a complicated art project.
The Harvest Wagon Door Carrying Your Whole Class Into Thanksgiving

Imagine a big wooden wagon loaded with pumpkins, apples, corn, and leaves. Now replace some of that produce with student names. The result looks like a fall harvest while giving every child a spot in the picture.
Materials Needed
- Brown construction paper
- Black cardstock
- Orange, red, yellow, and green cardstock
- Markers
- Scissors
- Removable adhesive
Step by Step
- Cut a large wagon for the lower half of the door.
- Add two large wheels.
- Cut pumpkins, apples, leaves, and ears of corn.
- Put one student name on each piece.
- Layer the pieces inside the wagon.
- Let a few pumpkins overlap the top edge.
- Add a wagon handle if there is enough room.
- Write “Our Class Is Rolling Into Thanksgiving.”
- Scatter a few leaves around the wheels.
For a class of 25 or more: Use several types of produce. Giving every child a large pumpkin will make the display crowded.
Quick version: Make the wagon from one large brown shape and add only the wheels, produce, and lettering.
The Cornucopia Door Overflowing With Things Students Love About Their Classroom

Instead of filling a cornucopia with fruit, fill it with classroom favorites. A book, paintbrush, pencil, music note, game piece, heart, or tiny science beaker can say much more about your class than another row of pumpkins.
Materials Needed
- Brown paper
- Cardstock in fall colors
- White paper
- Markers
- Scissors
- Tape
Step by Step
- Cut a large curved cornucopia.
- Add darker strips to suggest woven material.
- Place the opening around the middle of the door.
- Cut paper objects connected to classroom activities.
- Give one object to each student.
- Ask children to write their name and favorite classroom activity.
- Arrange the objects so they appear to spill out.
- Add the words “Our Classroom Is Full of Good Things.”
- Finish with a few leaves around the edges.
A child who loves reading might decorate a paper book. A student who loves art could get a paintbrush. Someone who talks about science every day might choose a beaker.
That variety is what makes the display worth stopping to read.
The “Pull Up a Chair” Thanksgiving Table Door With a Place Setting for Every Student

This display has one simple message: everyone gets a seat. Make a long table across the lower half of the door and give each student a place setting.
Materials Needed
- Tan or brown paper
- White cardstock
- Cream paper
- Orange and red cardstock
- Black marker
- Scissors
- Tape
Step by Step
- Cover the lower half of the door with tan paper.
- Add a darker strip along the top to represent the table edge.
- Cut one paper plate for every student.
- Put a child’s name on each plate.
- Add simple forks, spoons, cups, and napkins.
- Arrange the settings in rows.
- Place a turkey or pumpkin in the middle as the centerpiece.
- Write “Pull Up a Chair” above the table.
- Add “There’s a Place for You Here.”
- Finish the border with several autumn leaves.
The plates don’t need to look realistic. Simple circles work fine.
Try this with the class: Ask students what they would put on a classroom Thanksgiving table. Books, friends, recess, crayons, pets, and pizza may appear on the list. Choose a few of the funniest answers for the centerpiece.
The Giant Scarecrow Door With Students’ Names Hidden Among the Autumn Leaves

Give your scarecrow an oversized hat and a friendly face, then turn the surrounding leaves into a little name hunt.
Materials Needed
- Brown paper
- Tan cardstock
- Orange, red, yellow, and green paper
- Black marker
- Scissors
- Tape
- Optional yarn
Step by Step
- Cut a large scarecrow body.
- Make an oversized floppy hat.
- Add a simple face.
- Use thin yellow strips for straw.
- Cut autumn leaves in several sizes.
- Put one student’s name on each leaf.
- Arrange the leaves around the scarecrow.
- Tuck a few behind the scarecrow’s arms.
- Place several near the hat.
- Add “Welcome, Friends!” at the top.
For younger students, finding their name can become part of the morning routine. If you have first graders still practicing name recognition, use large printed letters.
A fun touch: Hide one leaf with the teacher’s name on it too.
The Thankful Tree Door With 3D Leaves That Create a Giant Classroom Canopy

A thankful tree becomes much more interesting when some leaves stand away from the door. You can create that raised effect with a simple fold rather than complicated paper construction.
Materials Needed
- Brown construction paper
- Red, orange, yellow, and gold cardstock
- Black marker
- Scissors
- Removable adhesive
- Foam mounting squares, optional
Step by Step
- Cut a thick tree trunk.
- Add branches that spread toward the upper corners.
- Cut one leaf for each student.
- Put a student’s name on each leaf.
- Ask children to add something they appreciate.
- Fold each leaf gently down the center.
- Attach some leaves flat.
- Raise others with foam squares.
- Add fallen leaves at the bottom.
- Write “Gratitude Grows Here.”
Don’t raise every leaf. A mixture of flat and raised pieces gives the tree more depth and saves you a lot of adhesive.
Best for: A class that already has a gratitude activity planned.
The Thanksgiving Mailbox Door Filled With Colorful “You Belong Here” Notes
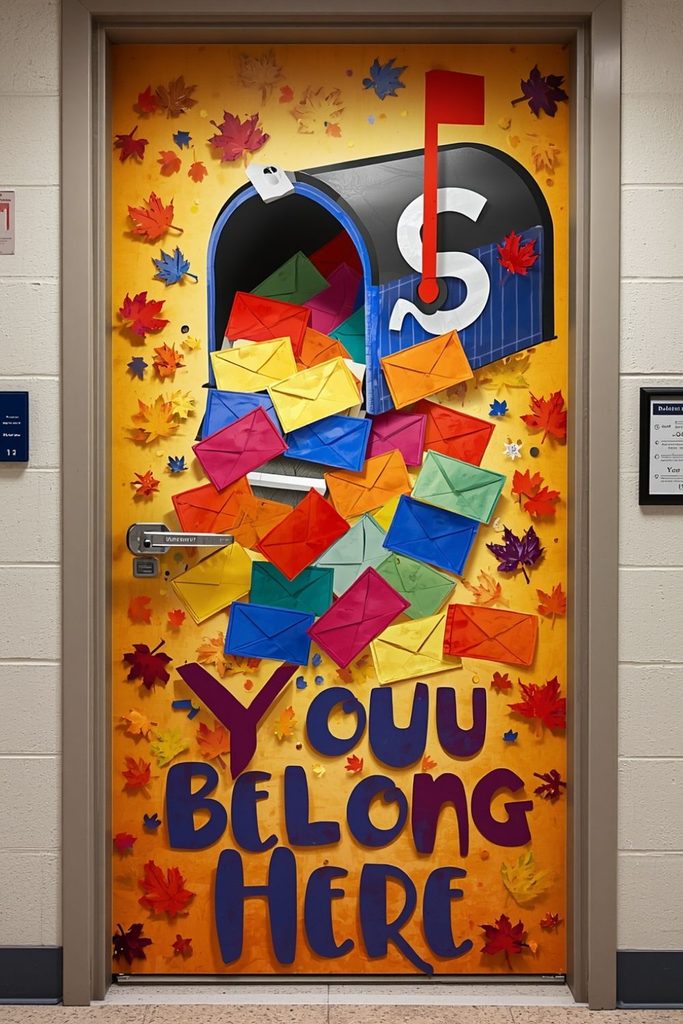
A giant mailbox is a refreshing change from the standard turkey display. Fill it with colorful envelopes and turn the decoration into a kindness activity.
Materials Needed
- Blue, cream, or red paper
- Cardstock in several colors
- White paper
- Black marker
- Scissors
- Tape
- Optional real envelopes
Step by Step
- Cut a large mailbox shape.
- Add a rounded top.
- Attach a red flag.
- Put the mailbox in the middle of the door.
- Cut colorful envelope shapes.
- Give each student two envelopes.
- Ask children to write short kind notes.
- Put the writer’s name on the back.
- Arrange the envelopes as though they are coming out of the mailbox.
- Write “You Belong Here” above it.
- Add a few leaves around the sides.
Keep the notes short enough that students can finish them during a normal class period.
If you are concerned about students being left out, don’t assign notes to individual classmates. Ask everyone to write something they appreciate about the class instead.
Hallway tip: Make the mailbox at least half the width of the door. A tiny mailbox will lose the visual impact.
The “Kindness Harvest” Door Where Student Names Grow From a Paper Garden

Instead of harvesting pumpkins, harvest kindness. Each student becomes a flower, vegetable, or plant growing from a strip of paper soil.
Materials Needed
- Brown paper
- Green construction paper
- Yellow, orange, red, and pink cardstock
- Markers
- Scissors
- Tape
Step by Step
- Cover the bottom part of the door with brown paper.
- Cut green stems.
- Add leaves.
- Make flowers, pumpkins, or vegetables.
- Put one student name on each plant.
- Add one positive word to each name.
- Arrange the plants at different heights.
- Add a paper watering can.
- Put a few seed shapes in the soil.
- Write “Kindness Grows Here.”
For younger children, choose the positive words yourself. Older students can nominate classmates for words such as helpful, patient, creative, funny, or thoughtful.
Design trick: Don’t line the plants up like a fence. Vary their heights so the garden has more movement.
The Giant Pie Door With Each Slice Representing Something Special About the Class

If every classroom in the hallway has a turkey, put a giant pie on your door instead. Divide it into large slices and let each slice represent something your students enjoy.
Materials Needed
- Golden brown paper
- Dark brown paper
- Cream cardstock
- Markers
- Scissors
- Tape
- Optional cotton balls
Step by Step
- Cut one large circular pie.
- Add a darker crust around the edge.
- Divide it into six to eight slices.
- Add cream paper “whipped cream.”
- Label each slice with a class favorite.
- Use categories such as Reading, Science, Art, Music, Friendship, Games, or Recess.
- Put student names near their favorite category.
- Write “A Class Full of Good Things” above the pie.
- Add a few paper leaves around the outside.
Let students vote on the categories before you make the slices.
And yes, if “Recess” wins the largest slice, that’s perfectly acceptable.
The Autumn Hot Air Balloon Door Carrying Students’ Names Above a Fall Scene
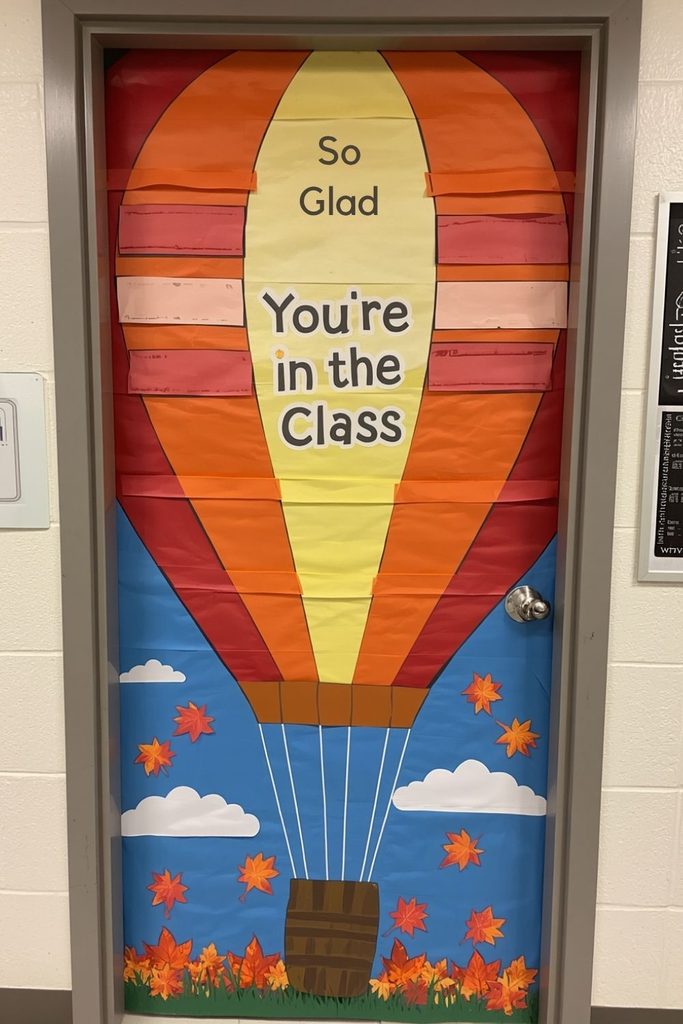
A hot air balloon is a smart choice for a narrow door because its shape naturally fills the space from top to bottom. Student names can sit inside the balloon panels while a small basket hangs underneath.
Materials Needed
- Red, orange, yellow, blue, and cream paper
- Brown cardstock
- White paper
- Black marker
- Scissors
- Tape
Step by Step
- Cut one large balloon.
- Divide it into six or eight curved panels.
- Alternate the colors.
- Put student names inside the panels.
- Cut a small brown basket.
- Connect the basket with narrow paper strips.
- Add two or three clouds.
- Scatter autumn leaves near the bottom.
- Write “So Glad You’re in Our Class” across the balloon.
Don’t shrink the names just to fit every student into a tiny balloon. If you have a large class, make the balloon wider.
Best for: Narrow doors and classrooms with large class lists.
The “Our Class Is Full of Good Things” Door Designed Like a Thanksgiving Market

Turn the door into a little market stall. Striped awnings create the recognizable market look, while the items underneath represent qualities and activities your students bring to class.
Materials Needed
- Red and cream paper
- Orange and brown cardstock
- Green paper
- Markers
- Scissors
- Tape
Step by Step
- Make a striped awning across the upper part of the door.
- Create three or four simple stalls.
- Label them Kindness, Friendship, Creativity, Curiosity, or Teamwork.
- Cut paper fruits and vegetables.
- Give one item to each student.
- Ask each child to write their name and one quality they bring to class.
- Place the items in the matching stalls.
- Add pumpkins and leaves along the bottom.
- Write “Our Class Is Full of Good Things” above the awning.
You don’t need to build baskets or complicated shelves. A few rectangles beneath a striped awning will be enough.
For older students: Let them choose the quality they think belongs on their own market item.
The Turkey Crossing Door With Student Names as Colorful Roadside Signs

Give your Thanksgiving turkey somewhere to go. A black road across the bottom of the door makes the turkey look as though it is crossing the hallway, while student names become colorful roadside signs.
Materials Needed
- Brown paper
- Black cardstock
- White paper
- Yellow, red, orange, and green cardstock
- Markers
- Scissors
- Tape
Step by Step
- Cut a black road across the lower third of the door.
- Add a white center line.
- Cut one large turkey.
- Give it oversized orange feet.
- Position it halfway across the road.
- Cut small roadside signs.
- Put one student name on each sign.
- Add words such as Kindness, Teamwork, Reading, or Creativity to some signs.
- Point the signs in different directions.
- Add a large “Turkey Crossing” sign.
Tiny detail that can make kids laugh: Give the turkey a backpack.
You can also put a stack of books beside the turkey if you want the display to connect with school life.
The Giant Acorn Door With Each Student as a “Little Acorn Ready to Grow”

Acorns don’t appear on nearly as many classroom doors as pumpkins, which gives this idea a fresh look. Make one oversized acorn the centerpiece and surround it with smaller acorns carrying student names.
Materials Needed
- Brown cardstock
- Tan paper
- Green, orange, and yellow paper
- Black marker
- Scissors
- Tape
Step by Step
- Cut one very large acorn.
- Add a lighter brown cap.
- Make one smaller acorn for every student.
- Put a name on each acorn.
- Arrange the smaller acorns around the centerpiece.
- Add autumn leaves between them.
- Write “Little Acorns, Big Dreams” at the top.
- Add “We Grow Together” underneath.
- Leave some open space around the large acorn.
For kindergarten, let children decorate their acorns with dots and stripes.
For older students, ask them to write one goal they have for the school year.
Best for: A classroom already talking about growth, goals, or learning.
The “Gathered With Gratitude” Door Framed Like a Warm Thanksgiving Fireplace

A paper fireplace can make a classroom entrance look warm without requiring a giant collection of tiny decorations. Build the frame with paper bricks, then use stockings with student names to personalize it.
Materials Needed
- Red, brown, and cream construction paper
- Black paper
- Orange and yellow cardstock
- Markers
- Scissors
- Tape
Step by Step
- Cut brick shapes from red and brown paper.
- Arrange them around the outside of the door.
- Leave the center open for the fireplace.
- Cut a black rectangle for the fireplace opening.
- Add orange and yellow flames.
- Make a cream colored mantel.
- Cut one stocking for every student.
- Put names on the stockings.
- Hang them across the mantel.
- Write “Gathered With Gratitude” above the fireplace.
- Add pumpkins near the bottom.
You don’t have to cover the entire door with bricks. A brick frame around the main fireplace will save paper and still make the idea clear.
Make it faster: Use one large red background and draw the brick pattern with a black marker instead of cutting individual bricks.
The Giant Fall Quilt Door Made From Personalized Squares for Every Student
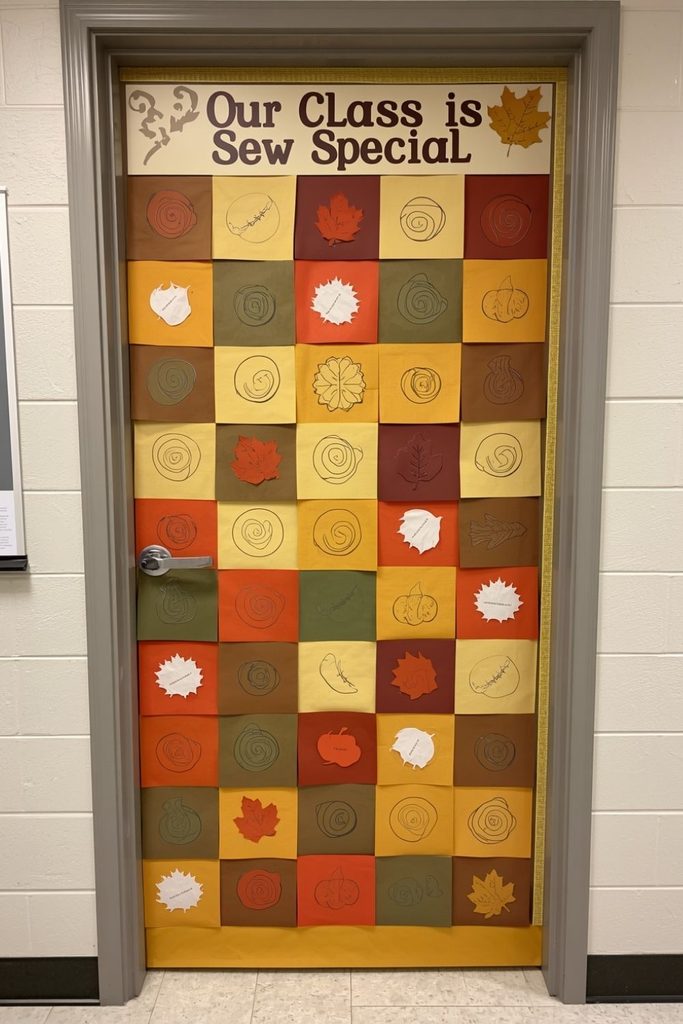
A paper quilt gives every child exactly the same amount of space. That makes it especially useful when you want to display student artwork without one large drawing taking over the entire door.
Materials Needed
- Cardstock in six or more fall colors
- Cream or white paper
- Black markers
- Ruler
- Scissors
- Tape
- Optional stickers
Step by Step
- Measure the door before cutting anything.
- Decide how many squares fit across and down.
- Cut every square to the same size.
- Give one square to each student.
- Ask children to add their name and a small picture.
- Suggest subjects such as a favorite book, hobby, animal, family activity, or classroom memory.
- Arrange the squares in rows.
- Alternate colors so matching colors aren’t touching.
- Add several Thanksgiving squares with leaves, pumpkins, or turkeys.
- Write “Our Class Is Sew Special” above the quilt.
- Add a cream border.
For younger students: Keep the prompt simple and let them draw.
For older students: Ask them to add a one sentence explanation beneath their picture.
If you have 30 students, don’t force the quilt into a perfect rectangle. A slightly taller arrangement will look better than shrinking every square until the artwork is impossible to see.
Which Thanksgiving Door Idea Should You Choose?
You don’t have to choose the most complicated design. Start with the amount of time you actually have.
Need something quick? The pumpkin patch, acorn, or thankful tree can come together quickly once the large shapes are cut.
Want every student involved? Go with the thankful turkey, student portrait turkey, mailbox, or quilt.
Have a narrow door? The hot air balloon and giant acorn use vertical space well.
Want something that doesn’t look like every other Thanksgiving door? Try the mailbox, giant pie, market, sweater, or fireplace.
Have a large class? Use small leaves, apples, acorns, or market items for names instead of trying to give every child a huge centerpiece.
Want a display that can stay up through November? The sweater, cabin, acorn, quilt, and kindness garden don’t depend on Thanksgiving Day alone.
One more thing: don’t try to finish everything during a single evening if students can help. Cutting the main shapes ahead of time and letting children complete their own feathers, leaves, pumpkins, notes, or quilt squares turns the decorating into a short classroom activity.