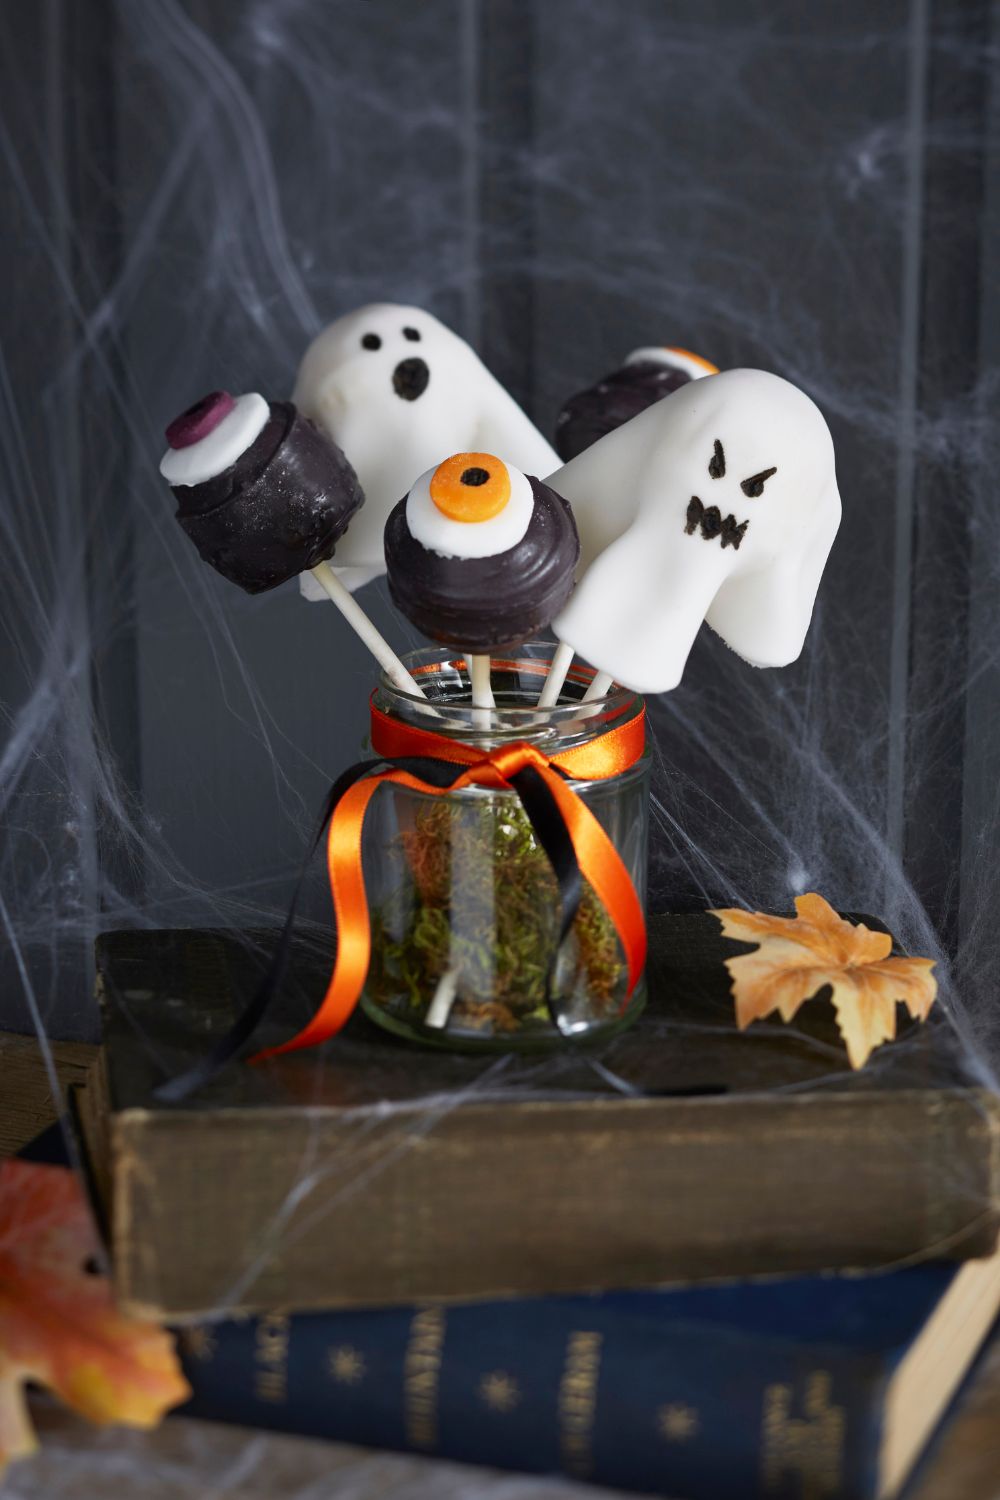
Halloween is a special season where children and parents can spend time together creating decorations, playful characters, and handmade surprises. These halloween crafts for kids are perfect for families who want affordable activities that encourage creativity, imagination, and happy memories at home. From glowing lanterns to silly monsters, each project brings a fun way for children to enjoy the holiday.
Making homemade Halloween decorations does not require expensive supplies or complicated steps. Simple items like paper rolls, jars, leaves, and cardboard can become amazing creations with a little paint and imagination. Parents can enjoy watching children build confidence while making decorations they feel proud to display.
Glow-in-the-Dark Ghost Mason Jar Lanterns
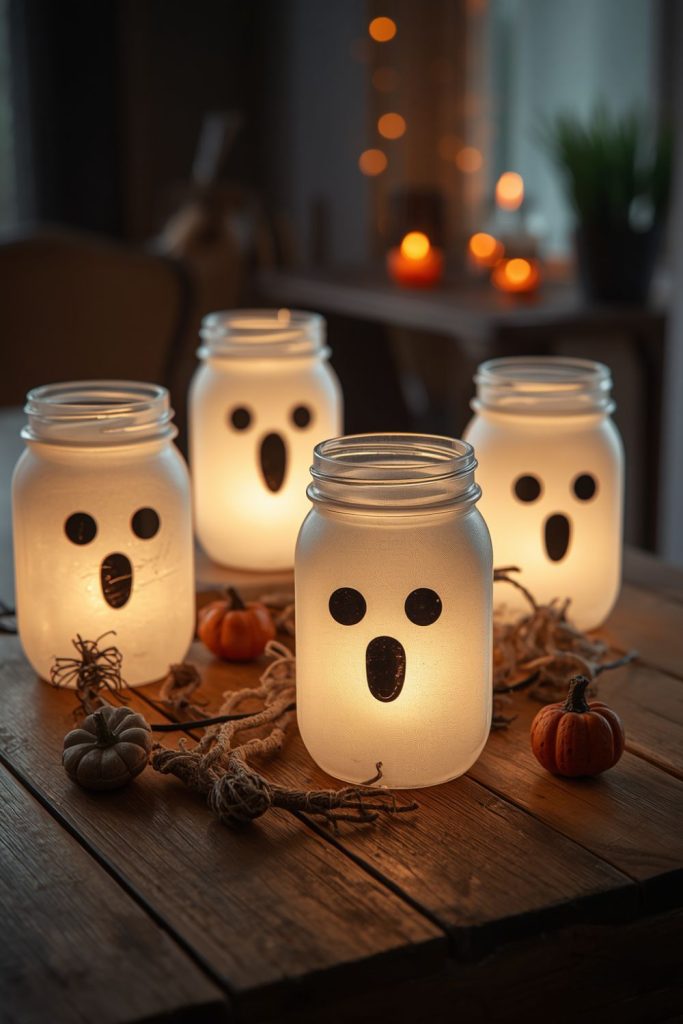
Glow in the dark ghost lanterns are a fun way to add a spooky but friendly touch to Halloween decorations. This project is one of the favorite halloween crafts for kids because it combines creativity with a magical glowing effect that children love. A simple glass jar can become a cute ghost character that lights up a bedroom shelf, party table, or front porch area. Kids can create different ghost faces, from happy smiles to funny surprised expressions, making each lantern feel personal.
Steps to make Glow in the Dark Ghost Mason Jar Lanterns:
- Clean and dry a mason jar before starting the project.
- Paint the jar white or cover it with white tissue paper.
- Allow the paint or glue to dry completely.
- Add eyes and a mouth using paint, stickers, or markers.
- Place a battery operated LED light inside the jar.
- Decorate the outside with ribbons or small Halloween shapes.
Children enjoy watching their ghost lantern shine when the room becomes darker. Parents can help younger children with cutting and gluing while allowing them to choose the face design and decorations. The finished lanterns can be placed together to create a small ghost family display. This activity also teaches children how ordinary household items can become something exciting through creative thinking. Since the lantern uses safe LED lights, kids can enjoy the glowing effect without worry. It is a simple project that brings Halloween spirit into any home.
- Related post Winning Halloween Door Decorations Classroom Contest Ideas for Teachers Who Love to Wow
Toilet Paper Roll Hanging Bats
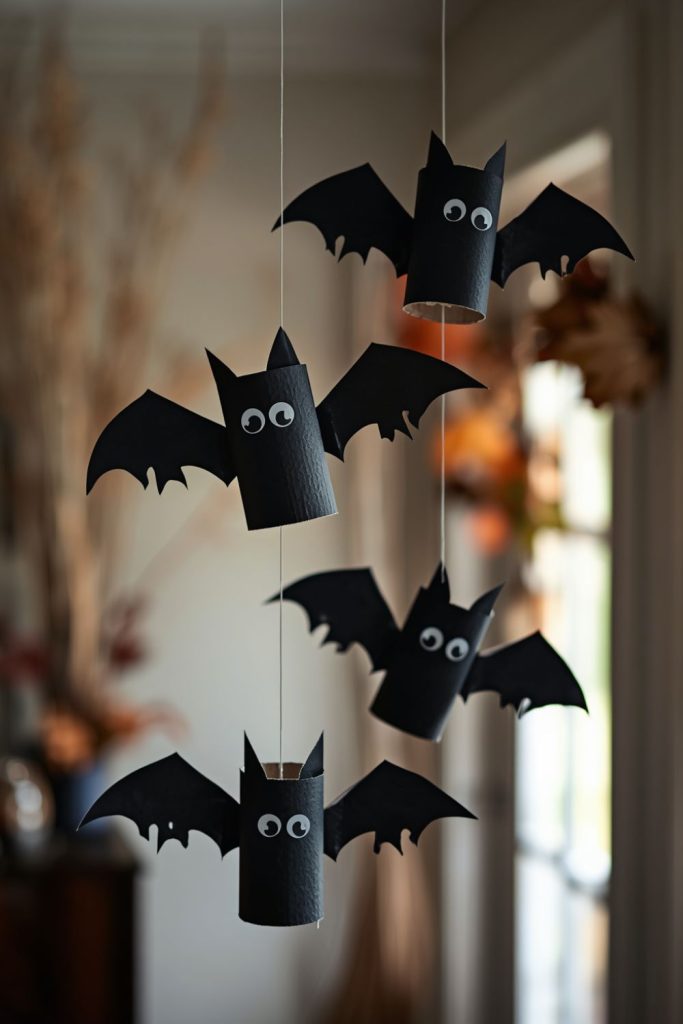
Empty toilet paper rolls can become adorable flying bats with a few simple supplies. This activity is a great choice for parents searching for halloween crafts for kids that are affordable and easy to prepare. Instead of throwing away cardboard rolls, children can transform them into decorations that add a playful Halloween feeling to bedrooms, classrooms, and family spaces.
Steps to make Toilet Paper Roll Hanging Bats:
- Collect clean toilet paper rolls for the project.
- Paint each roll black and allow it to dry.
- Cut bat wings from black paper or cardboard.
- Attach wings to both sides of the roll.
- Add eyes, fangs, and funny expressions.
- Tie string on top to hang the bats.
Kids can create a whole group of bats with different personalities. Some bats can have big eyes, tiny smiles, colorful wings, or silly faces. Parents can hang them near windows, doorways, or from the ceiling to create a flying bat display. Younger children can focus on painting and decorating, while older children can help with cutting shapes and arranging the display.
This project also helps children learn about recycling because they are using something that would usually be thrown away. The lightweight design makes the bats easy to move around, so kids can use them for pretend play after decorating. Creating several bats together can become a fun family activity during Halloween week.
Paper Plate Pumpkin Faces with Interchangeable Expressions
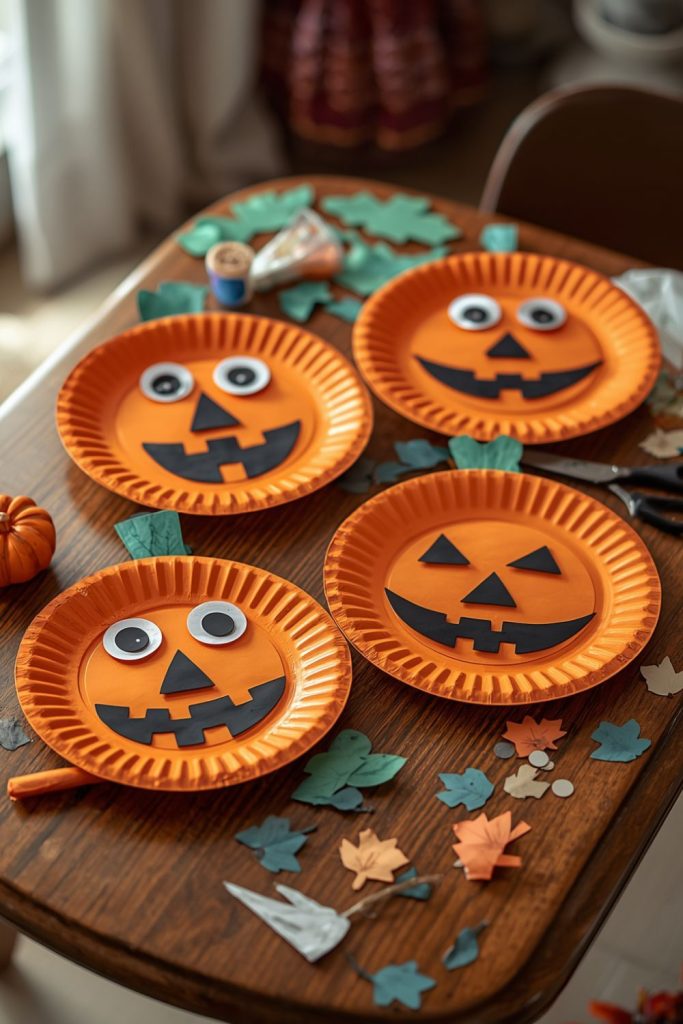
Paper plate pumpkins are a creative activity that allows children to design many different pumpkin faces without making a permanent change. This makes them a fun choice among halloween crafts for kids because children can keep playing with their creations even after the project is finished. Instead of creating only one pumpkin face, kids can make different expressions depending on their mood.
Steps to make Paper Plate Pumpkin Faces:
- Paint a paper plate orange and let it dry.
- Cut a green stem shape from paper.
- Create different eyes, noses, and mouths from black paper.
- Attach reusable stickers or small fasteners.
- Change the pumpkin face whenever you want.
- Display the finished pumpkin on a wall or table.
Children can create happy pumpkins, silly pumpkins, sleepy pumpkins, or funny monster pumpkins. This activity encourages imagination because there are endless ways to arrange the facial pieces. Parents can prepare different shapes before the activity, allowing younger children to focus on designing their pumpkin.
The interchangeable face idea also makes this project useful for classroom activities or family Halloween games. Children can create a pumpkin character and tell a short story about it. The craft is simple, low cost, and enjoyable for different age groups. With only a paper plate and a few decorations, kids can create something colorful that brings Halloween excitement into their space.
Coffee Filter Watercolor Ghost Decorations
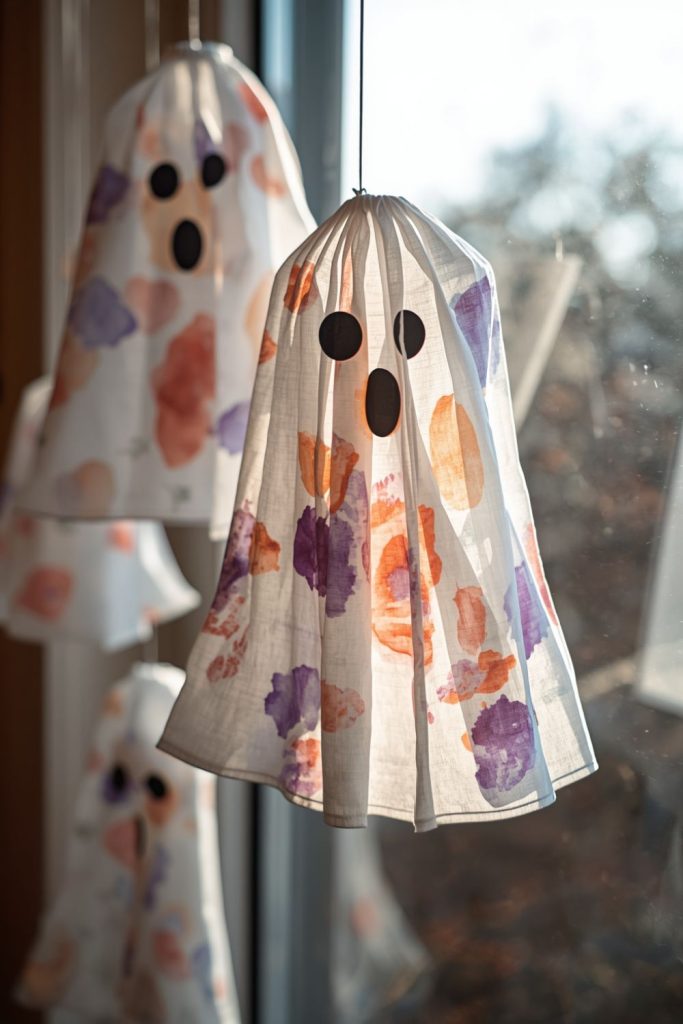
Coffee filter ghosts are soft, colorful decorations that bring a gentle Halloween style to any room. This project is perfect for younger children because it uses simple painting techniques and allows them to experiment with colors. Many parents choose this activity among halloween crafts for kids because it creates beautiful decorations without requiring complicated materials.
Steps to make Coffee Filter Watercolor Ghost Decorations:
- Place a coffee filter on a protected surface.
- Color the filter with washable markers or watercolors.
- Spray a small amount of water to blend the colors.
- Let the filter dry completely.
- Shape the filter into a ghost form.
- Add eyes and facial details.
The blending colors create soft patterns that make every ghost look different. Children can use traditional Halloween colors like purple and orange or create colorful friendly ghosts with pink, blue, and green shades. Once dry, the ghosts can be hung near windows, on walls, or from shelves.
Parents can turn this activity into a conversation about colors and patterns while children create their decorations. Younger kids enjoy watching the colors spread, while older children can experiment with different designs. Adding ribbons, paper hats, or small accessories gives each ghost a fun personality.
These decorations are lightweight and easy to store, making them a practical choice for families who enjoy saving handmade Halloween items each year.
Egg Carton Spiders with Pipe Cleaner Legs
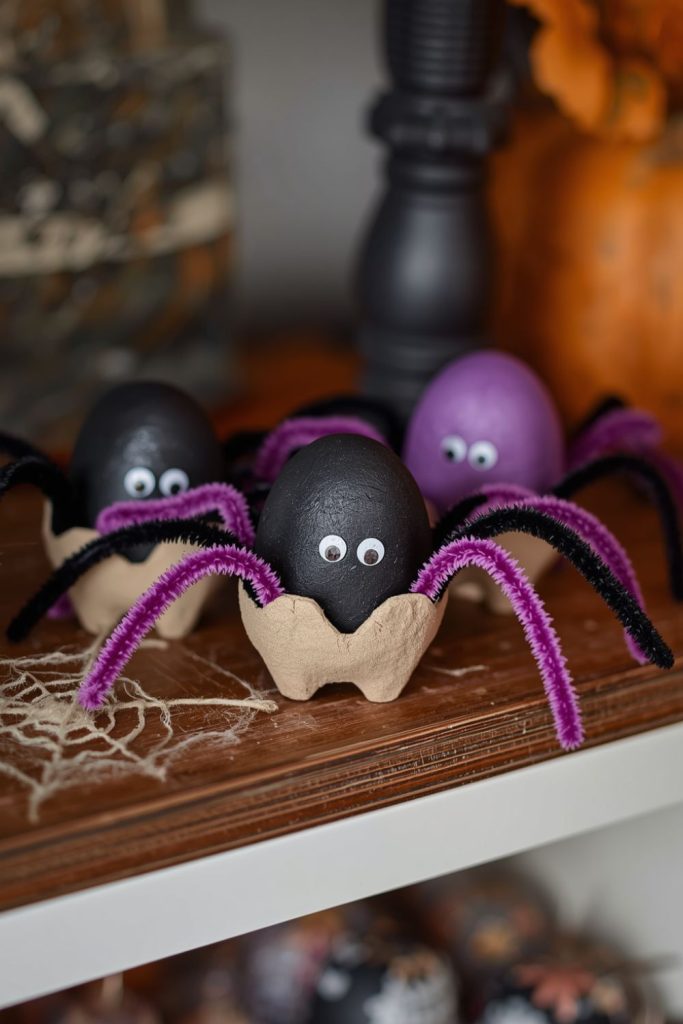
Egg carton spiders are a fun recycled activity that turns everyday packaging into cute Halloween characters. This project works well for children who enjoy painting, building, and creating small creatures. It is one of the most budget friendly halloween crafts for kids because the main material is something many families already have at home.
Steps to make Egg Carton Spiders:
- Cut individual cups from an empty egg carton.
- Paint each piece using Halloween colors.
- Add pipe cleaners to create spider legs.
- Glue eyes onto the front.
- Add extra details like smiles or patterns.
- Place spiders around your home as decorations.
Children can make black spiders, colorful spiders, or friendly cartoon style spiders. The flexible pipe cleaner legs allow kids to move them into different positions, making the spiders look like they are walking or climbing. Parents can help younger children attach the legs while letting them choose colors and facial expressions.
This activity introduces children to recycling while allowing them to create something playful from simple materials. A group of egg carton spiders can be placed on shelves, tables, or homemade spider webs for Halloween decoration. Kids can also use them during pretend play by creating stories about their handmade spider characters.
The project is simple enough for preschool children but still enjoyable for older kids who want to add more details. It is a great example of how basic household supplies can become creative Halloween decorations.
Flying Witch Silhouette Moon Canvas Art
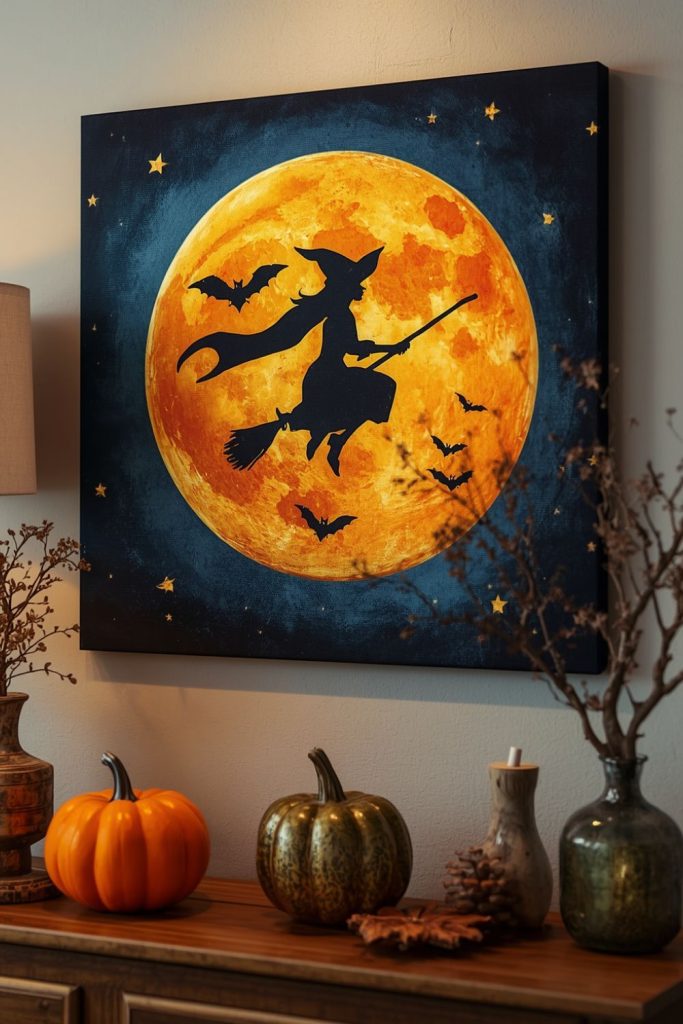
Flying witch silhouette art is a beautiful project for children who enjoy painting and creating Halloween scenes. This activity is a wonderful choice among halloween crafts for kids because it allows children to create a spooky night picture using simple colors and shapes. The finished artwork can be displayed on bedroom walls, shelves, or family areas during the Halloween season. Children can create a bright moon, a dark sky, and a flying witch shape that gives the painting a classic Halloween feeling.
Steps to make Flying Witch Silhouette Moon Canvas Art:
- Paint a small canvas or thick paper with dark blue or purple colors.
- Create a large moon shape using yellow or white paint.
- Draw or cut out a witch silhouette shape.
- Attach or paint the witch flying across the moon.
- Add stars, clouds, or tiny bats around the scene.
- Let the artwork dry before displaying it.
Children can add their own ideas by changing the moon size, adding a castle in the background, or creating a group of flying witches. Parents can help younger children with drawing shapes while allowing them to choose colors and details. This activity helps children practice painting skills and encourages storytelling because they can create a story about the witch in their artwork.
The finished canvas becomes more than just a decoration because it represents the child’s own creativity. Families can create several paintings and display them together as a Halloween art collection. This project is also suitable for classrooms, play groups, or weekend family activities.
Cardboard Coffin Halloween Treat Boxes
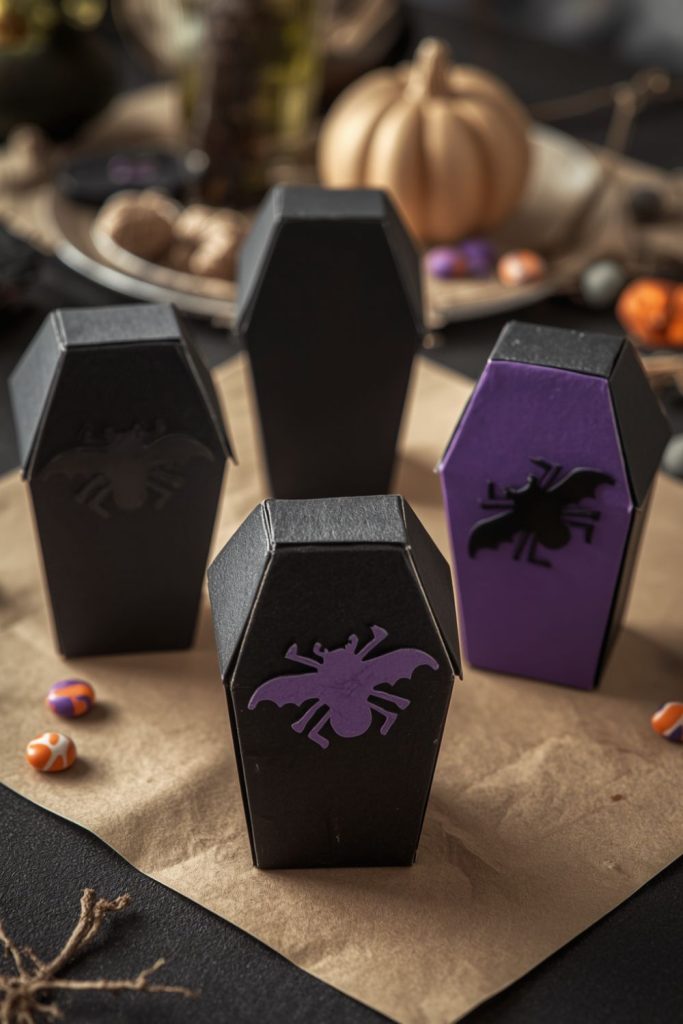
Cardboard coffin treat boxes are a fun way to combine Halloween decorations with party surprises. These small boxes are perfect for holding candy, stickers, or tiny toys during Halloween celebrations. Parents looking for halloween crafts for kids often choose this activity because children can design their own spooky containers while practicing cutting, coloring, and decorating skills.
Steps to make Cardboard Coffin Halloween Treat Boxes:
- Draw a coffin shape on cardboard and cut it carefully.
- Create matching top and bottom pieces.
- Glue the sides together to form a small box.
- Paint the box black, gray, or purple.
- Add spooky decorations like bats, skulls, or spider designs.
- Fill the box with small Halloween treats.
Children can create friendly coffin boxes with funny faces instead of scary designs. Some may enjoy adding glitter, stickers, ribbons, or paper decorations to make their boxes stand out. Parents can help with cutting thicker cardboard while children focus on decorating and adding personal touches.
These treat boxes are useful for Halloween parties because children can make one for each guest. They can also be used as room decorations or small storage containers after the holiday. Making these boxes gives children a chance to create something useful while enjoying the excitement of Halloween preparation.
This activity works well for older children who enjoy detailed designs, but younger children can also join by painting and decorating pre cut shapes prepared by adults.
Monster Paper Bag Hand Puppets
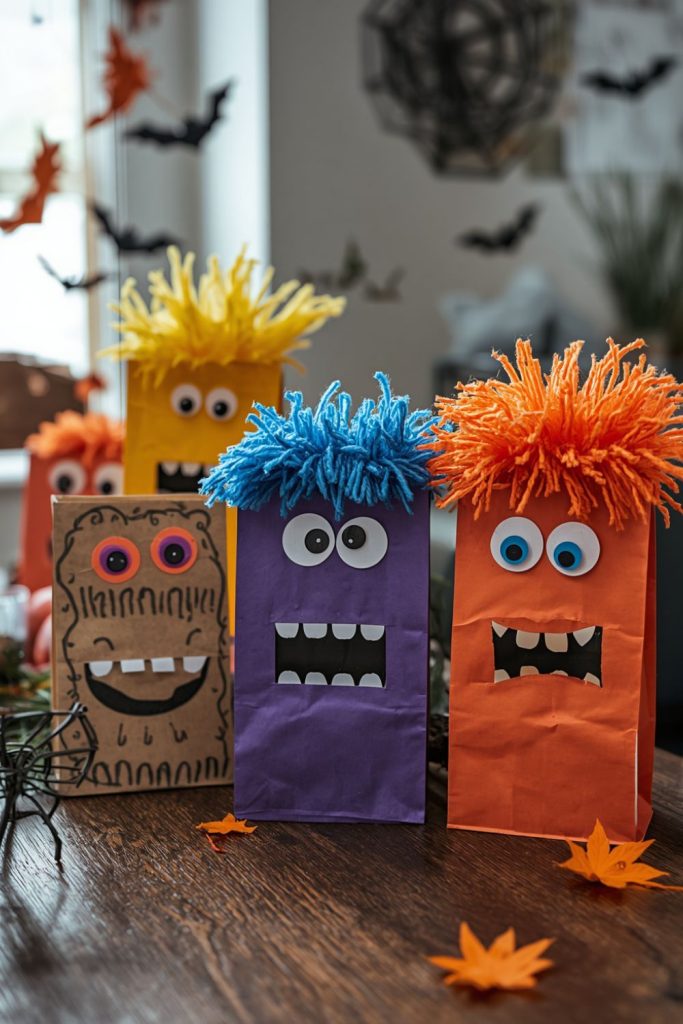
Monster paper bag puppets bring Halloween characters to life through pretend play. This activity is a great option for halloween crafts for kids because it combines art, storytelling, and creativity in one project. Children can create silly monsters, friendly creatures, or funny Halloween characters using simple paper bags and decorations.
Steps to make Monster Paper Bag Hand Puppets:
- Choose a clean paper bag for the puppet base.
- Paint or cover the bag with colored paper.
- Add eyes, teeth, ears, and hair using craft supplies.
- Create a funny monster face on the flap area.
- Add details like horns, bows, or spots.
- Use the puppet for stories and games.
Children love creating characters with different personalities. One child may make a purple monster with giant eyes, while another may create a tiny smiling creature with colorful hair. Parents can encourage children to name their monsters and create short Halloween stories using their puppets.
This project supports imaginative play because the finished puppet becomes part of games after the decorating is complete. It is also helpful for children who enjoy acting or telling stories. Families can create several puppets and organize a small Halloween puppet show at home.
Paper bag puppets are inexpensive and easy to customize, making them a popular choice for classrooms, play dates, and family craft afternoons. The activity gives children a chance to create, perform, and have fun with their handmade characters.
Painted Mini Pumpkin Characters
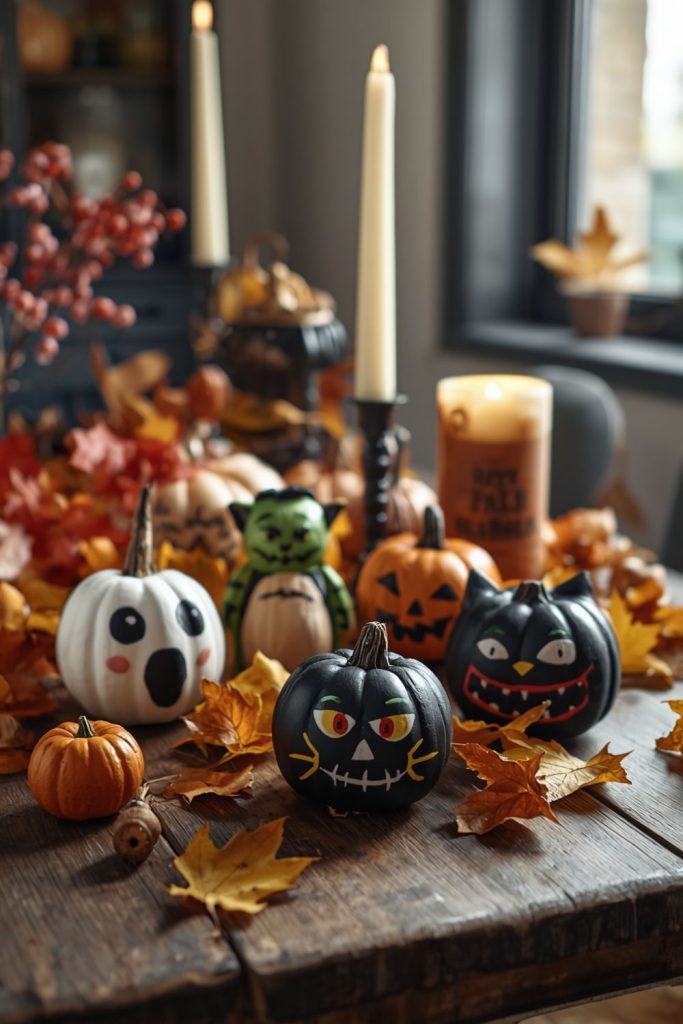
Mini pumpkin characters are a fun alternative to traditional pumpkin carving, especially for younger children. This activity is one of the most popular halloween crafts for kids because it allows children to decorate pumpkins safely without using sharp tools. Small pumpkins can become cute animals, funny monsters, friendly ghosts, or colorful Halloween characters.
Steps to make Painted Mini Pumpkin Characters:
- Wash and dry small pumpkins before decorating.
- Paint the pumpkin with a base color.
- Add eyes, mouths, and character details.
- Use accessories like paper hats or ribbons.
- Let the paint dry completely.
- Display the finished pumpkins around your home.
Children can create a whole collection of mini pumpkin friends using different colors and designs. A pumpkin can become a vampire with tiny fangs, a monster with bright eyes, or a cat with painted ears. Parents can help younger children with detailed painting while letting them choose the character style.
Painted pumpkins last longer than carved pumpkins, which makes them a nice decoration for the entire Halloween season. Kids enjoy seeing their creations displayed on tables, shelves, or windowsills. This activity also allows families to decorate together because every person can create their own pumpkin character.
Using small pumpkins makes the project manageable for children and reduces waste. It is a simple activity that creates colorful decorations while giving children confidence in their artistic choices.
Yarn Wrapped Mummy Letters for Halloween Décor
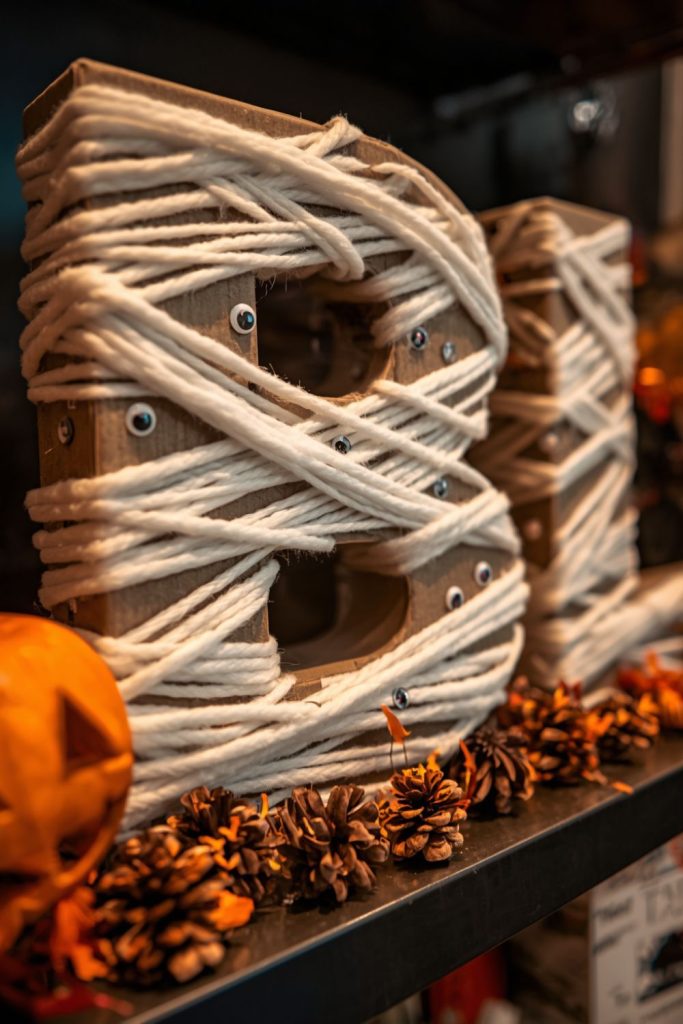
Yarn wrapped mummy letters are a creative way to decorate a child’s room or Halloween party area. This project combines letters, textures, and Halloween themes, making it an enjoyable choice among halloween crafts for kids. Children can use the first letter of their name or create words like “BOO” to decorate their space.
Steps to make Yarn Wrapped Mummy Letters:
- Cut large letters from cardboard or thick paper.
- Wrap white yarn around the letter shape.
- Continue wrapping until the surface is covered.
- Add googly eyes between the yarn layers.
- Attach small decorations like bats or stars.
- Display the letters on shelves or walls.
The soft yarn gives the letters a mummy appearance while keeping the decoration cute and friendly. Children can create different expressions by changing the placement of the eyes. Some may add colorful yarn strips to create a funny mummy character.
Parents can help with cutting cardboard letters, while children enjoy the wrapping and decorating process. This activity also helps children practice hand movement and patience because they need to guide the yarn around the shape.
Finished letters can be used as bedroom decorations, party signs, or personalized Halloween displays. Since children can choose different words and colors, every project can look different. This makes yarn wrapped mummy letters a fun handmade decoration that families can enjoy creating together.
Salt Painted Spider Web Watercolor Art
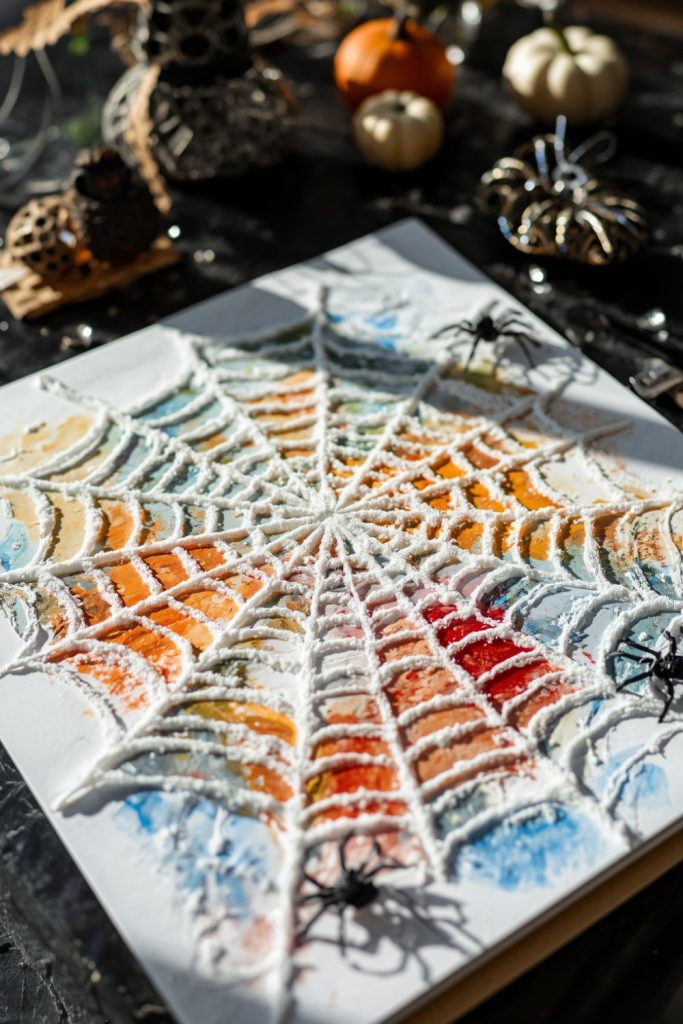
Salt painted spider web art is a creative Halloween activity that combines science and painting in a simple way. This project is a wonderful choice among halloween crafts for kids because children can watch colors move across the salt lines and create a raised spider web design. The finished artwork has a textured appearance that makes it stand out when displayed on a wall or refrigerator.
Steps to make Salt Painted Spider Web Watercolor Art:
- Draw a spider web design using white glue on thick paper.
- Sprinkle salt over the glue lines.
- Shake away extra salt after covering the design.
- Add watercolor drops onto the salt using a brush.
- Watch the colors spread along the raised lines.
- Allow the artwork to dry completely before displaying.
Children enjoy seeing how the paint travels through the salt and creates different patterns. They can use traditional Halloween shades like purple, orange, and black or experiment with other colors. Adding a small paper spider or painted spider character can make the picture more complete.
Parents can introduce this activity during a Halloween afternoon because it keeps children interested while giving them a chance to create something decorative. Younger children may enjoy adding colors, while older kids can create more detailed web patterns. The textured finish makes every painting look different, and children often feel proud of the artwork they create.
This project uses simple supplies and does not require advanced painting skills. It is suitable for home activities, school projects, and family craft time. The final artwork becomes a handmade Halloween decoration that captures the creativity of the child.
Halloween Character Rock Painting
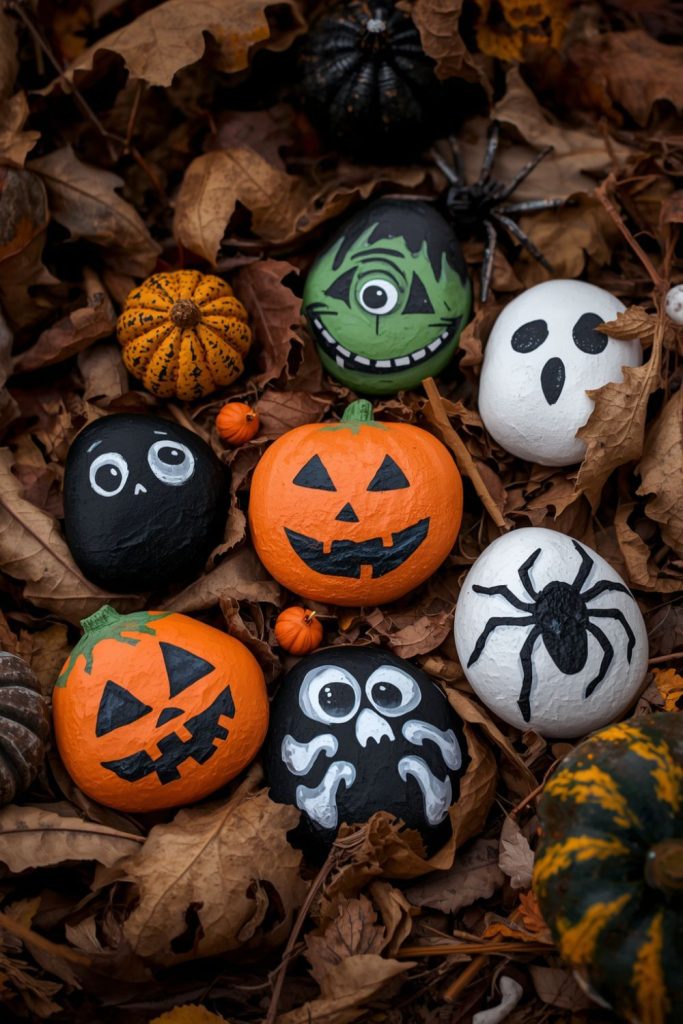
Rock painting is a fun outdoor inspired activity where ordinary stones become Halloween characters. This idea works well as one of the halloween crafts for kids because it encourages children to use imagination while creating decorations that can be displayed indoors or outdoors. Small rocks can become pumpkins, ghosts, monsters, spiders, or funny Halloween faces.
Steps to make Halloween Character Rock Painting:
- Collect smooth rocks and wash them before painting.
- Paint each rock with a base color.
- Add faces, patterns, and Halloween details.
- Use markers or paint pens for small designs.
- Allow the paint to dry fully.
- Place the finished rocks around your home or garden.
Children enjoy choosing different rocks because each shape can inspire a new character. A round rock may become a pumpkin, while a long rock may look like a tiny monster. Parents can help children think of ideas while allowing them to create their own designs.
These painted rocks can become decorations for flower pots, shelves, or Halloween party tables. Some families hide them around the neighborhood as a fun seasonal activity for others to find. The project also works well because children can create several characters without needing expensive materials.
Rock painting gives kids the chance to slow down, focus on details, and enjoy the process of making something by hand. The finished creations are durable and can be stored for future Halloween seasons.
Paper Straw Skeleton Puppets
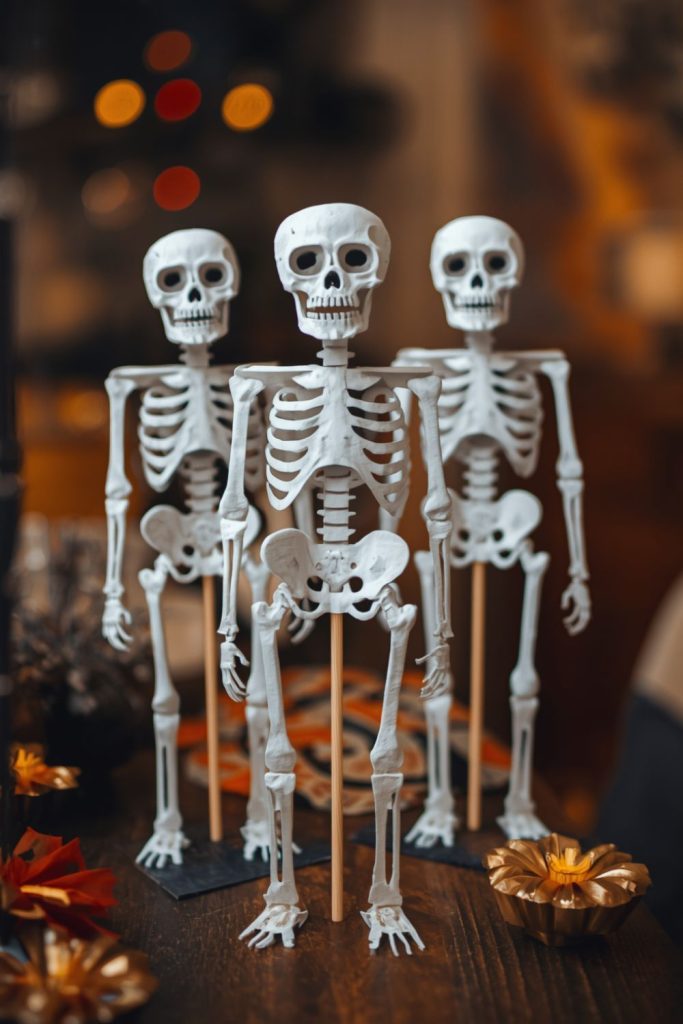
Paper straw skeleton puppets are playful Halloween creations that children can move and use for pretend games. This activity is a fun choice among halloween crafts for kids because it combines drawing, assembling, and storytelling. Children can create their own skeleton characters and make them dance using simple materials.
Steps to make Paper Straw Skeleton Puppets:
- Draw or print a skeleton shape on white paper.
- Cut out the skeleton body parts.
- Attach paper straws behind each section.
- Connect the parts with small fasteners or string.
- Add details like funny faces or colorful accessories.
- Move the puppet using the straw handles.
Kids enjoy making skeletons with different personalities. Some may create a silly dancing skeleton, while others may design a superhero skeleton with a cape. Parents can help younger children with cutting and assembling the moving parts.
The puppet design allows children to create a character that can be used after the decorating activity is finished. They can perform small shows, tell Halloween stories, or play with siblings and friends. This adds extra fun compared with decorations that only sit on a shelf.
Paper straw skeleton puppets are affordable and easy to prepare, making them suitable for home, classrooms, and Halloween parties. The activity also helps children practice hand coordination as they connect and move each part.
Bubble Wrap Printed Pumpkin Art
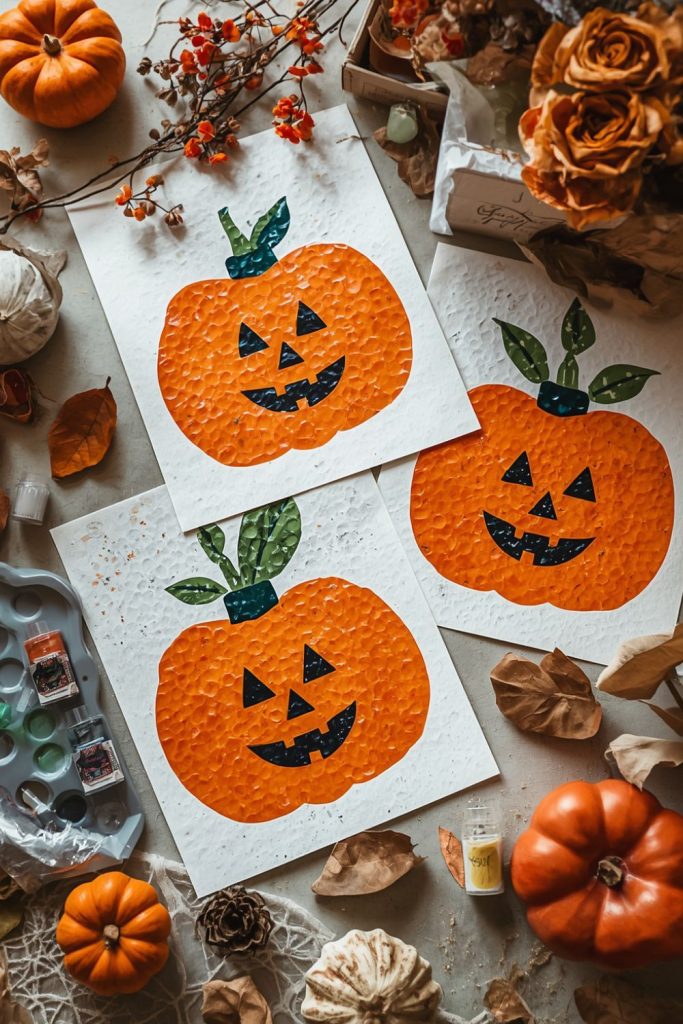
Bubble wrap pumpkin art is a creative painting project that gives children a chance to make pumpkins using an unusual printing method. This activity is one of the exciting halloween crafts for kids because it creates a textured pumpkin pattern without requiring detailed drawing skills. The bubble texture makes each pumpkin print look playful and different.
Steps to make Bubble Wrap Printed Pumpkin Art:
- Cut bubble wrap into small pumpkin shapes.
- Paint the bubble side with orange paint.
- Press the bubble wrap onto paper.
- Lift it carefully to reveal the pumpkin texture.
- Add stems, leaves, and pumpkin faces.
- Let the artwork dry before displaying.
Children enjoy the surprise of seeing the bubble pattern appear on the paper. After making several pumpkin prints, they can decorate each one with different expressions. Some pumpkins can have happy faces, while others can look spooky or silly.
Parents can prepare this activity with basic painting supplies and recycled bubble wrap from packages. It is a good option for younger children because the printing process is simple and enjoyable. Older children can add backgrounds such as a night sky, haunted house, or pumpkin field.
The finished artwork can be framed, placed on greeting cards, or used as Halloween decorations around the home. This project shows children that creative ideas can come from ordinary items found around the house.
Clothespin Vampire Bats
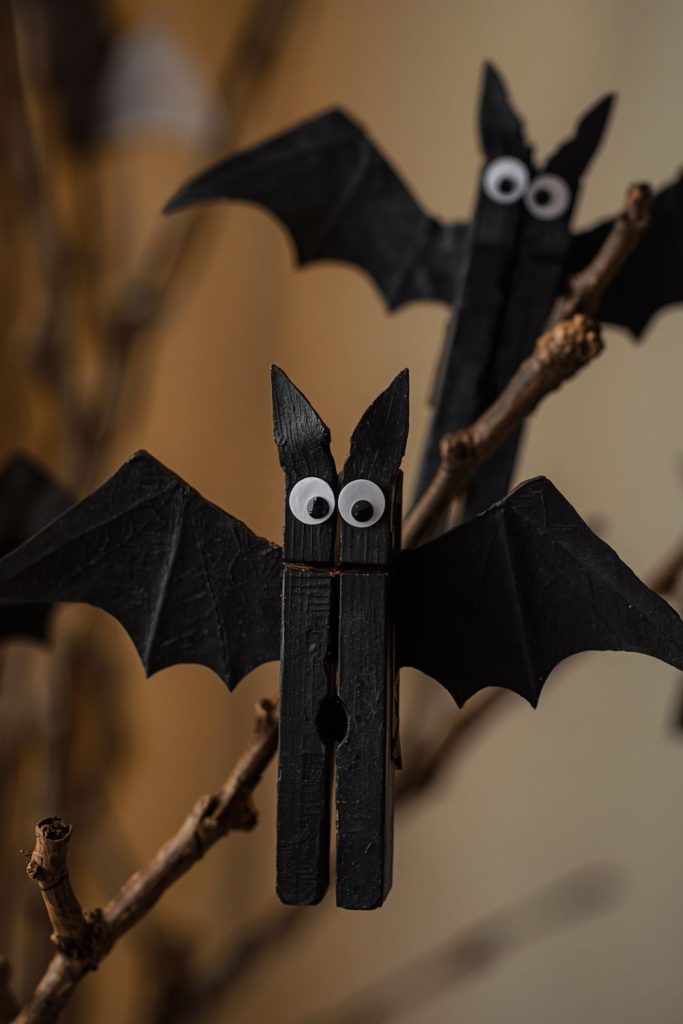
Clothespin vampire bats are small Halloween decorations that are easy to create and fun to display. This project is a great choice among halloween crafts for kids because children can build a tiny character using simple supplies. The wooden clothespin gives the bat a movable feature, making it more playful than a regular paper decoration.
Steps to make Clothespin Vampire Bats:
- Paint a wooden clothespin black.
- Cut bat wings from paper or foam.
- Attach wings to the sides of the clothespin.
- Add eyes, fangs, and facial details.
- Decorate with small accessories if desired.
- Clip the bats onto decorations around your home.
Children can create a group of vampire bats with different expressions and styles. Some bats can have tiny hats, colorful wings, or funny faces. Parents can help with cutting the wing shapes while children enjoy painting and decorating.
The clothespin design allows kids to attach bats to curtains, gift bags, plants, or Halloween displays. They can also use them as clips for notes or party decorations. This makes the project useful as well as decorative.
The small size makes these bats easy to store after Halloween. Families can create new designs each year and add them to their collection of handmade decorations. This activity is simple, affordable, and enjoyable for children who love making tiny characters.
Tissue Paper Stained Glass Halloween Suncatchers
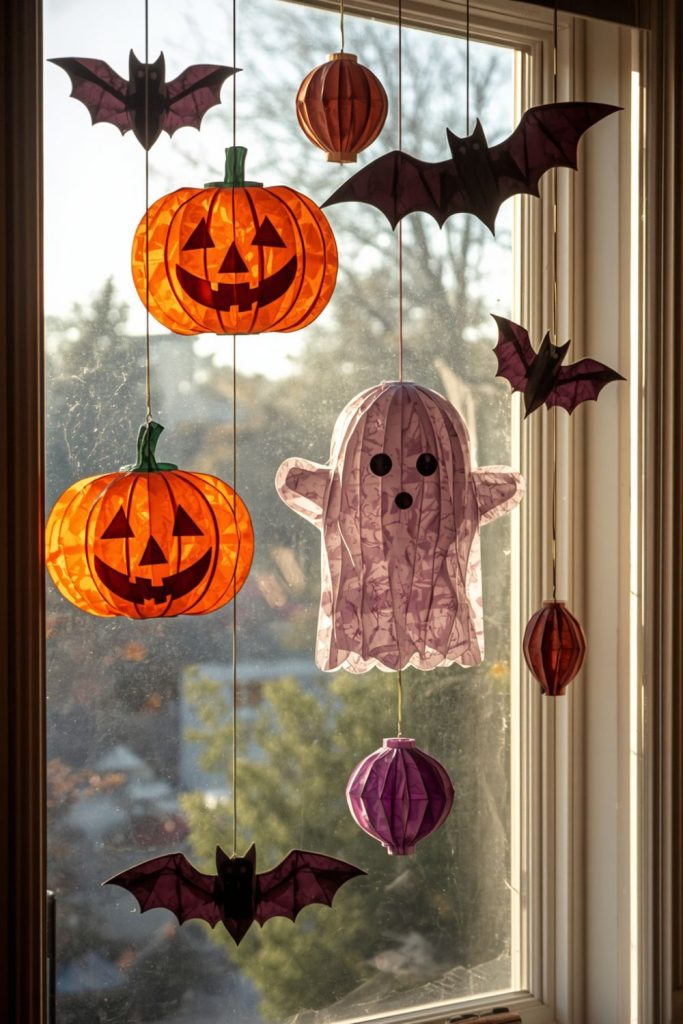
Tissue paper stained glass suncatchers are colorful decorations that look beautiful when placed near windows. This project is a wonderful choice among halloween crafts for kids because children can create glowing designs using simple paper materials. When sunlight passes through the finished decoration, the colors create a lovely effect that adds Halloween style to any room.
Steps to make Tissue Paper Stained Glass Halloween Suncatchers:
- Cut a Halloween shape from black paper or cardstock.
- Remove the inside area to create an empty frame.
- Cut small pieces of colorful tissue paper.
- Glue tissue paper pieces across the back of the frame.
- Let the glue dry completely.
- Hang the decoration near a window.
Children can create pumpkins, ghosts, bats, spiders, or haunted houses using different color combinations. Younger kids may enjoy placing tissue paper pieces randomly, while older children can create patterns and detailed designs. Parents can help with cutting the frame shapes and allow children to handle the decorating part.
This activity helps children learn about colors, shapes, and patterns while making a seasonal decoration. The lightweight design makes the suncatchers easy to hang with tape or string. Families can create several designs and decorate different windows throughout the home.
The finished decorations look especially attractive during sunny afternoons because the light shines through the colorful paper. This makes the project feel special and gives children a handmade item they can proudly show to visitors during Halloween.
Tin Can Halloween Luminaries
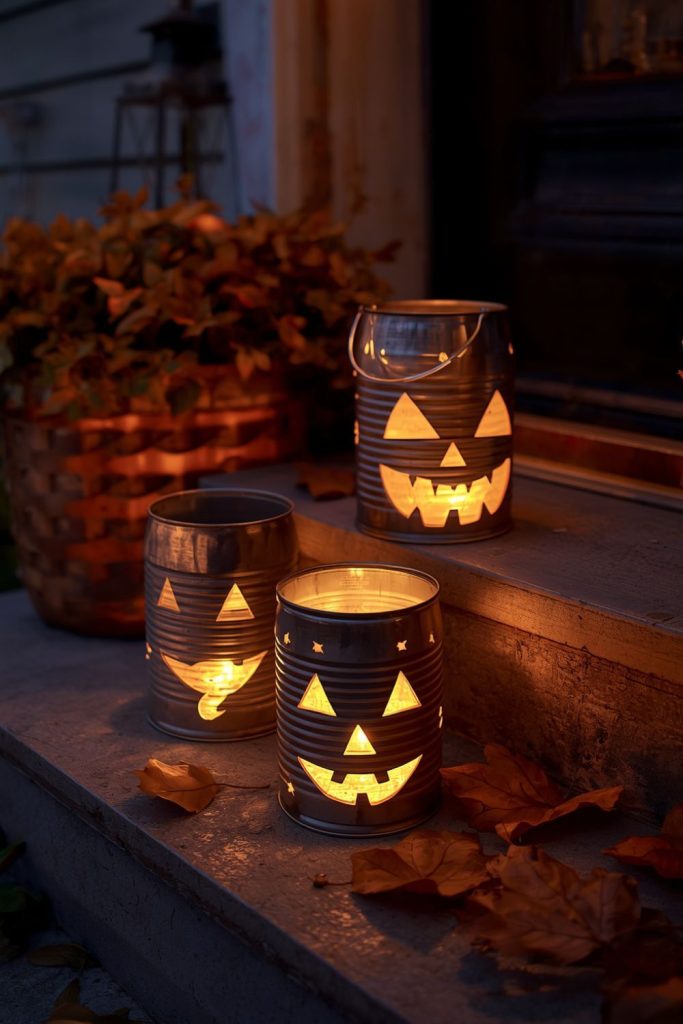
Tin can Halloween luminaries are creative decorations that reuse empty cans and turn them into glowing Halloween displays. This project is a fun choice among halloween crafts for kids because children can decorate recycled materials and create a safe light decoration for the home. With adult help, empty cans can become spooky lanterns featuring pumpkins, ghosts, or friendly monsters.
Steps to make Tin Can Halloween Luminaries:
- Clean and dry empty tin cans completely.
- Ask an adult to create small design holes.
- Paint the outside of the can with Halloween colors.
- Add faces or decorative patterns.
- Place a battery operated light inside.
- Display the finished lantern safely.
Children can choose different designs for each can. One may have a smiling pumpkin face, another may have a silly monster, and another may show a pattern of stars and bats. Parents should handle any sharp edges and help prepare the cans before children begin decorating.
Once finished, these luminaries can decorate shelves, tables, or outdoor spaces. Battery lights make them safe for children to enjoy during Halloween parties or family gatherings. The glowing effect makes the designs stand out after sunset.
This activity also teaches children the value of reusing materials. Instead of throwing away empty cans, families can turn them into decorations that bring Halloween excitement into their homes.
Cardboard Tube Candy Corn Windsocks
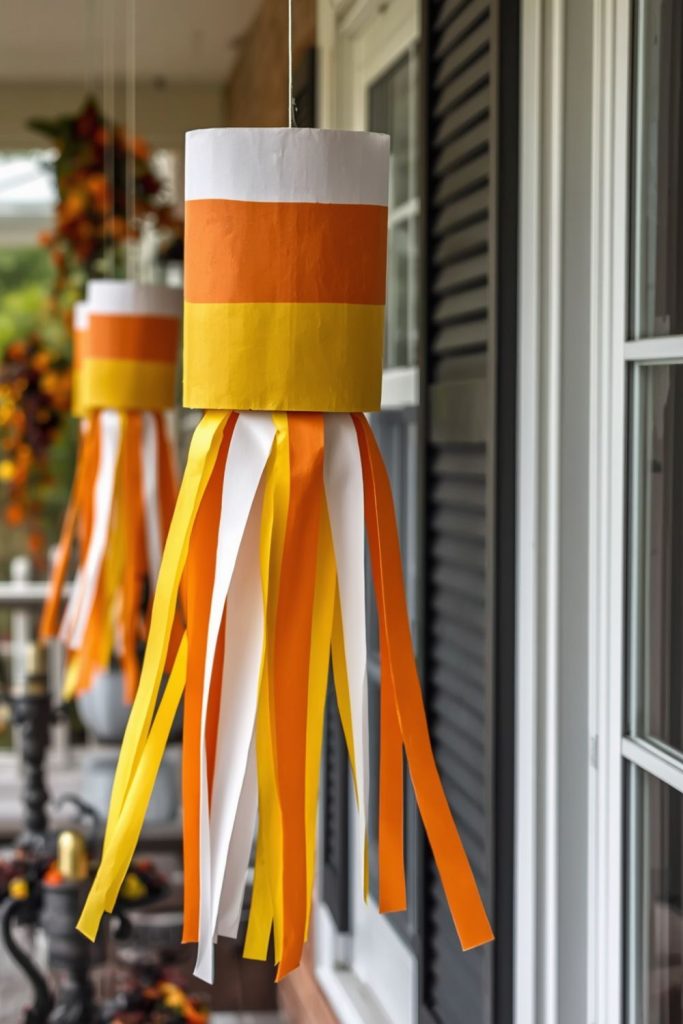
Candy corn windsocks are colorful hanging decorations made from cardboard tubes and paper strips. This activity is a fun choice among halloween crafts for kids because it creates movement and bright colors while using simple household materials. Children enjoy watching the paper strips move when air passes through them.
Steps to make Cardboard Tube Candy Corn Windsocks:
- Paint a cardboard tube with candy corn colors.
- Add white, orange, and yellow sections.
- Cut long paper strips for the hanging pieces.
- Glue the strips around the bottom edge.
- Attach string or ribbon at the top.
- Hang the windsock outside or near a window.
Children can decorate their windsocks with Halloween stickers, faces, or glitter. They can also create other designs such as pumpkins, ghosts, or monsters. Parents can help younger children with attaching the string while allowing them to choose colors and decorations.
The movement of the paper strips makes the decoration feel alive. Kids enjoy checking how their windsock moves throughout the day. These decorations work well for porches, balconies, classrooms, or bedroom windows.
This project is simple enough for young children but still gives older kids room to add creative details. It combines painting, cutting, and decorating into one activity that produces a cheerful Halloween display.
Leaf Print Halloween Monster Art
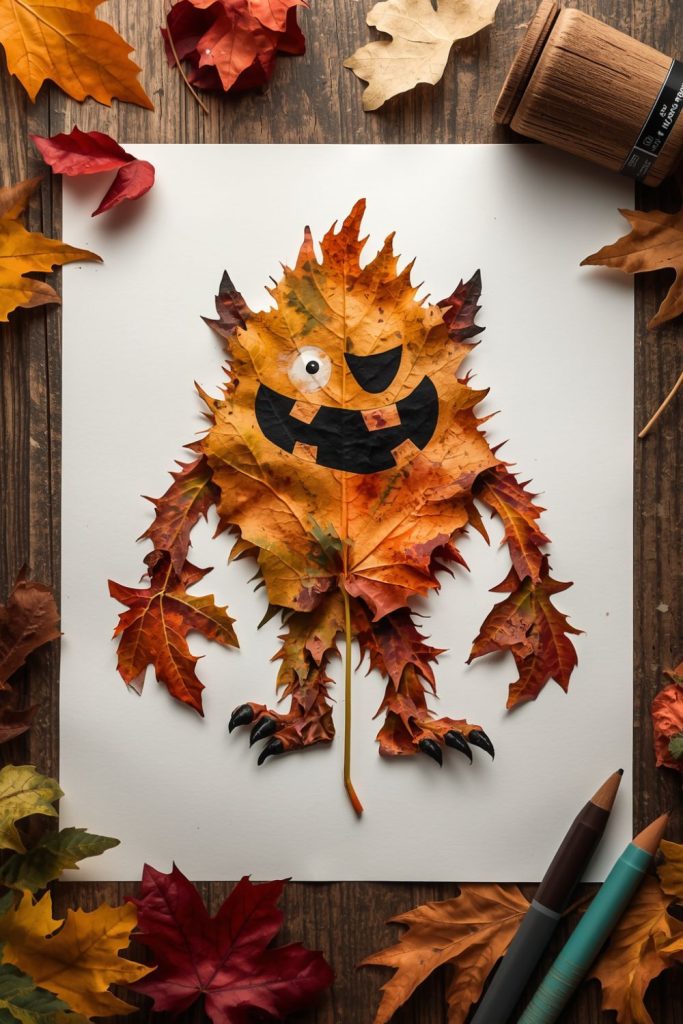
Leaf print monster art combines nature with Halloween creativity. This project is one of the enjoyable halloween crafts for kids because children can collect leaves outdoors and transform them into funny monster characters. Each leaf shape creates a different body style, making every finished picture look different.
Steps to make Leaf Print Halloween Monster Art:
- Collect clean leaves of different sizes and shapes.
- Paint one side of each leaf with washable paint.
- Press the painted leaf onto paper.
- Allow the prints to dry.
- Add eyes, mouths, arms, and other details.
- Create a Halloween scene around the monsters.
Children can turn long leaves into tall monsters, round leaves into funny faces, and small leaves into tiny creatures. Adding paper eyes, drawn expressions, and colorful backgrounds makes the artwork more playful.
Parents can use this activity as an outdoor family project. Collecting leaves together becomes part of the fun before the painting begins. Younger children can focus on making prints, while older children can create stories about their leaf characters.
The finished artwork can be framed or displayed as seasonal decoration. Since each leaf creates a different shape, children enjoy experimenting with many designs. This activity connects outdoor exploration with creative expression and gives families a simple way to celebrate Halloween using natural materials.
Cotton Ball Ghost Collage
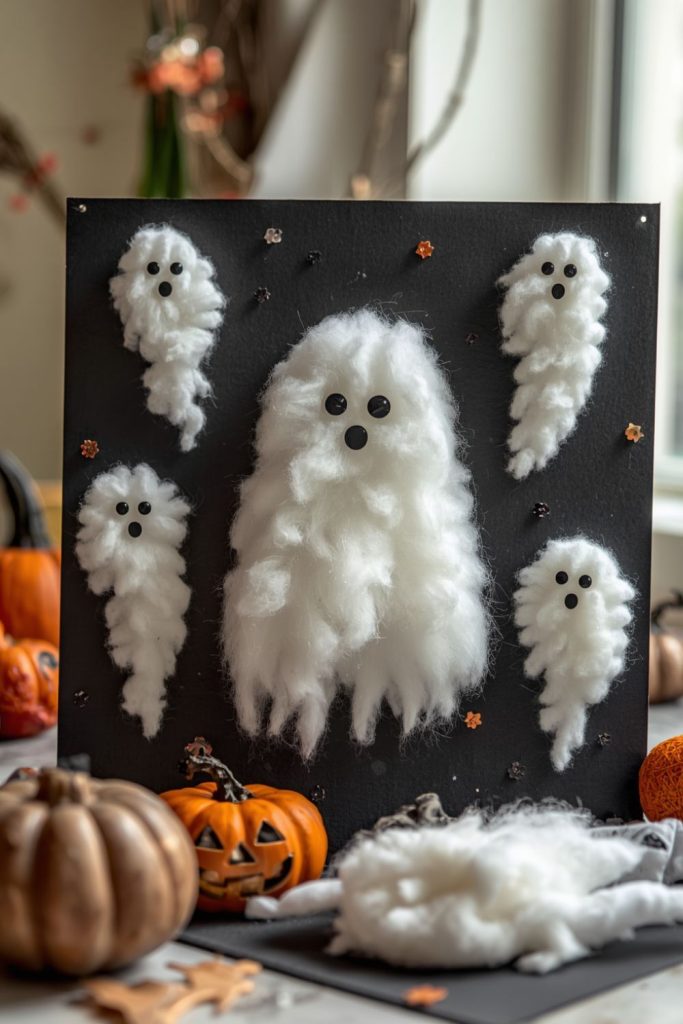
Cotton ball ghost collage is a soft and simple project that is perfect for younger children. This activity is a popular choice among halloween crafts for kids because it uses easy materials and creates a cute Halloween decoration. The fluffy texture of cotton balls makes the ghosts look friendly rather than scary.
Steps to make Cotton Ball Ghost Collage:
- Draw ghost shapes on dark colored paper.
- Spread glue inside the ghost outline.
- Place cotton balls across the shape.
- Add eyes and a mouth after the glue dries.
- Decorate the background with stars or bats.
- Display the finished collage.
Children enjoy touching the soft cotton and arranging the pieces to create their ghost shape. They can make one large ghost or several small ghosts floating across the page. Adding colorful backgrounds helps the white ghosts stand out.
Parents can use this project for quiet afternoon activities because it does not require many supplies. Younger children can practice placing objects carefully, while older children can create detailed scenes with houses, moons, and Halloween characters.
The finished collage looks charming when displayed on refrigerators, classroom walls, or bedroom doors. Since the materials are inexpensive and easy to find, families can create several versions without much preparation. This project proves that simple ideas can create memorable Halloween decorations.
Foam Cup Monster Characters
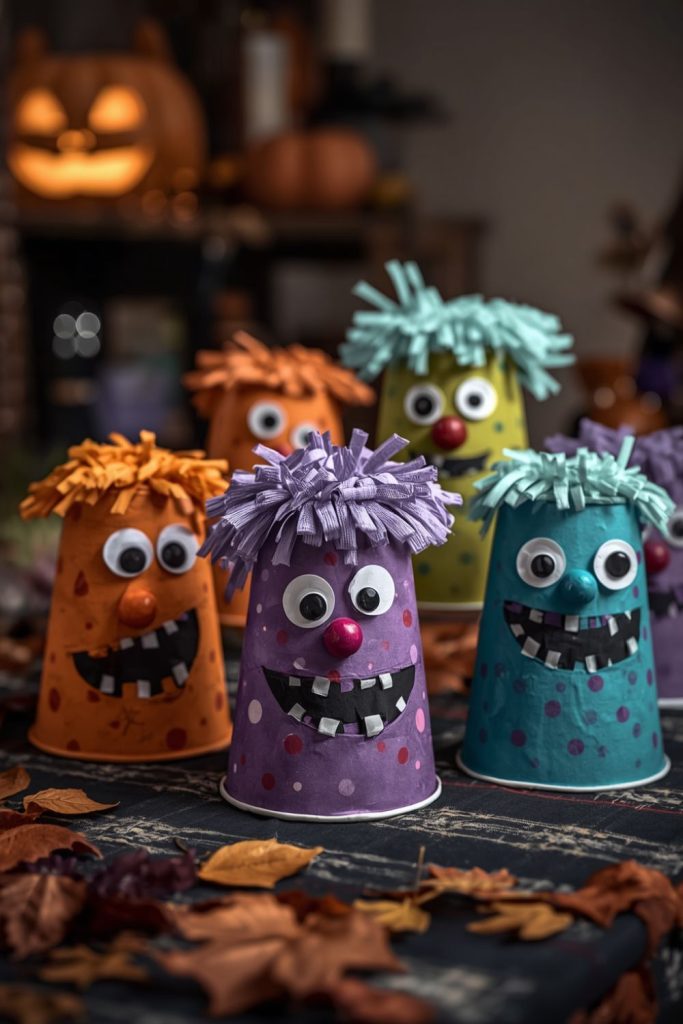
Foam cup monster characters are playful decorations that allow children to turn simple cups into silly Halloween creatures. This activity is a fun addition to halloween crafts for kids because it combines painting, decorating, and storytelling in one project. Children can create friendly monsters with funny faces, colorful hair, and unusual shapes using easy to find materials.
Steps to make Foam Cup Monster Characters:
- Choose clean foam cups for the project.
- Paint each cup with a bright or dark color.
- Allow the paint to dry completely.
- Add eyes, mouths, teeth, and other features.
- Attach paper, yarn, or foam pieces for extra details.
- Display or use the monsters for pretend play.
Children can create different monster personalities by changing the colors and decorations. One cup can become a one eyed monster, another can become a creature with fuzzy hair, and another can have funny teeth and a big smile. Parents can prepare decorations ahead of time and allow children to make their own choices.
This activity is helpful for children who enjoy making characters because the finished monsters can become toys after the decorating is complete. Kids can create stories, small plays, or Halloween games using their handmade creatures.
Foam cups are lightweight and easy for small hands to hold, making this project suitable for younger children. Older children can add more details such as costumes, hats, or accessories. The activity gives families a simple way to spend time together while creating cheerful Halloween decorations.
Wooden Spoon Halloween Puppets
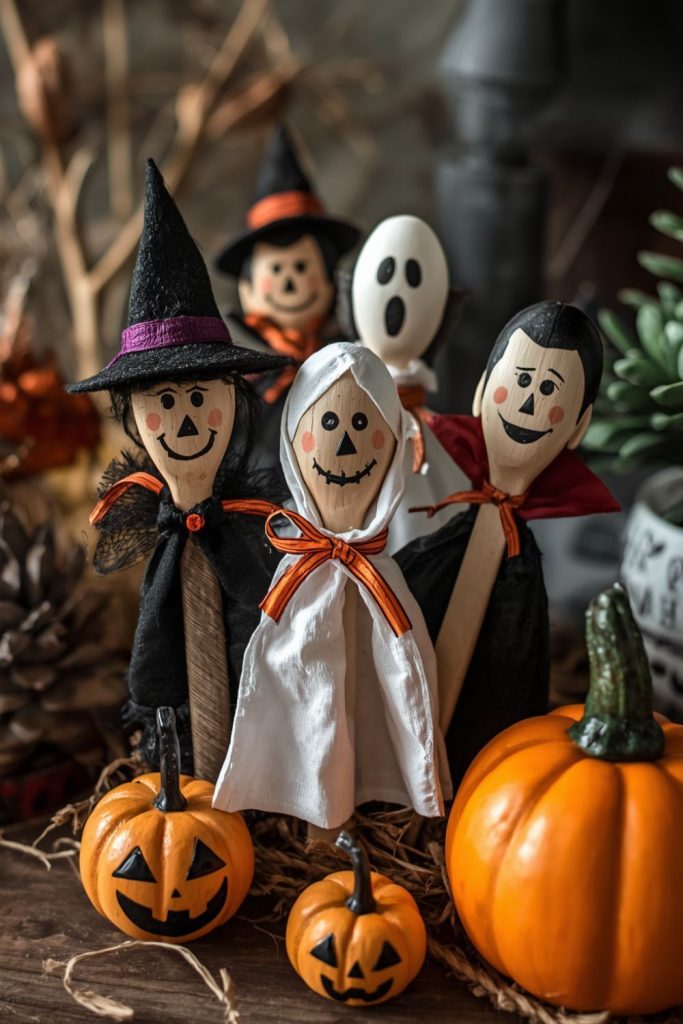
Wooden spoon Halloween puppets are creative character projects that turn kitchen items into fun toys. This activity is a great choice among halloween crafts for kids because children can decorate simple wooden spoons and transform them into witches, ghosts, vampires, pumpkins, or other Halloween characters.
Steps to make Wooden Spoon Halloween Puppets:
- Choose clean wooden spoons for the puppet base.
- Paint the spoon head with a Halloween color.
- Add facial details using markers or paint.
- Create hair, hats, or clothing from paper and fabric.
- Attach decorations using glue.
- Use the finished puppets for storytelling.
Children enjoy giving each puppet a personality. A spoon can become a friendly witch with a paper hat, a smiling ghost with white fabric, or a tiny pumpkin character with an orange painted face. Parents can help with attaching small pieces while children focus on designing the characters.
The finished puppets are not only decorations but also provide hours of imaginative play. Children can create Halloween stories, perform puppet shows, or play with siblings and friends. This makes the activity more interactive than a decoration that only sits in one place.
Wooden spoon puppets are also easy to store and reuse for future creative activities. Families can create a whole collection of characters and add new ones each Halloween season. This project encourages children to use imagination while making something they can enjoy after the activity ends.
Milk Jug Ghost Porch Lanterns
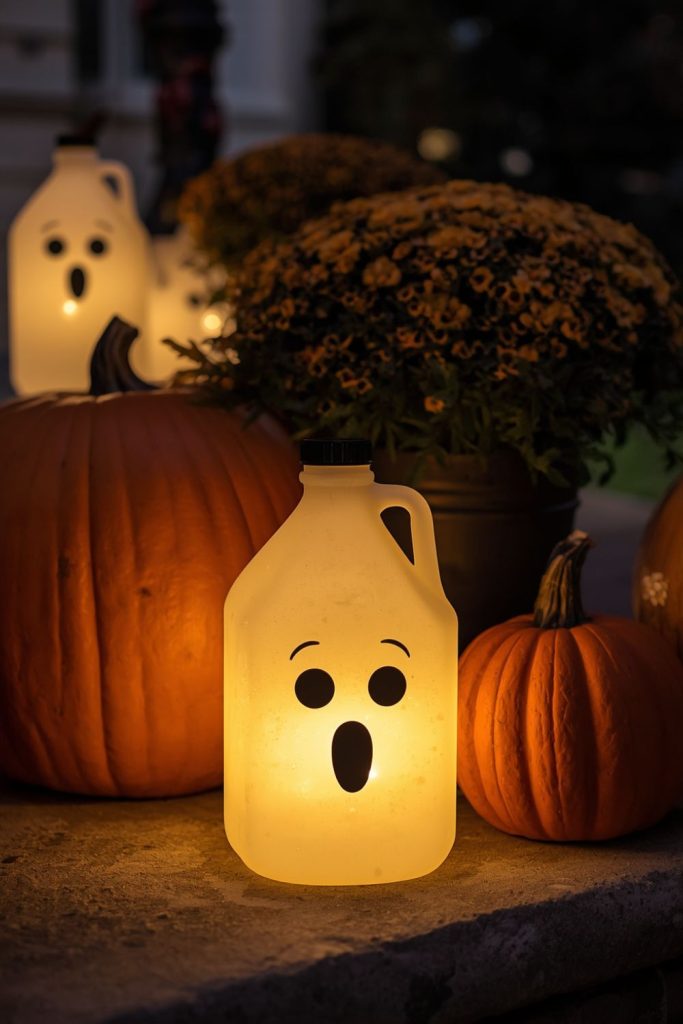
Milk jug ghost porch lanterns are large Halloween decorations that create a fun display outside or near windows. This activity is one of the creative halloween crafts for kids because children can transform an everyday container into a glowing ghost decoration. With adult help, empty milk jugs can become friendly Halloween characters that brighten up the home.
Steps to make Milk Jug Ghost Porch Lanterns:
- Wash and dry an empty plastic milk jug.
- Draw a ghost face on the front.
- Decorate the outside with markers or paint.
- Place a battery operated light inside.
- Add extra decorations like ribbons or paper shapes.
- Put the lantern in a safe display area.
Children enjoy creating different ghost expressions, from happy smiles to silly surprised faces. Parents can help prepare the jug and explain how to use lights safely. Younger children can decorate the face, while older children can add more details.
These lanterns are larger than small jar decorations, which makes them noticeable from a distance. Families can place several ghost jugs along a porch, walkway, or window area to create a friendly Halloween display.
This project also introduces children to reusing household items. Instead of throwing away plastic containers, families can give them another purpose through creativity. The final decoration becomes a fun reminder of the time spent making something together.
Paper Mosaic Jack o Lantern Art
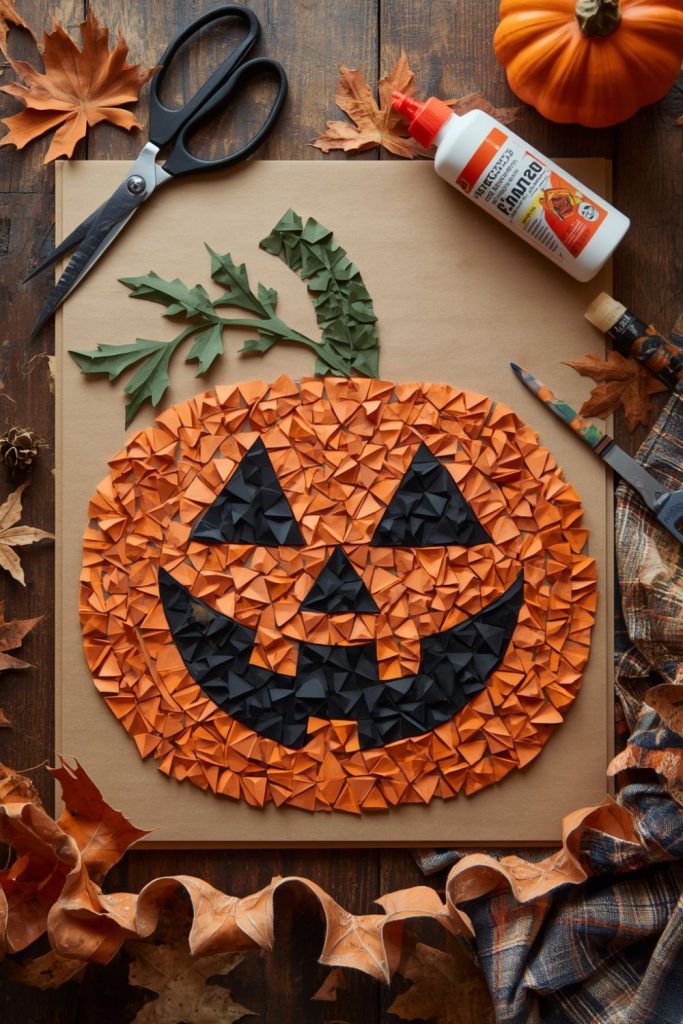
Paper mosaic jack o lantern art is a colorful project that helps children create pumpkins using small paper pieces. This activity is a wonderful choice among halloween crafts for kids because it allows children to build pictures using different colors and textures. It is suitable for younger children who enjoy arranging shapes and older children who like detailed designs.
Steps to make Paper Mosaic Jack o Lantern Art:
- Draw a pumpkin shape on thick paper.
- Cut orange, black, and green paper into small pieces.
- Apply glue inside the pumpkin outline.
- Place paper pieces to create the pumpkin design.
- Add eyes, mouth, and stem details.
- Allow the artwork to dry before displaying.
Children can create traditional jack o lantern faces or invent their own pumpkin characters. Some may add colorful backgrounds with stars, leaves, or Halloween scenes. Parents can prepare the paper pieces before starting, especially for younger children.
The activity helps children practice hand control as they pick up and place small pieces of paper. It also gives them freedom to create different patterns and designs. No two pumpkins need to look the same because each child can arrange the pieces in their own style.
Finished mosaic pumpkins can be framed, displayed on walls, or used as homemade Halloween cards. This project creates a bright decoration while giving children an enjoyable art experience using simple supplies.
Halloween Nature Collage with Leaves, Twigs, and Acorns
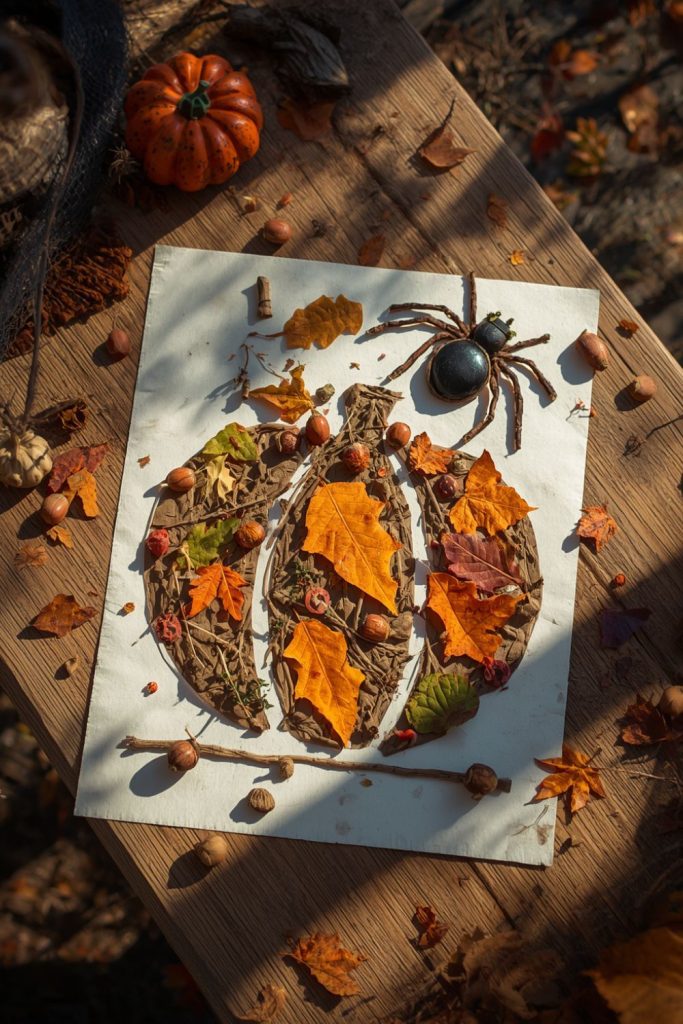
Halloween nature collage is a creative outdoor activity that combines seasonal materials with Halloween themes. This project is a great option among halloween crafts for kids because children can collect leaves, twigs, and acorns before turning them into handmade decorations. It connects outdoor time with creative activities at home.
Steps to make Halloween Nature Collage:
- Collect clean leaves, twigs, and acorns outside.
- Arrange the materials into a Halloween design.
- Glue the pieces onto thick paper.
- Add painted details or paper decorations.
- Create characters like pumpkins, monsters, or spiders.
- Allow the collage to dry before displaying.
Children can use leaves as monster bodies, twigs as spider legs, and acorns as tiny heads or decorations. They can create a Halloween forest scene, funny creatures, or seasonal artwork. Parents can join the collection process by taking a short walk with children and finding interesting shapes.
This activity encourages children to notice the natural materials around them and use their imagination. Older children may enjoy creating detailed scenes, while younger children can focus on arranging and gluing the pieces.
The finished collage becomes a handmade decoration that represents both Halloween and the beauty of the season. Families can display it on tables, walls, or shelves during October. It is an easy project that uses simple materials while creating a memorable family activity.