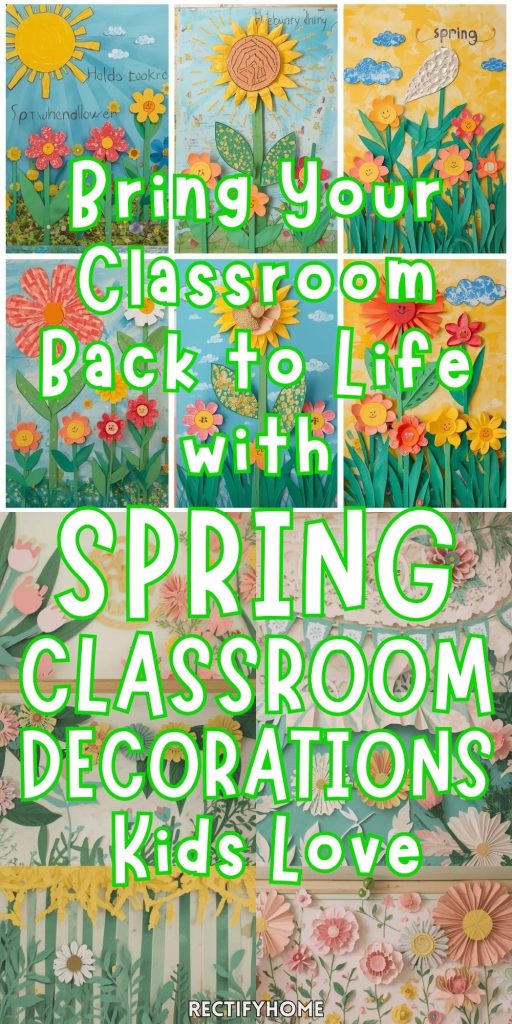
Spring is a time of growth, renewal, and color, and your classroom should reflect that energy. After the long winter months, students often return to a space that feels static or dull. Spring classroom decorations can breathe life back into the environment, making it feel cheerful, inviting, and inspiring. The right decorations do more than just brighten walls—they influence student mood, engagement, and creativity. From doors to windows, walls to corners, each space in the classroom can become a playful canvas for spring-themed decorations that children will notice, enjoy, and even help create. This article will guide elementary and preschool teachers through practical ideas, design considerations, and step-by-step ways to implement spring classroom decorations that are both visually striking and educational. With a mix of DIY projects, interactive displays, and hands-on student activities, your classroom can become a lively, motivating place for everyone to enjoy the season.
The Purpose and Benefits of Spring Classroom Decorations for Elementary Students
Decorating for spring goes beyond aesthetics. Spring classroom decorations can directly influence how students feel, behave, and interact. A bright and colorful classroom creates a sense of warmth and comfort, which can reduce stress and increase focus. Seasonal decorations can also serve as informal teaching tools, introducing concepts like weather patterns, plant growth, or animal life cycles.
For example, a classroom corner with a 3D flower wall can spark curiosity and conversation among young learners. Incorporating student-made projects into these decorations gives children a sense of ownership, boosting confidence and encouraging creativity. Research shows that students in visually stimulating environments are often more engaged and motivated. By using spring classroom decorations, teachers can subtly guide learning, reinforce positive behaviors, and create an inviting environment that makes returning to school after winter more exciting.
Decorations also promote social-emotional development. Students can collaborate on making paper garlands, arranging flowers, or painting elements for a mural, helping them learn teamwork and communication skills. Seasonal decor helps mark time and transitions, making the classroom feel alive with change. Even simple decorations, like hanging tissue paper flowers or window decals, can make children feel more connected to their environment. Teachers can use these spaces as conversation starters or even as tools for reflective activities, asking students to identify the changes they see in nature or the season. Ultimately, spring classroom decorations offer both aesthetic and functional benefits that make classrooms more stimulating, supportive, and fun.
- Related post How to Turn Your Classroom Entrance into a Welcoming Space with Spring Door Decorations Classroom Ideas
Designing Spring Classroom Decorations That Align with Learning Objectives
When planning spring classroom decorations, it’s important to consider how they can support learning goals. Decorations don’t have to be purely decorative—they can reinforce lessons in science, math, language arts, and social studies. For example, an interactive “weather tracker” board with movable icons allows students to observe patterns, practice data recording, and discuss seasonal changes, making it both fun and educational. Similarly, a paper honeycomb beehive can be used to teach about pollination, teamwork in nature, and even counting skills. Designing decorations with clear learning connections ensures that the visual appeal doesn’t overshadow their educational potential.
Teachers can also integrate hands-on activities to complement the decor. Having students create paper tulips or paint mini terrariums not only brightens the classroom but also practices fine motor skills, observation, and collaboration. Even ceiling displays like hanging paper hot-air balloons can spark imagination and storytelling exercises, giving students a tangible way to connect seasonal visuals with creative writing. By thoughtfully choosing spring classroom decorations that align with lessons, teachers create a classroom that is visually inviting, academically purposeful, and emotionally engaging.
Choosing Themes and Visual Elements Kids Love in Spring Classroom Decorations
The most effective spring classroom decorations are ones children immediately notice and enjoy. Young students respond well to bright colors, familiar animals, and playful imagery. Themes such as gardens, weather, insects, or butterflies are visually appealing and relatable. Using three-dimensional elements like pop-up 3D meadow displays or hanging cotton cloud and sun mobiles adds depth to the space, creating a more immersive environment. Simple changes, like stained glass-style tissue window decor, can transform natural light into playful patterns that children adore.
Visual elements should also encourage interaction. Floor decals like a colorful caterpillar crawl allow students to physically move through the classroom while staying on theme. A paper birdhouse village on a board can spark storytelling and discussion about habitats. Materials like cardstock, tissue paper, recycled containers, and paint are inexpensive yet versatile, allowing teachers to create decorations that are bright, hands-on, and engaging. By combining thematic visuals with interactive elements, spring classroom decorations become not just eye-catching, but also tools for learning, exploration, and fun.
Implementing Spring Classroom Decorations Within Time and Budget Constraints
Teachers often face limited time and budget, so spring classroom decorations need to be practical as well as appealing. DIY options, like rainbow paper-chain garlands or tissue-paper blossom garlands, are low-cost and quick to assemble. Using recycled materials, such as painted tin cans or cardboard, reduces expenses while giving students the opportunity to participate in decorating. Layered backdrops, like a pop-up 3D meadow display or garden gate illusion for doors, can be made in sections, allowing small incremental updates rather than one large project.
Planning is essential. Teachers can organize a rotation schedule where students create or update decorations weekly, keeping the classroom fresh without overwhelming preparation. Tools like pre-cut shapes, templates, and simple craft supplies make it feasible to complete projects efficiently. Even ceiling displays, such as paper hot-air balloons or cotton cloud mobiles, can be hung using string or removable adhesive hooks to save time and avoid damage. With thoughtful planning, spring classroom decorations can be both visually impressive and manageable within realistic classroom constraints.
Maintaining Engagement with Spring Classroom Decorations Throughout the Season
Once decorations are in place, it’s important to keep students engaged with them. Rotating items like the DIY weather wheel station or interactive “weather tracker” board allows students to participate in ongoing activities. Small changes, like adding a new paper tulip to a wall display or rearranging mini terrariums on shelves, can make the space feel alive and dynamic. This prevents decorations from becoming static backgrounds and encourages children to observe, ask questions, and interact.
Incorporating learning opportunities into decorations can also maintain interest. For example, students can update the sun-and-shadow cardstock art on windows or add elements to the paper greenhouse centerpiece as part of science lessons. Engaging spring classroom decorations help teachers keep the seasonal theme relevant, support curriculum goals, and create an environment that encourages curiosity and participation. By planning updates and hands-on involvement, decorations stay fresh and meaningful all season long.
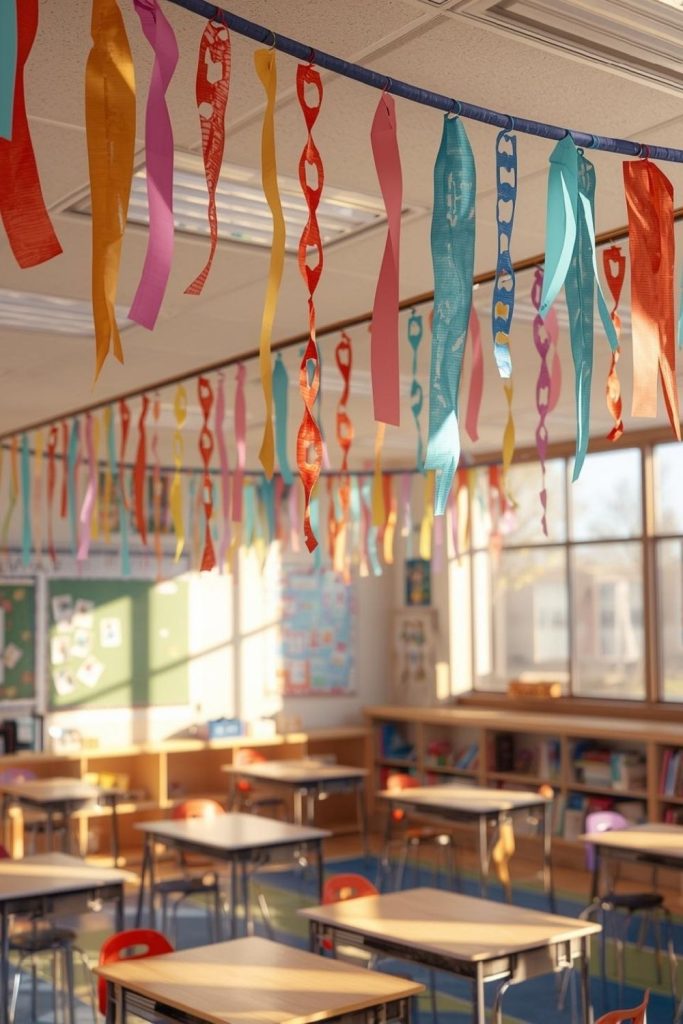
1. Rainbow paper-chain garland classroom spring decoration
Bring color and movement into your classroom with a simple rainbow paper-chain garland. It’s a cheerful way to brighten walls, bulletin boards, or windows while getting kids involved in a fun craft. This decoration is lightweight, reusable, and instantly makes the classroom feel lively.
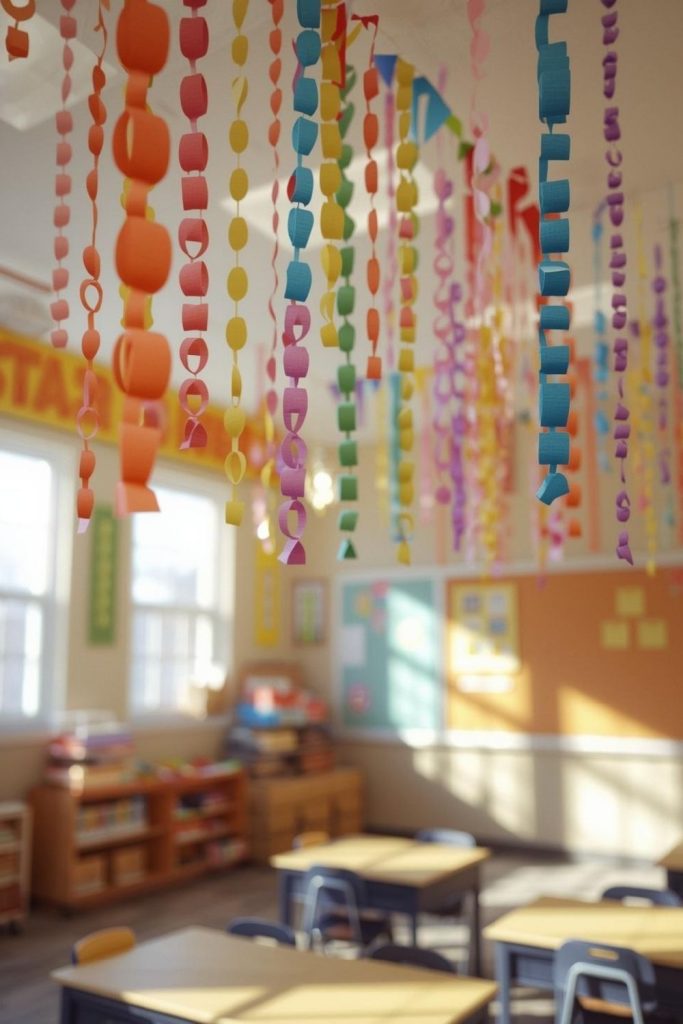
Materials needed: Colored paper strips, glue, scissors, tape
Step-by-step method:
- Cut paper into uniform strips.
- Form the first strip into a loop and glue ends.
- Slide the next strip through the first loop and glue ends.
- Continue linking strips until chain reaches desired length.
- Hang along walls, bulletin boards, or ceiling edges for a colorful effect.
2. Hanging paper hot-air balloon display decor
Add a whimsical touch to your classroom ceilings with floating paper hot-air balloons. This 3D decoration gives the illusion of balloons drifting across the room, capturing kids’ attention and adding seasonal cheer.
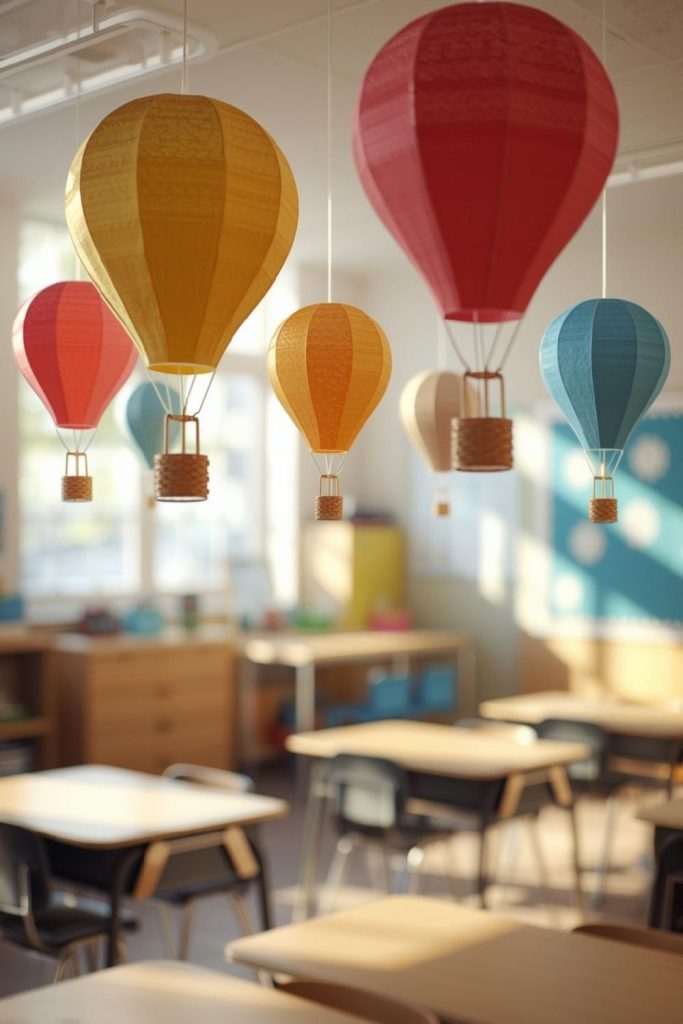
Materials needed: Colored cardstock, string, glue, scissors
Step-by-step method:
- Cut balloon shapes from colored cardstock.
- Fold in half and glue edges to create a 3D effect.
- Attach small paper baskets at the bottom of each balloon.
- Tie string to the top of each balloon.
- Hang from the ceiling at varying heights for a floating effect.
3. Giant 3D paper sunflower wall installation
Bring the feeling of a spring garden indoors with a giant 3D sunflower mural. This wall installation creates depth and visual interest while giving students a cheerful focal point in the classroom.
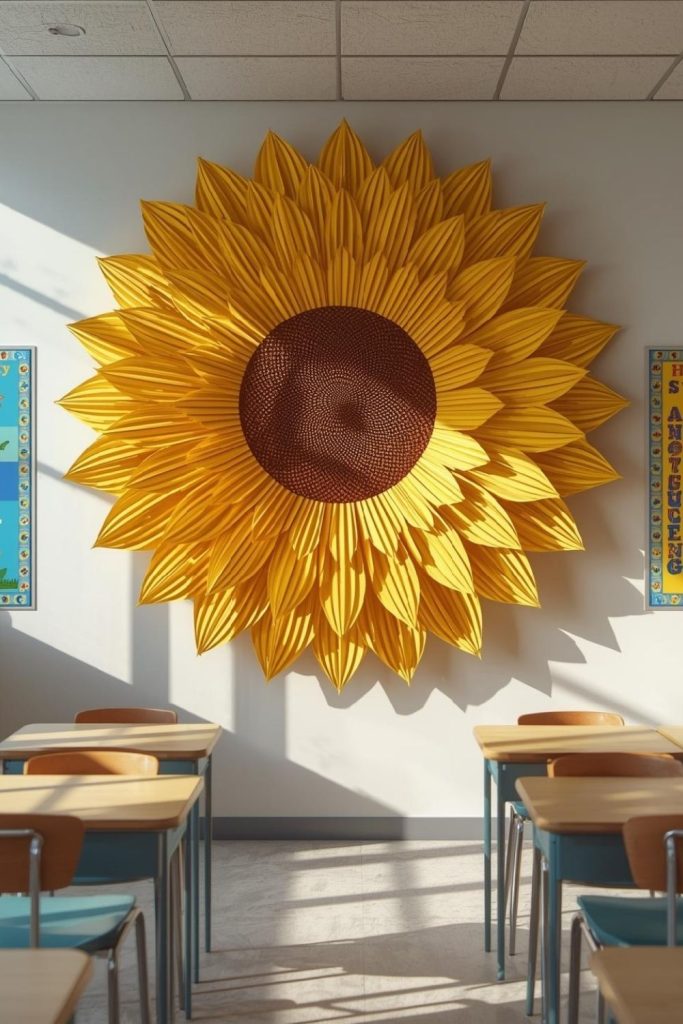
Materials needed: Yellow and brown cardstock, glue, scissors
Step-by-step method:
- Cut petals from yellow cardstock in various sizes.
- Layer petals around a circular brown center, gluing each layer for dimension.
- Attach the sunflower to a wall backing or directly to the wall.
- Add smaller sunflowers around the main flower for variety.
- Adjust petals to give a full, 3D appearance.
4. Interactive “weather tracker” board with movable icons
Help students observe and discuss seasonal weather patterns with an interactive tracker board. It’s both decorative and educational, reinforcing observation, discussion, and data skills while keeping the spring theme visible.
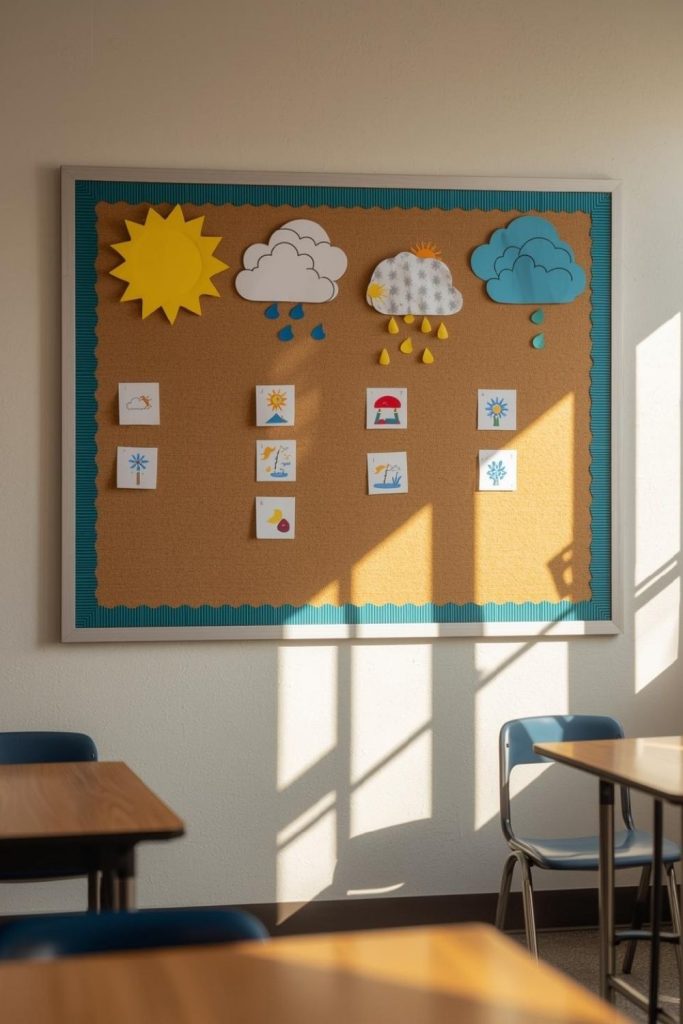
Materials needed: Bulletin board, colored cardstock, Velcro dots
Step-by-step method:
- Draw the layout of the board with days of the week and weather categories.
- Cut weather icons like sun, clouds, rain, and wind from cardstock.
- Attach Velcro dots to the back of icons and corresponding spots on the board.
- Each day, have students place the correct icon for the weather.
- Encourage discussion about patterns and changes throughout the season.
5. Spring garden-themed door decoration with paper insects
Make the classroom entrance a spring wonderland with a garden-themed door. Paper flowers, leaves, and insects create a playful, immersive effect that welcomes students and reinforces seasonal themes.
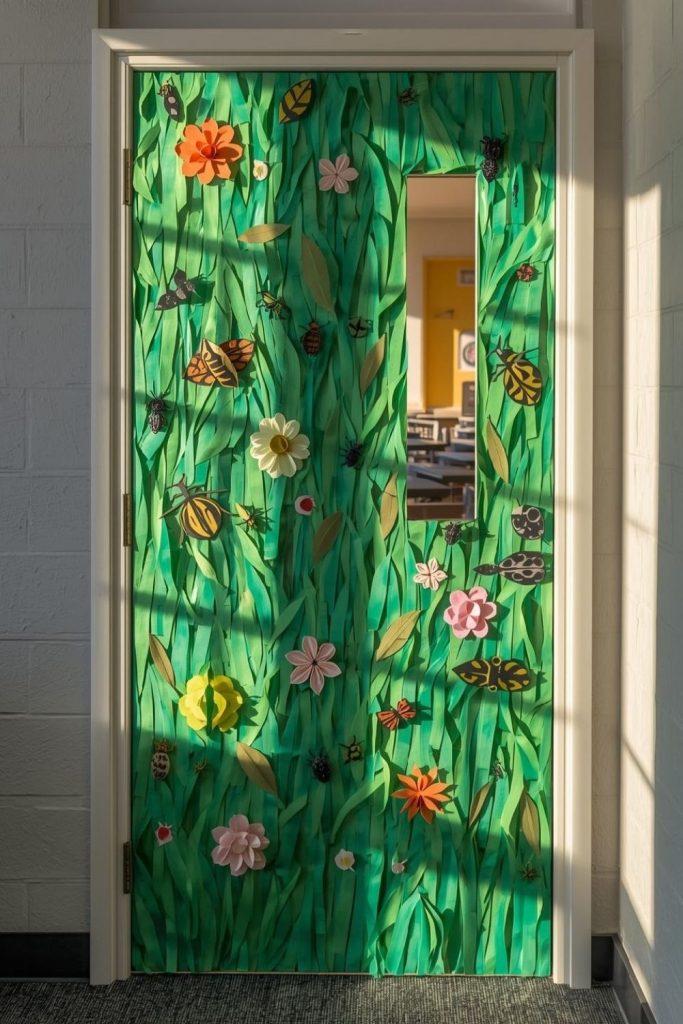
Materials needed: Green butcher paper, colored paper, tape, markers
Step-by-step method:
- Cover the door with green butcher paper to form a garden background.
- Cut flowers, leaves, and insects from colored paper.
- Arrange and tape them to the door for a balanced design.
- Add student names on insects or flowers for personalization.
- Update decorations throughout spring for freshness and seasonal variety.
6. Stained glass-style tissue window décor for sunlight effects
Let sunlight pour through colorful tissue “glass” to make your classroom windows sparkle. Kids will love how the light changes throughout the day, creating a bright, cheerful atmosphere that complements any spring lesson.
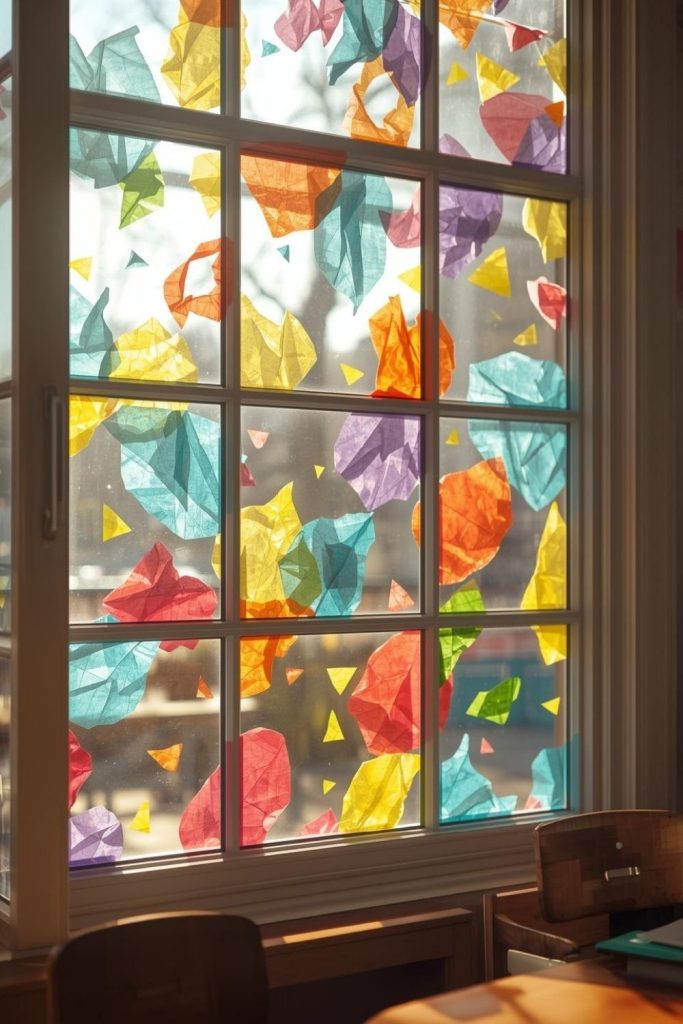
Materials needed: Clear contact paper, colored tissue paper squares, scissors
Step-by-step method:
- Cut tissue paper into squares or shapes of choice.
- Cover window section with clear contact paper, sticky side out.
- Let students stick tissue pieces onto the contact paper.
- Overlap colors to create a stained-glass effect.
- Press down gently and hang the completed piece on the window to catch sunlight.
7. Painted recycled tin can planters for school display
Bring greenery into your classroom with mini tin can planters. This decoration introduces students to plants and responsibility while adding colorful, spring-themed decor to shelves or windowsills.
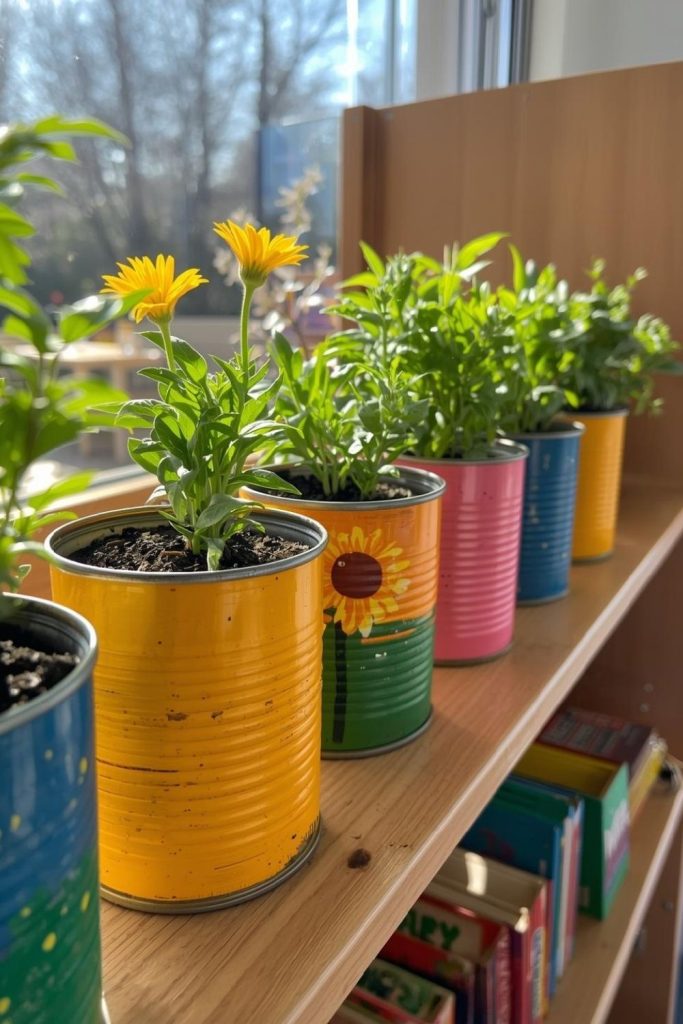
Materials needed: Empty tin cans, acrylic paint, brushes, potting soil, small plants
Step-by-step method:
- Clean and remove labels from tin cans.
- Paint cans in bright spring colors and patterns; let dry.
- Add a layer of small pebbles for drainage.
- Fill cans with potting soil and plant small flowers or herbs.
- Arrange on classroom shelves or windows for a cheerful display.
8. Paper honeycomb beehive decor for pollination theme
Create a 3D beehive to teach about bees and pollination while brightening your classroom walls. The honeycomb adds depth and a fun focal point for spring lessons.
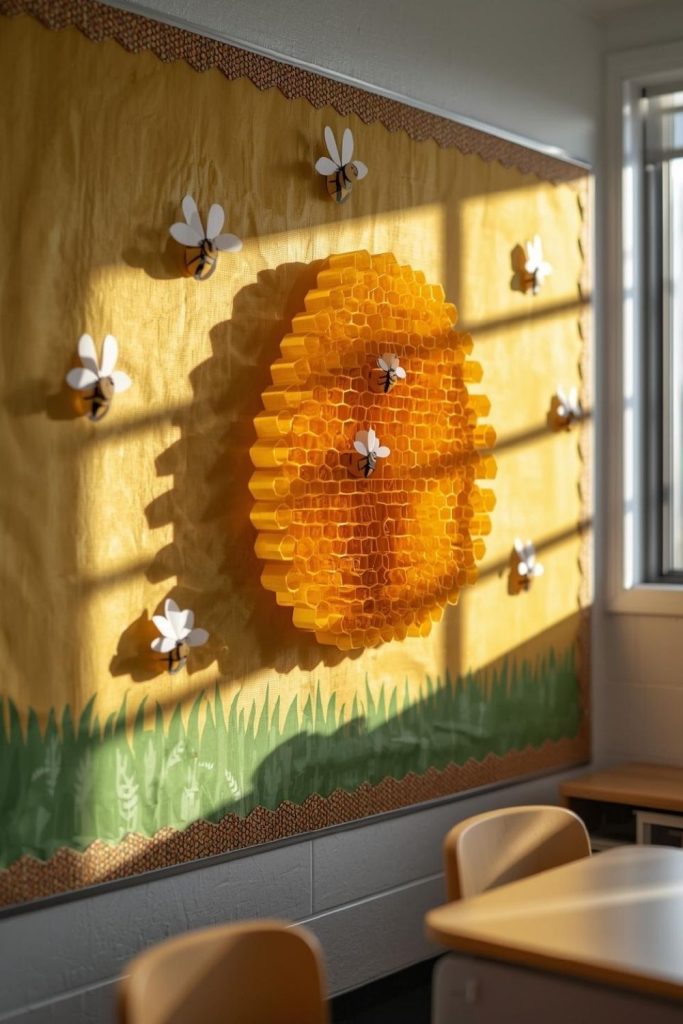
Materials needed: Colored paper, glue, scissors
Step-by-step method:
- Cut paper strips and form hexagons, gluing the ends together.
- Layer hexagons to build a honeycomb pattern.
- Attach bees made from paper or foam to the honeycomb.
- Mount the beehive on a wall or bulletin board.
- Encourage students to add notes or labels about pollination facts.
9. Colorful caterpillar crawl floor decal for preschool pathways
Turn a plain floor into a fun, interactive path with caterpillar decals. This playful decoration encourages movement and adds a whimsical, spring vibe to the classroom.
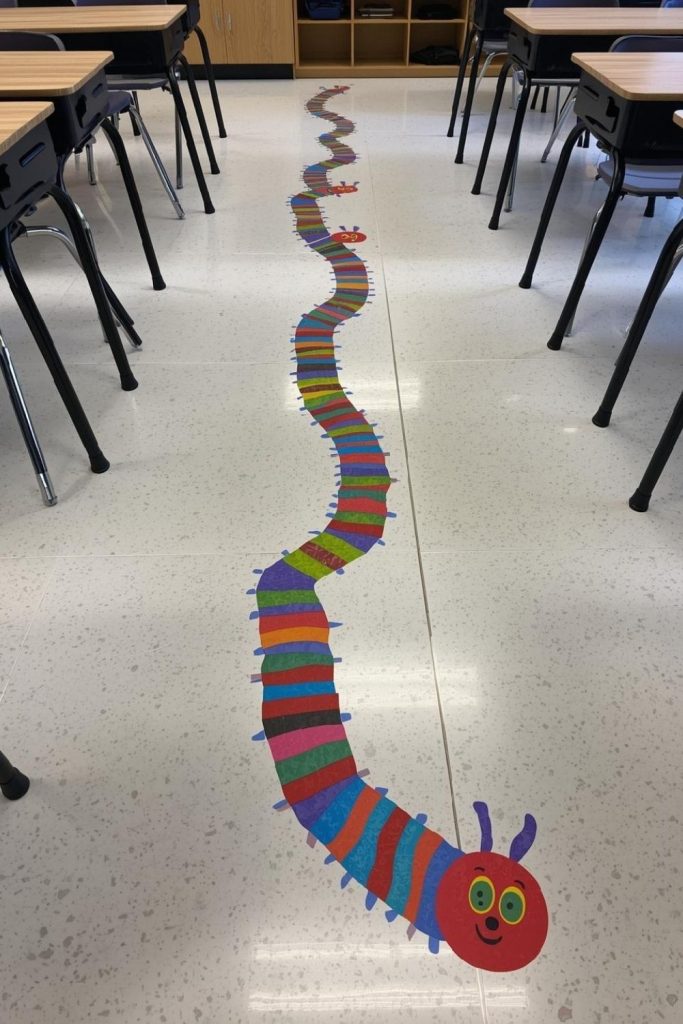
Materials needed: Colored vinyl or paper, scissors, tape
Step-by-step method:
- Cut out caterpillar body segments and a head from colored vinyl/paper.
- Number the segments or add patterns for extra learning.
- Tape them on the floor to create a winding path.
- Ensure decals are secure to prevent slipping.
- Let students hop or crawl along the path for fun movement breaks.
10. Hanging cotton cloud and sun mobile season decor
Bring the sky indoors with a cloud-and-sun mobile. Kids will enjoy watching it move and it’s perfect for tying into weather, seasons, or storytelling activities.
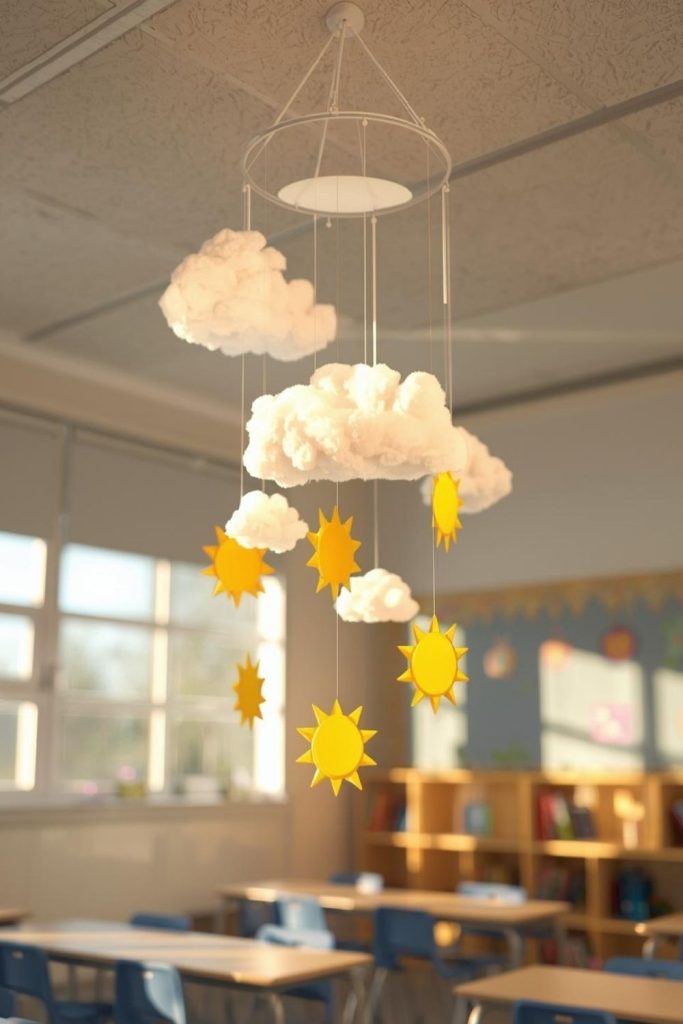
Materials needed: Cotton batting, yellow cardstock, string, hanger, glue
Step-by-step method:
- Shape cotton batting into fluffy clouds.
- Cut sun shapes from yellow cardstock.
- Attach clouds and suns to strings at different lengths.
- Tie strings to a hanger or hoop.
- Hang from the ceiling for a 3D seasonal effect.
11. Origami frog pond centerpiece spring decoration
Make a table centerpiece that brings spring to life with paper frogs and lily pads. It’s playful, educational, and perfect for a reading or science corner.
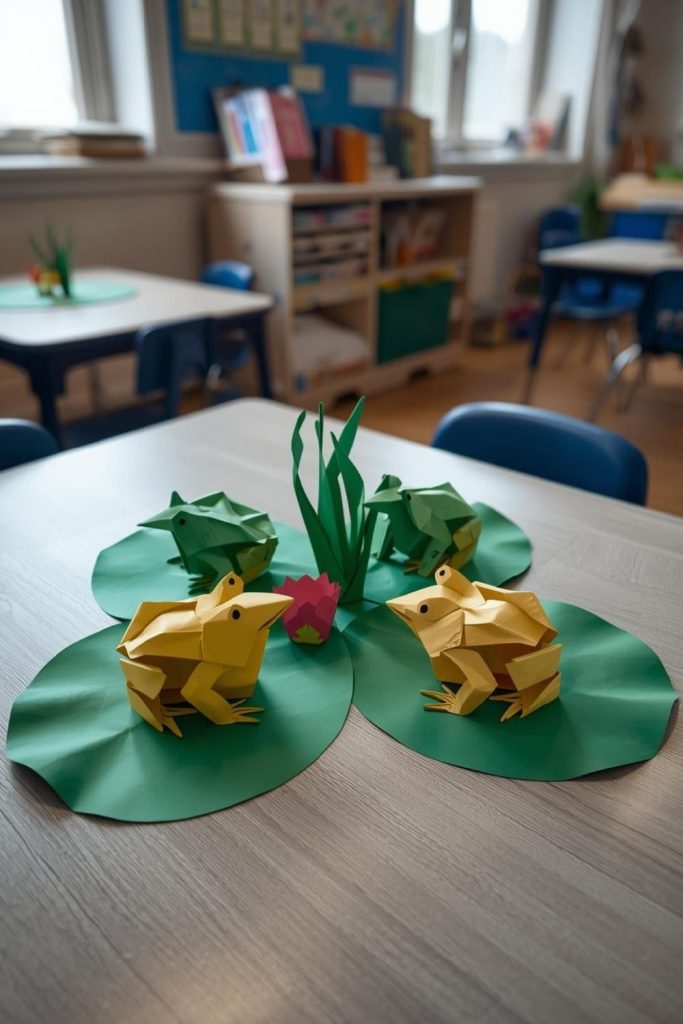
Materials needed: Origami paper, green cardstock, glue, markers
Step-by-step method:
- Fold origami frogs using green paper.
- Cut lily pads from cardstock.
- Arrange frogs and pads on a tray or table centerpiece.
- Draw or add water details with blue paper.
- Encourage kids to reposition frogs and add small critters for variety.
12. Chalkboard-style garden board décor with daily student goals
Combine decoration and classroom management with a garden-themed board. It brightens walls while giving students a visual cue for daily learning goals.
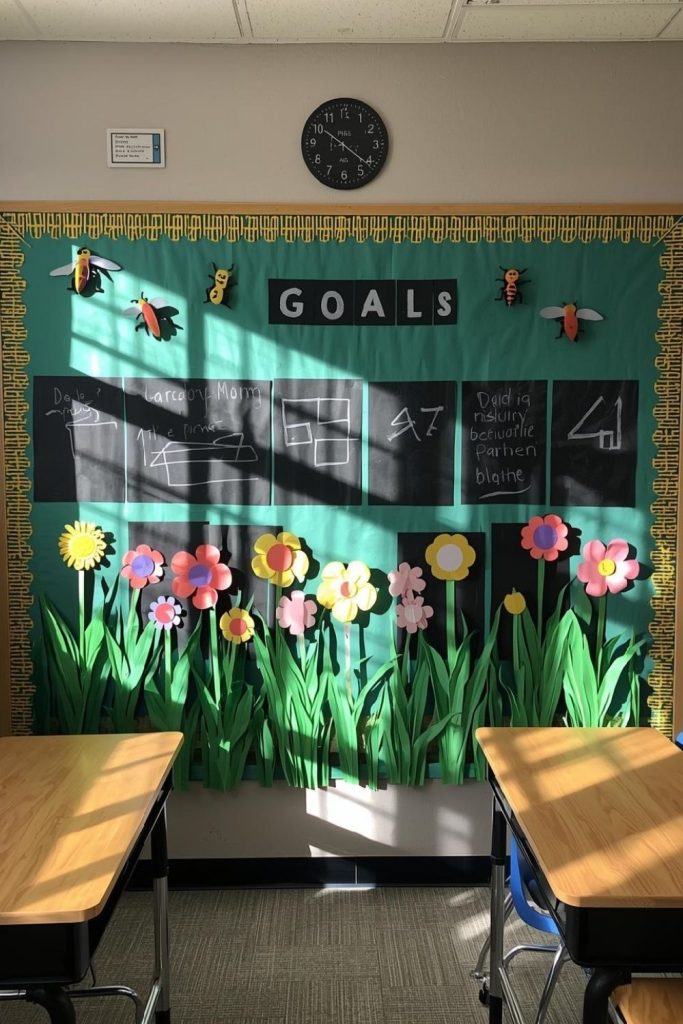
Materials needed: Bulletin board, black paper, colored chalk or markers, decorative paper flowers
Step-by-step method:
- Cover board with black paper to mimic a chalkboard.
- Draw garden-themed borders using chalk or markers.
- Add sections for daily goals or reminders.
- Decorate with paper flowers, bees, or butterflies.
- Update regularly to keep students engaged with goals and decorations.
13. Paper tulip student art wall idea display
Celebrate student creativity with a tulip wall display. Each tulip can feature a student’s artwork or name, creating a personalized and visually appealing decoration.
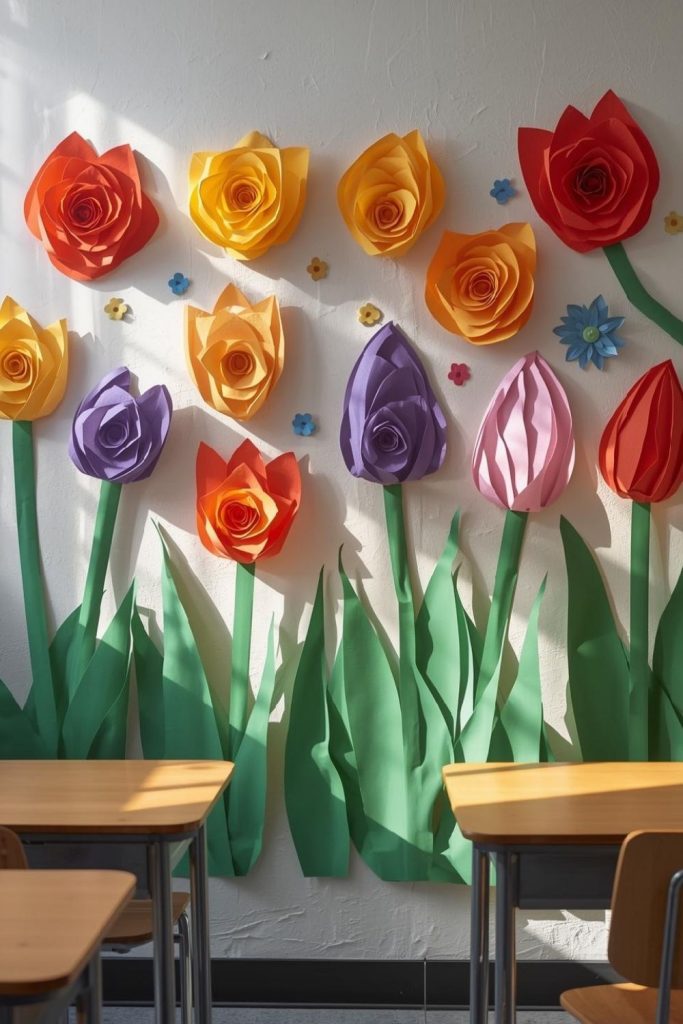
Materials needed: Colored paper, scissors, glue, markers
Step-by-step method:
- Cut tulip shapes from colored paper.
- Let students decorate each tulip with patterns or drawings.
- Cut green stems and attach to tulips.
- Arrange tulips on a bulletin board or wall.
- Step back and adjust layout for a full “spring garden” effect.
14. Sun-and-shadow cardstock art window décor for sunlight play
Play with light and shadows by creating sun-inspired cardstock art. It brightens windows and introduces students to basic light concepts.

Materials needed: Cardstock, scissors, tape, markers
Step-by-step method:
- Cut sun shapes, rays, and abstract patterns from cardstock.
- Decorate with markers or paint for contrast.
- Tape the pieces to a window or window frame.
- Adjust placement to let sunlight cast shadows on classroom surfaces.
- Change designs throughout the season for fresh effects.
15. Mini terrarium jars on shelves as spring-themed classroom décor
Bring nature indoors with mini terrariums. They’re perfect for science lessons, hands-on learning, and adding greenery to the classroom.
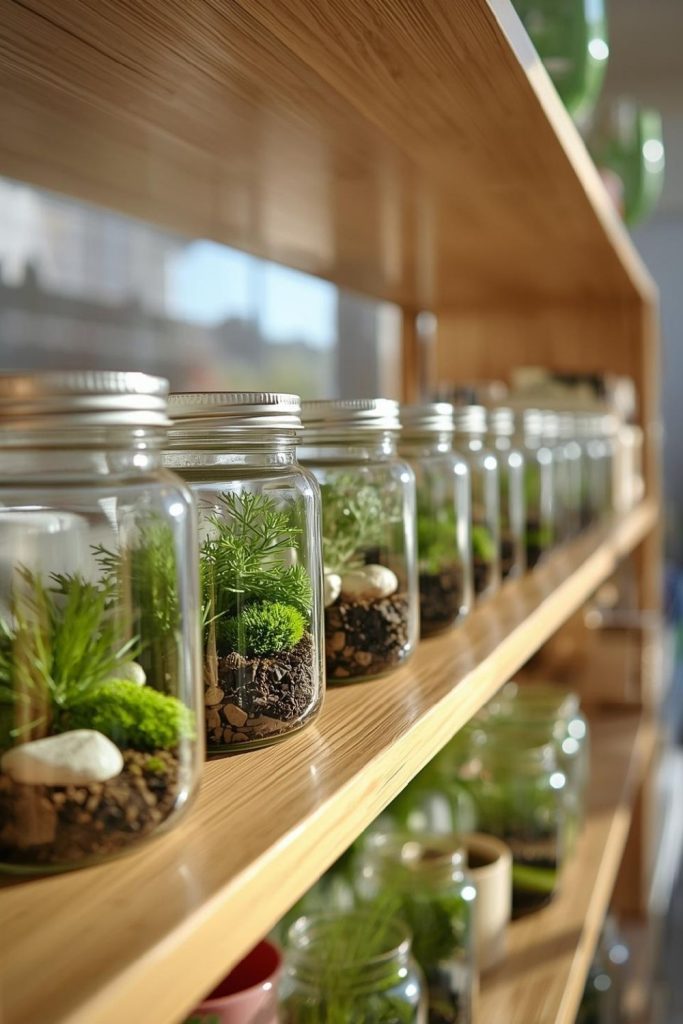
Materials needed: Glass jars, small plants, soil, pebbles, decorative items
Step-by-step method:
- Place a layer of small pebbles in the bottom of each jar.
- Add soil suitable for small plants.
- Plant moss, succulents, or small flowers.
- Decorate with miniature figures or stones.
- Arrange jars on shelves or windowsills to enhance the spring theme.
16. Painted wooden fence mural classroom wall decor
Create a playful fence mural to mimic an outdoor garden inside. It serves as a backdrop for bulletin boards, student art, or seasonal displays.
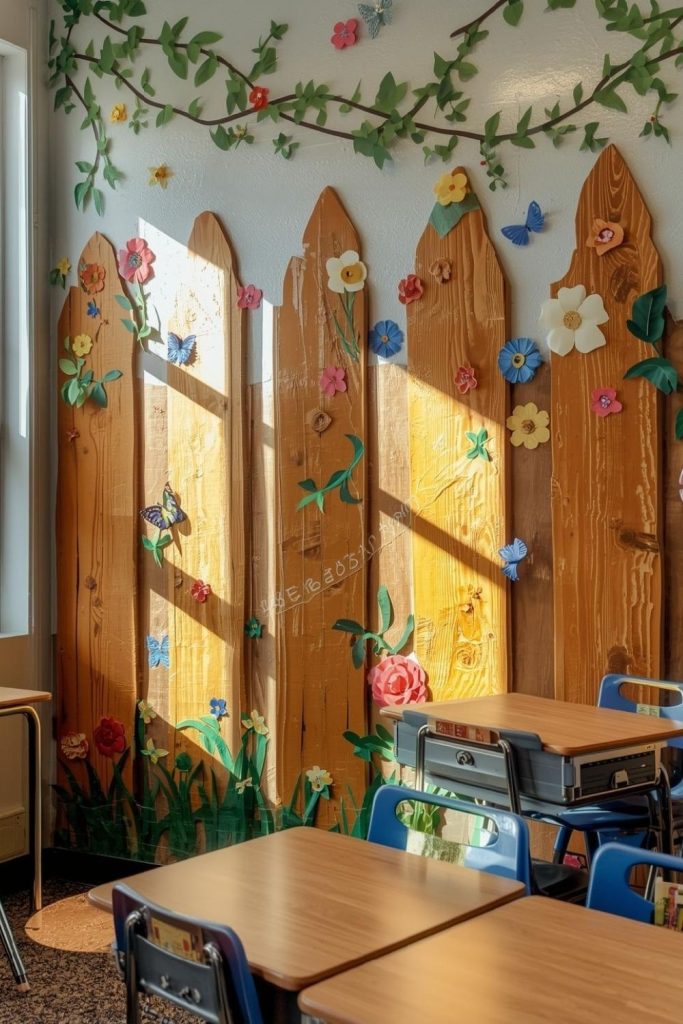
Materials needed: Wooden boards or cardboard, paint, brushes
Step-by-step method:
- Arrange boards or cardboard panels vertically.
- Paint boards to resemble a classic picket fence.
- Add decorative elements like painted flowers or grass.
- Mount the fence on a wall using safe fasteners.
- Use as a seasonal backdrop for spring-themed displays.
17. Pop-up 3D meadow display spring decorations in a corner
Transform an empty corner into a blooming meadow for students to enjoy. This 3D display brings depth, color, and seasonal vibes to the classroom.
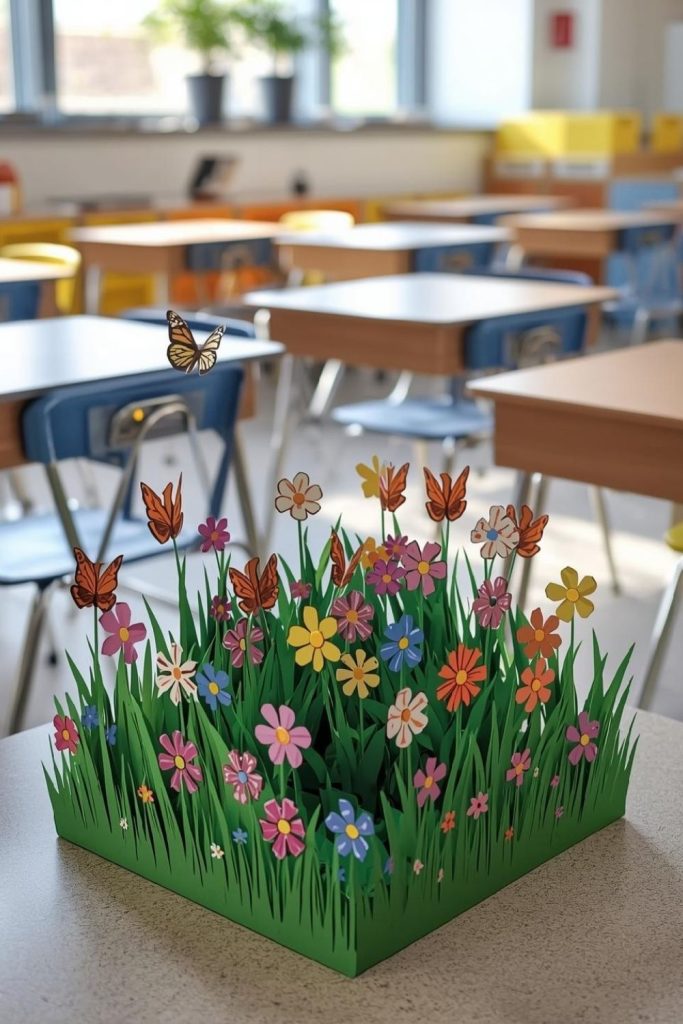
Materials needed: Colored paper, cardstock, glue, scissors
Step-by-step method:
- Cut flowers, grass, and butterflies from paper.
- Fold and layer pieces to create a 3D effect.
- Glue to a corner wall or bulletin board base.
- Add small creatures or paper insects for variety.
- Encourage students to contribute artwork for ongoing updates.
18. DIY weather wheel station school decor for hands-on learning
A weather wheel lets students track conditions and predict patterns while serving as a bright spring decoration.
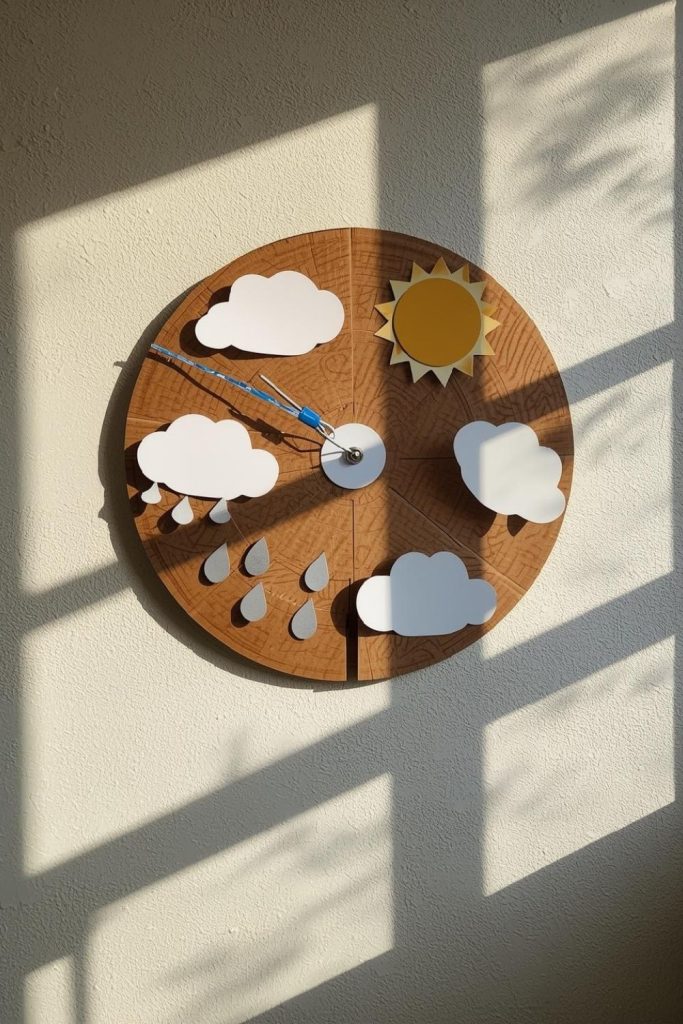
Materials needed: Cardboard, brad, cardstock, markers
Step-by-step method:
- Cut a large circle from cardboard.
- Divide circle into weather categories.
- Cut an arrow from cardstock and attach with a brad.
- Decorate with drawings of sun, clouds, or rain.
- Let students rotate the arrow daily to indicate current weather.
19. Garden gate illusion door décor using layered cardboard
Turn a classroom door into a spring entrance with a layered garden gate. It adds depth, interest, and seasonal flair.

Materials needed: Cardboard, paint, scissors, tape
Step-by-step method:
- Cut cardboard panels to form gate slats.
- Paint in light wood or bright spring colors.
- Layer panels for depth and tape securely to the door.
- Add paper flowers, vines, or butterflies.
- Step back and adjust decorations for a welcoming look.
20. Tissue-paper blossom garland decor idea for reading nook
Soft and colorful tissue-paper blossoms can bring life to cozy classroom areas like reading corners.
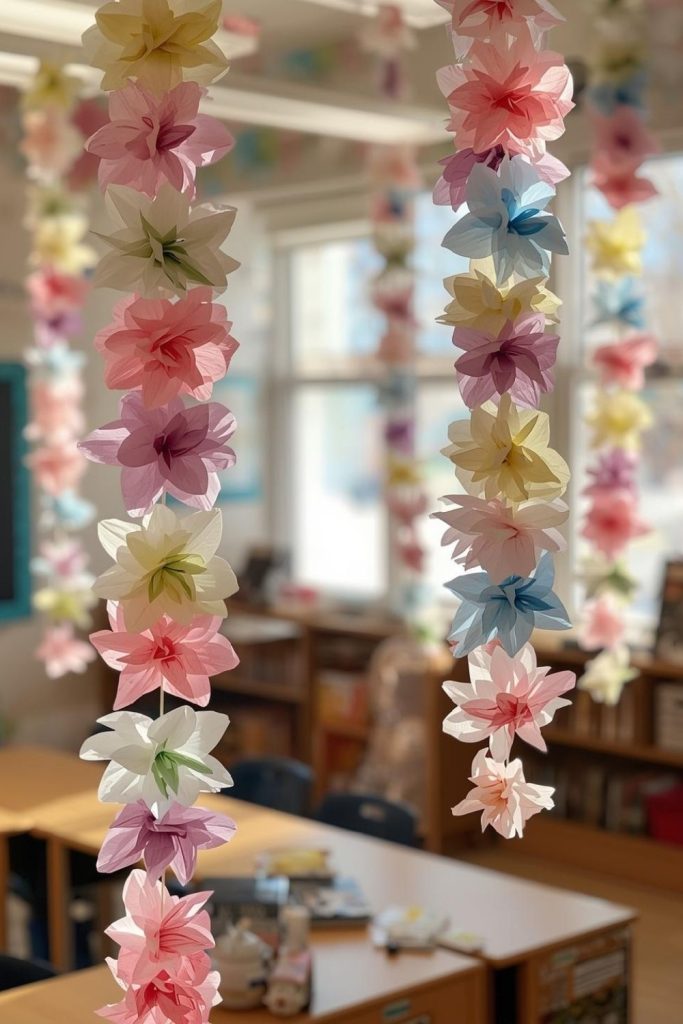
Materials needed: Tissue paper, string, glue, scissors
Step-by-step method:
- Cut tissue into circles or petal shapes.
- Layer and glue to form blossoms.
- Attach blossoms to a string at regular intervals.
- Hang garland above reading nooks or bulletin boards.
- Add variety by mixing colors and sizes for a fuller effect.
21. Hanging raindrop curtain window decoration for spring season
Create a dynamic window display with dangling paper raindrops. The gentle movement adds visual interest while tying into spring themes.
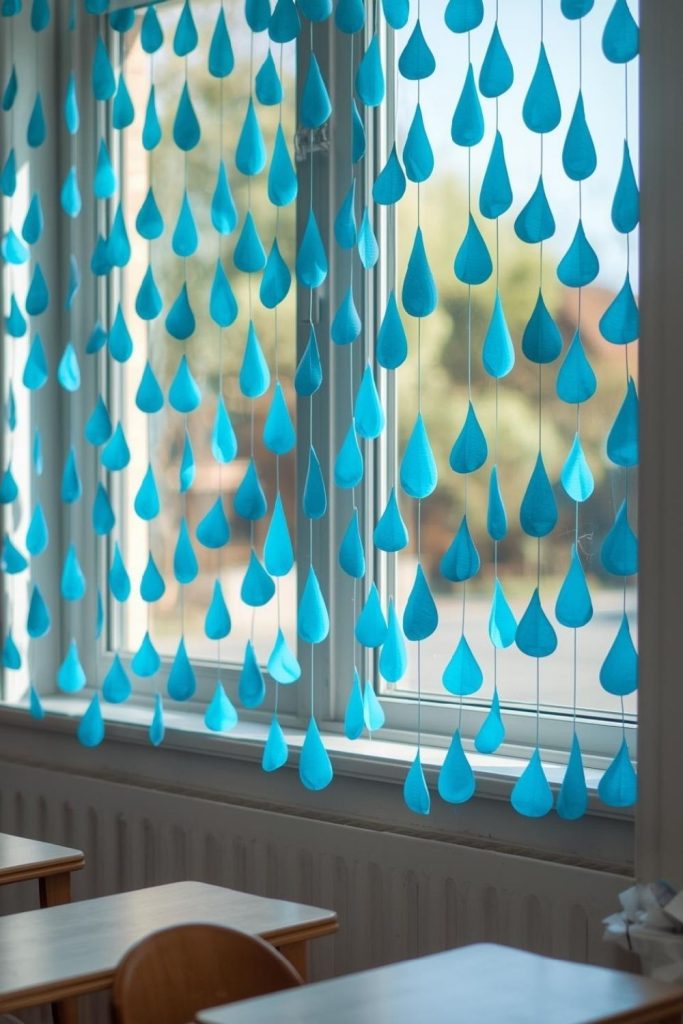
Materials needed: Blue cardstock, string, tape, scissors
Step-by-step method:
- Cut raindrop shapes from blue cardstock.
- Attach drops to strings at various intervals.
- Hang strings from curtain rods or tape to window frames.
- Vary string lengths for visual depth.
- Encourage kids to add additional drops for interactive updates.
22. Layered landscape backdrop classroom DIY wall decor
Make a colorful spring landscape on a wall for immersive seasonal decor.
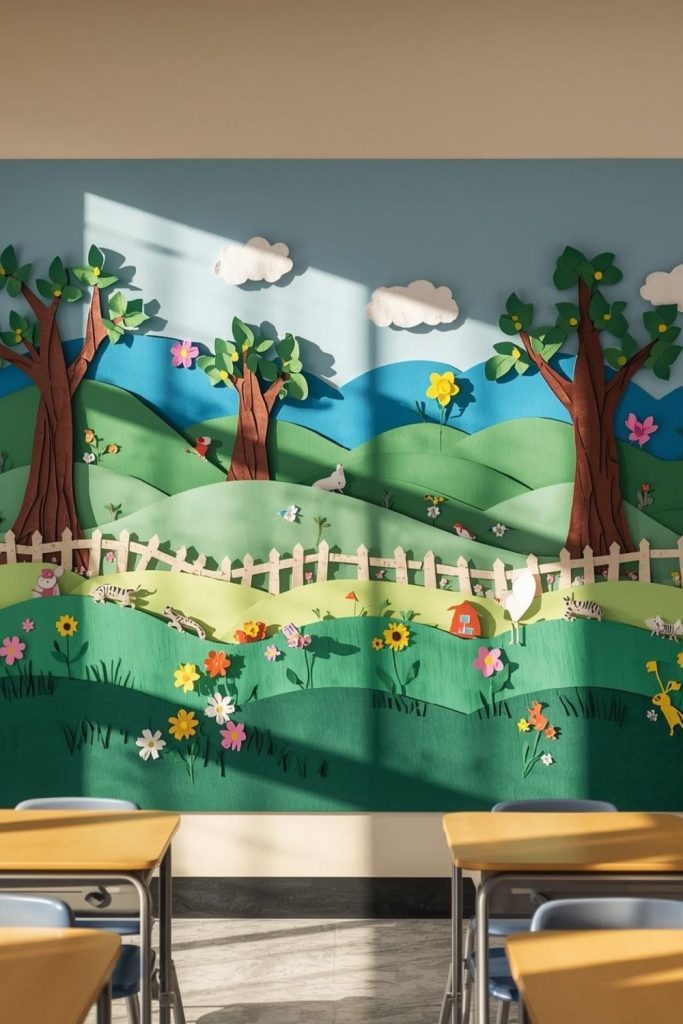
Materials needed: Colored paper, glue, scissors, markers
Step-by-step method:
- Cut hills, trees, flowers, and clouds from colored paper.
- Layer pieces from background to foreground.
- Glue onto wall or bulletin board base.
- Add paper animals or insects for liveliness.
- Rotate seasonal elements to maintain freshness.
23. Paper birdhouse village board decoration for spring theme
Bring a whimsical village to your classroom board with mini birdhouses. Kids can add small birds or eggs for interactive fun.
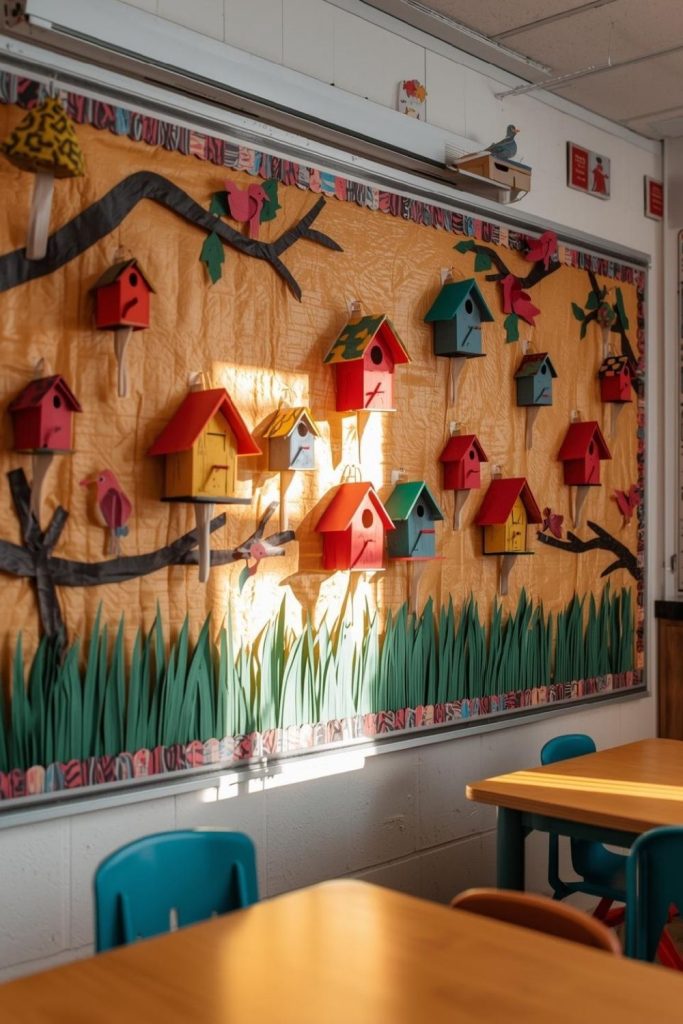
Materials needed: Cardstock, markers, glue, scissors
Step-by-step method:
- Cut birdhouse shapes from cardstock.
- Decorate with markers or patterns.
- Glue to a bulletin board in clusters.
- Add paper birds, nests, or eggs.
- Encourage students to contribute their own designs.
24. Paper greenhouse centerpiece season decoration for display table
A miniature paper greenhouse brightens tabletops and serves as a spring learning tool for plants.
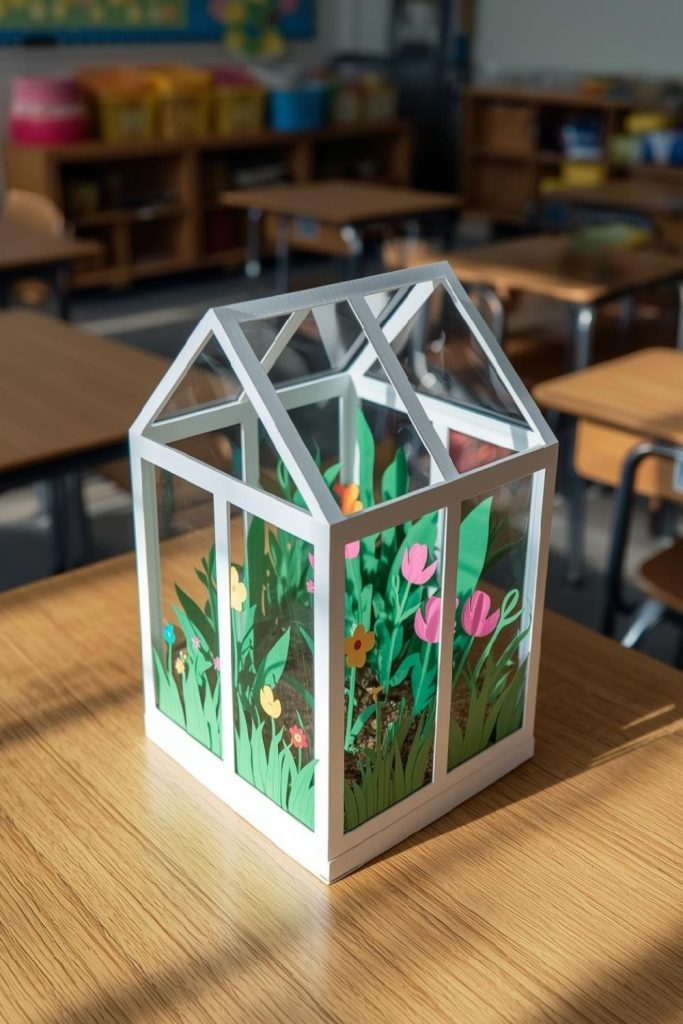
Materials needed: Cardstock, glue, scissors, colored paper for plants
Step-by-step method:
- Cut panels for greenhouse walls and roof.
- Fold and glue panels to create a 3D structure.
- Add paper plants or flowers inside.
- Decorate outside with spring-themed elements.
- Place centerpiece on table or shelf for display.
25. Sunburst geometric mural classroom focal wall décor
Create a bold, spring-themed focal wall with geometric sunburst designs. It energizes the classroom and adds a modern touch.
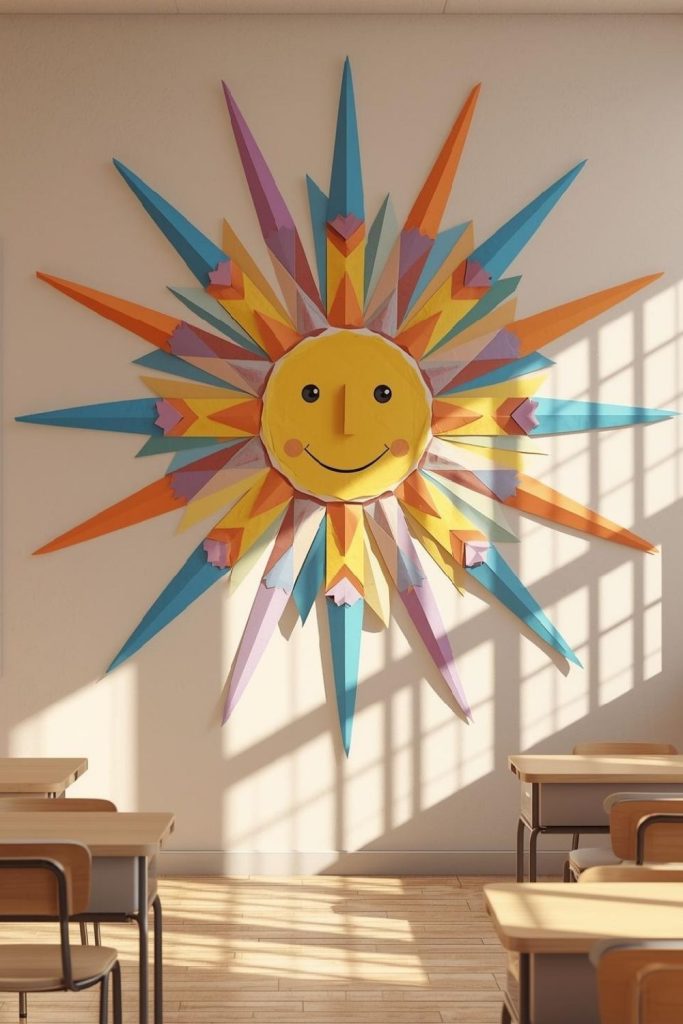
Materials needed: Colored paper, scissors, glue, tape
Step-by-step method:
- Cut triangles and rays from colored paper.
- Arrange in a sunburst pattern on a wall.
- Glue or tape each piece securely.
- Layer colors for depth and vibrancy.
- Step back to adjust spacing and create a balanced mural.