

Halloween is a wonderful season for toddlers to enjoy colors, textures, and creative activities with their parents. Simple handmade projects give young children a chance to play with different materials while creating cute decorations for the home. For children between 2 and 5 years old, the best Halloween activities are those that allow them to touch, paint, stick, and arrange items with their own little hands.
Parents often look for easy Halloween crafts that do not require expensive supplies or complicated preparation. Activities made with paper, paint, cotton, yarn, and recycled items can keep toddlers busy while supporting early skills like hand control, color recognition, and decision making. These projects also create special family moments because parents and children can work together and enjoy the finished results.
The following Halloween crafts are designed with toddlers in mind. Each idea uses simple materials and focuses on creating something cute, colorful, and suitable for young children. From funny pumpkins to friendly monsters, these activities bring Halloween fun into the home without making the process stressful.
1. Paper Plate Jack-o’-Lantern with Interchangeable Funny Faces
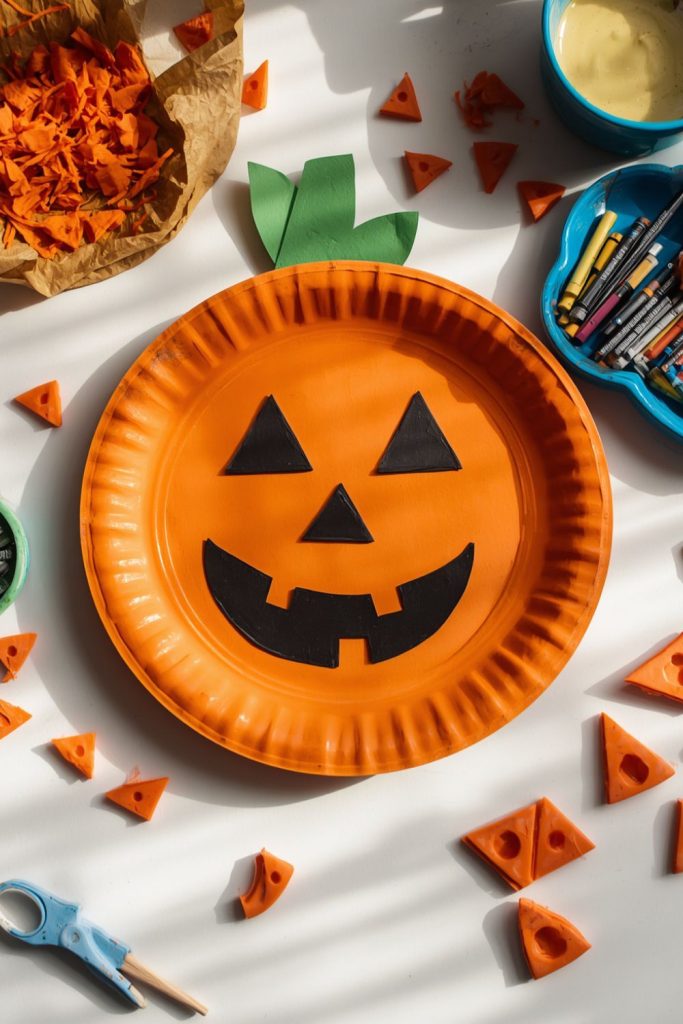
This paper plate pumpkin activity lets toddlers create different silly Halloween faces using simple pieces they can move around.
It is a playful project that combines painting, shapes, and pretend play while creating a cheerful decoration.
Materials Needed:
- Paper plate
- Orange paint
- Paint brush
- Black construction paper
- Green paper
- Glue
- Child safe scissors
- Googly eyes or stickers
Step by Step Method:
- Paint the paper plate orange and leave it aside until the paint dries.
- Cut a small green stem shape from paper and attach it to the top of the plate.
- Cut different face pieces from black paper, including eyes, noses, and mouths.
- Create several expressions such as happy, surprised, sleepy, and silly faces.
- Place the face pieces on the pumpkin using removable tape or reusable adhesive.
- Let toddlers move the pieces around to create different jack-o’-lantern looks.
- Display the finished pumpkin decoration in a room or play area.
This activity is a great choice because toddlers can change the pumpkin face again and again instead of making only one design. Moving the pieces helps children practice hand movements while choosing where each part belongs. Parents can talk about feelings by asking what kind of expression the pumpkin has. The bright orange pumpkin and funny faces make this project enjoyable for children and attractive as a Halloween decoration.
- Related post 25 Stunning Halloween Crafts for Adults to Transform Your Home Into a Spooky-Chic Haven
2. Handprint Ghost Keepsake Craft

This handprint ghost activity turns a child’s hand shape into a cute Halloween character.
It creates a simple keepsake that parents can save while toddlers enjoy messy painting fun.
Materials Needed:
- White paper
- Black paper
- White washable paint
- Paint brush
- Glue
- Googly eyes
Step by Step Method:
- Paint the toddler’s hand with white washable paint.
- Press the painted hand onto white paper to create the ghost shape.
- Allow the handprint to dry completely.
- Add googly eyes or draw eyes on the ghost face.
- Cut around the handprint if desired and place it on black paper.
- Add small decorations around the ghost using stickers or drawings.
- Display the finished ghost picture.
Toddlers enjoy this activity because they can see their own hand become a Halloween character. The process introduces them to textures and colors while allowing them to participate in making the artwork. Parents often enjoy handprint activities because they capture a small moment from their child’s early years. The finished ghost looks cute rather than scary, making it suitable for young children.
3. Cotton Ball Ghost Hanging Decoration

This cotton ball ghost decoration gives toddlers a chance to work with soft textures while creating a friendly Halloween figure.
The finished ghost can be hung around the home as a simple seasonal decoration.
Materials Needed:
- Cardboard or paper ghost shape
- Cotton balls
- Glue
- Black paper
- String or ribbon
Step by Step Method:
- Cut a simple ghost shape from cardboard or thick paper.
- Spread glue across the ghost shape.
- Let toddlers place cotton balls over the surface.
- Cut small black circles for the eyes and mouth.
- Attach the face pieces to the cotton-covered ghost.
- Add a string or ribbon at the top.
- Hang the ghost decoration near a window or doorway.
The soft cotton texture makes this activity interesting for toddlers who enjoy touching different materials. Children can practice placing small items carefully while creating their own ghost decoration. Parents can prepare several ghost shapes and allow children to make a small group of friendly ghosts. The simple design works well for young children because there are no complicated steps, yet the final result looks charming.
4. Paper Roll Bat with Foldable Wings
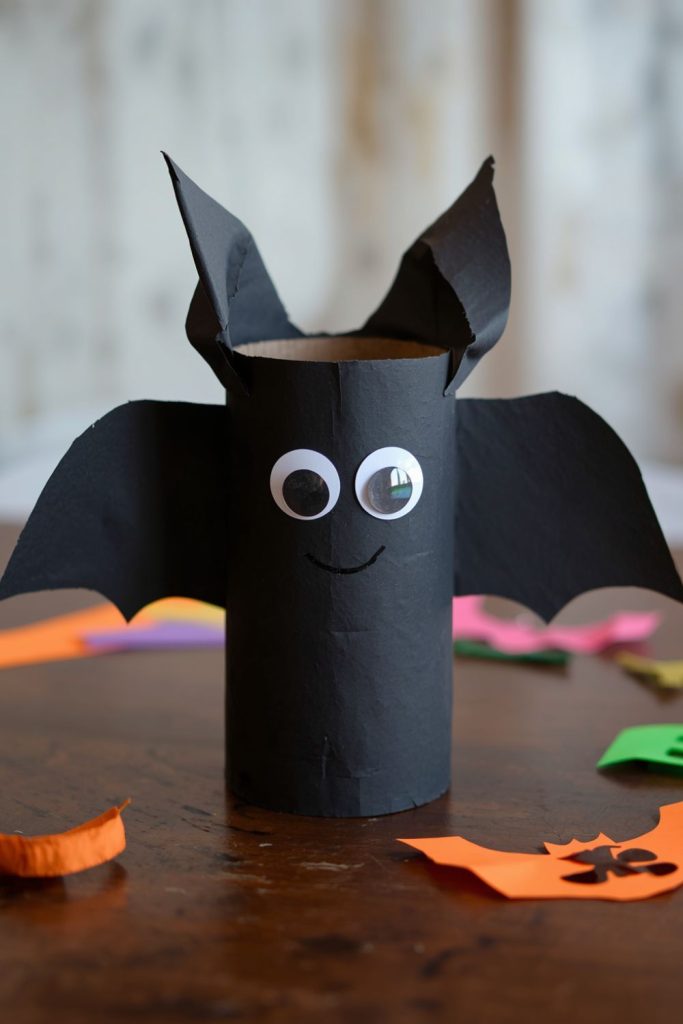
This paper roll bat project transforms a recycled cardboard tube into a cute Halloween character.
Toddlers can decorate the bat while learning how simple household items can become creative decorations.
Materials Needed:
- Empty paper roll
- Black paint or black paper
- Black cardstock
- Glue
- Googly eyes
- Scissors
Step by Step Method:
- Cover the paper roll with black paint or black paper.
- Cut two bat wings from black cardstock.
- Attach the wings to both sides of the paper roll.
- Add googly eyes to create a friendly face.
- Fold the wings slightly so they look like they are moving.
- Add small details such as a smile or tiny teeth.
- Place the bat on a shelf or hang it with string.
This craft helps toddlers explore recycling while making a recognizable Halloween character. The wing movement makes the bat more interesting because children can pretend it is flying around the room. Parents can use this activity to introduce different shapes and textures. Since the materials are easy to find, this project is practical for a quick Halloween afternoon activity.
5. Friendly Monster Paper Bag Puppet

This paper bag monster puppet allows toddlers to create a funny Halloween character they can play with afterward.
It combines decoration and pretend play, making the activity enjoyable before and after it is finished.
Materials Needed:
- Paper bag
- Colored paper
- Glue
- Googly eyes
- Crayons
- Scissors
Step by Step Method:
- Turn the paper bag upside down so the flap becomes the monster mouth.
- Cut colorful shapes for eyes, ears, horns, and teeth.
- Let toddlers choose where to place each decoration.
- Glue the pieces onto the bag.
- Add a silly expression using crayons or markers.
- Allow the puppet to dry before playing.
- Use the puppet for Halloween pretend games.
This monster puppet gives toddlers freedom to make their own funny character without needing a perfect design. Choosing colors and placing different shapes helps children develop creativity and confidence. Parents can join the activity by creating their own puppet and having a small Halloween puppet show together. The finished puppet becomes more than a decoration because children can continue playing with it after making it.
6. Torn Paper Candy Corn Collage

This colorful candy corn collage gives toddlers a simple way to create Halloween artwork using small pieces of paper.
It helps young children practice tearing, placing, and arranging materials while making a bright seasonal picture.
Materials Needed:
- White paper
- Yellow construction paper
- Orange construction paper
- White tissue paper
- Glue
- Pencil
Step by Step Method:
- Draw a large candy corn shape on a piece of white paper.
- Tear orange, yellow, and white paper into small pieces.
- Add glue inside each section of the candy corn shape.
- Let toddlers place the paper pieces onto the matching areas.
- Press the pieces gently so they stick properly.
- Allow the artwork to dry completely.
- Display the finished candy corn picture as Halloween decoration.
This activity is suitable for toddlers because it does not require perfect cutting or detailed drawing. Children can enjoy the feeling of tearing paper and deciding where each piece should go. The different colors help toddlers recognize patterns while they create their artwork. Parents can prepare the candy corn outline before starting and allow children to complete the decorating part. The finished collage has a textured appearance that looks attractive on a refrigerator, wall, or craft display area. It is a simple Halloween activity that turns basic paper supplies into a colorful seasonal decoration.
7. Fingerprint Spider with Painted Web Background

This fingerprint spider activity combines painting and tiny hand movements to create a cute Halloween picture.
Toddlers can make their own little spiders while exploring colors and textures.
Materials Needed:
- White paper
- Black washable paint
- White paint
- Paint brush
- Googly eyes
- Glue
Step by Step Method:
- Paint a simple spider web shape on paper using white paint.
- Dip a toddler’s fingertip into black washable paint.
- Press fingerprints onto the paper to create spider bodies.
- Add small legs around each fingerprint using a paint brush.
- Attach googly eyes to the spiders.
- Add extra dots or decorations around the web.
- Let the picture dry before displaying it.
Toddlers enjoy fingerprint activities because they can see their own marks become pictures. This project creates a fun connection between simple movements and creative results. The black spiders against the white web background create a strong Halloween look without being frightening for young children. Parents can make this activity easier by drawing the web first and allowing toddlers to focus on creating the spiders. It is a great option for a short afternoon activity because it needs only a few supplies and produces a decoration children can proudly show.
8. Pumpkin Seed Mosaic Pumpkin Face

This pumpkin seed activity turns natural materials into a fun Halloween picture with texture and color.
Toddlers can arrange pumpkin seeds to create a funny pumpkin face while practicing careful hand movements.
Materials Needed:
- Paper pumpkin shape
- Pumpkin seeds
- Orange paint
- Black paper
- Glue
- Green paper
Step by Step Method:
- Paint the paper pumpkin orange and let it dry.
- Add glue to the inside area of the pumpkin shape.
- Let toddlers place pumpkin seeds across the surface.
- Cut black paper shapes for eyes and a mouth.
- Attach the face pieces to the pumpkin.
- Add a green paper stem at the top.
- Allow the finished pumpkin to dry completely.
This activity gives toddlers a chance to work with a different material while creating Halloween artwork. The texture of pumpkin seeds makes the finished picture stand out compared to regular paper decorations. Parents can use this activity after carving a pumpkin because the leftover seeds can become part of the project. Children enjoy placing each seed in different areas, which supports concentration and hand control. The final pumpkin face can look funny, silly, or surprised depending on how children arrange the pieces.
9. Paper Cup Monster Lantern with Battery Light
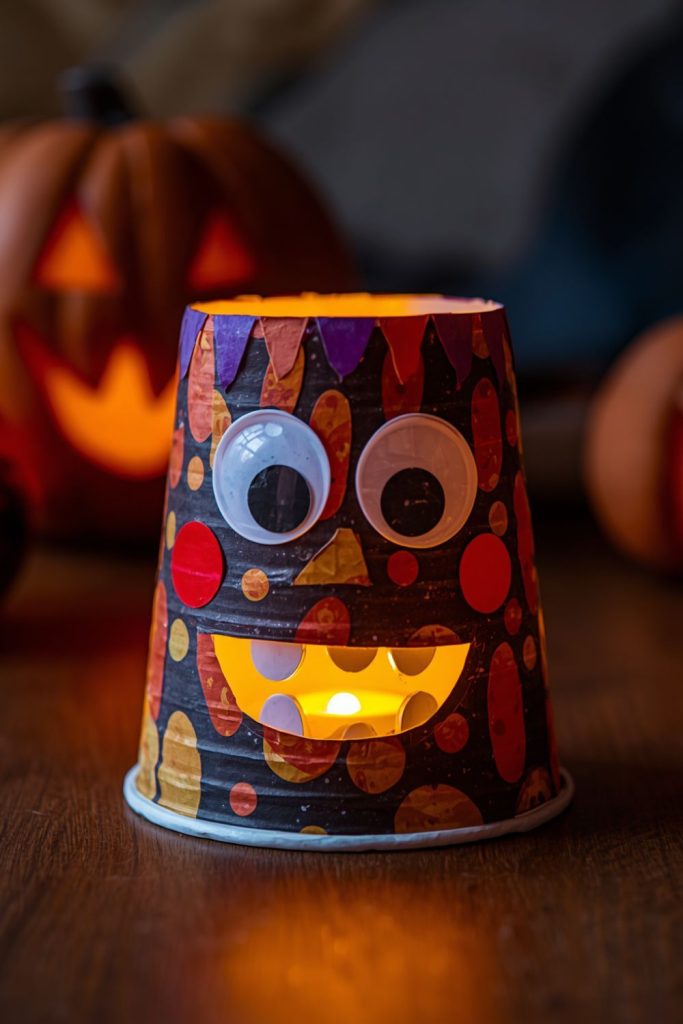
This paper cup monster lantern creates a cheerful Halloween decoration that can brighten a child’s room or play area.
Toddlers can decorate the cup with funny monster features and enjoy the soft glow afterward.
Materials Needed:
- Paper cup
- Battery operated tea light
- Colored paper
- Googly eyes
- Glue
- Child safe scissors
Step by Step Method:
- Turn the paper cup upside down.
- Cut small monster shapes from colored paper.
- Add eyes, teeth, ears, or horns to create a monster face.
- Glue the decorations onto the cup.
- Place a battery tea light underneath the cup.
- Turn on the light and watch the monster glow.
- Place the lantern in a safe area for decoration.
This Halloween activity is exciting because toddlers can create a character and then see it become a glowing decoration. Using a battery light keeps the project suitable for young children while adding extra fun. Parents can help with cutting while toddlers focus on choosing colors and placing decorations. The friendly monster design keeps Halloween feeling cheerful and playful. This project also works well as a small decoration for a Halloween party table or a child’s bedroom corner.
10. Black Cat Paper Plate Mask with Yarn Whiskers

This black cat mask gives toddlers a chance to create a pretend-play accessory for Halloween fun.
The simple materials create a cute character that children can wear after decorating.
Materials Needed:
- Paper plate
- Black paint
- Black paper
- Yarn
- Glue
- Child safe scissors
- Elastic string
Step by Step Method:
- Paint the paper plate black and allow it to dry.
- Cut two eye openings with adult help.
- Cut triangle shapes for cat ears.
- Attach the ears to the top of the plate.
- Add yarn pieces for whiskers.
- Attach string to both sides of the mask.
- Let toddlers wear the finished cat mask for pretend play.
This activity encourages imagination because children can become a friendly Halloween cat after making the mask. The yarn whiskers add a fun texture that makes the mask look more interesting. Parents can help toddlers decorate the mask while allowing them to choose where to place the pieces. The project is simple enough for young children and creates an item they can use during Halloween games or dress-up time. It combines creativity with play, which makes it a favorite type of activity for many toddlers.
11. Halloween Shape Monster Collage Using Paper Shapes
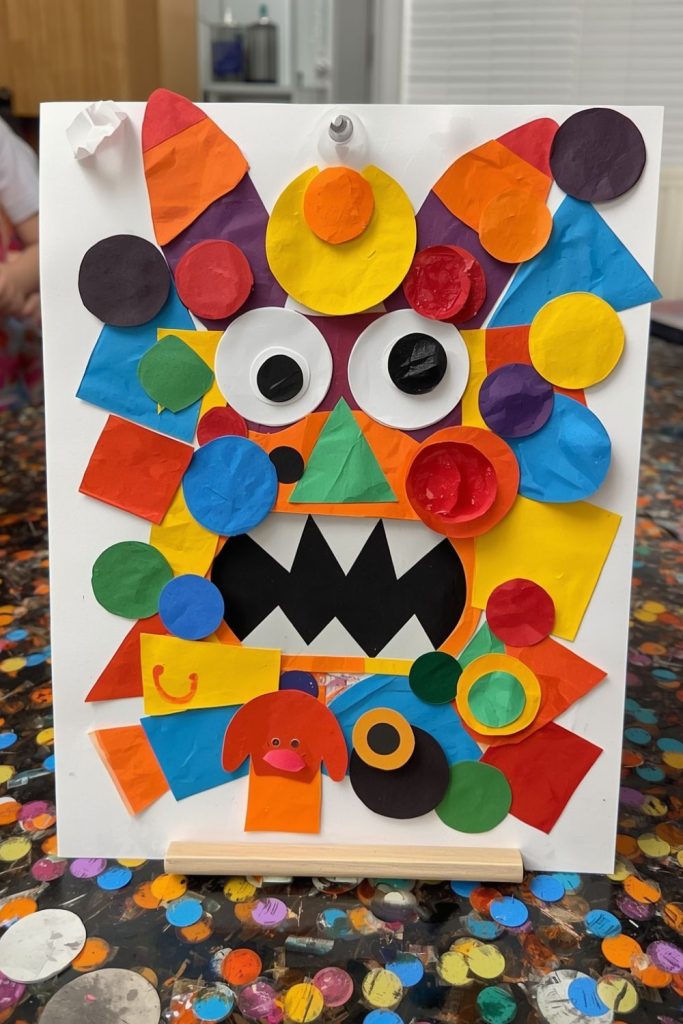
This shape monster collage helps toddlers create funny Halloween characters using simple paper pieces.
Children can combine different shapes, colors, and sizes to make their own silly monsters.
Materials Needed:
- Colored construction paper
- White paper
- Glue
- Child safe scissors
- Googly eyes
- Crayons
Step by Step Method:
- Cut different paper shapes such as circles, squares, triangles, and rectangles.
- Let toddlers choose shapes for the monster body, eyes, mouth, and arms.
- Arrange the pieces on white paper before gluing.
- Attach each shape to create a funny monster character.
- Add googly eyes or draw extra details.
- Use crayons to add hair, spots, or other decorations.
- Allow the picture to dry before displaying it.
This activity works well for toddlers because it combines Halloween fun with early shape recognition. Children do not need to follow one design, so every monster can look different. Parents can encourage toddlers to choose colors and decide where each part belongs. The finished artwork often becomes a funny collection of unique monster faces that children enjoy showing to others. This project uses basic materials that many families already have at home, making it a simple choice for a Halloween afternoon activity.
12. Tissue Paper Ghost Window Decoration
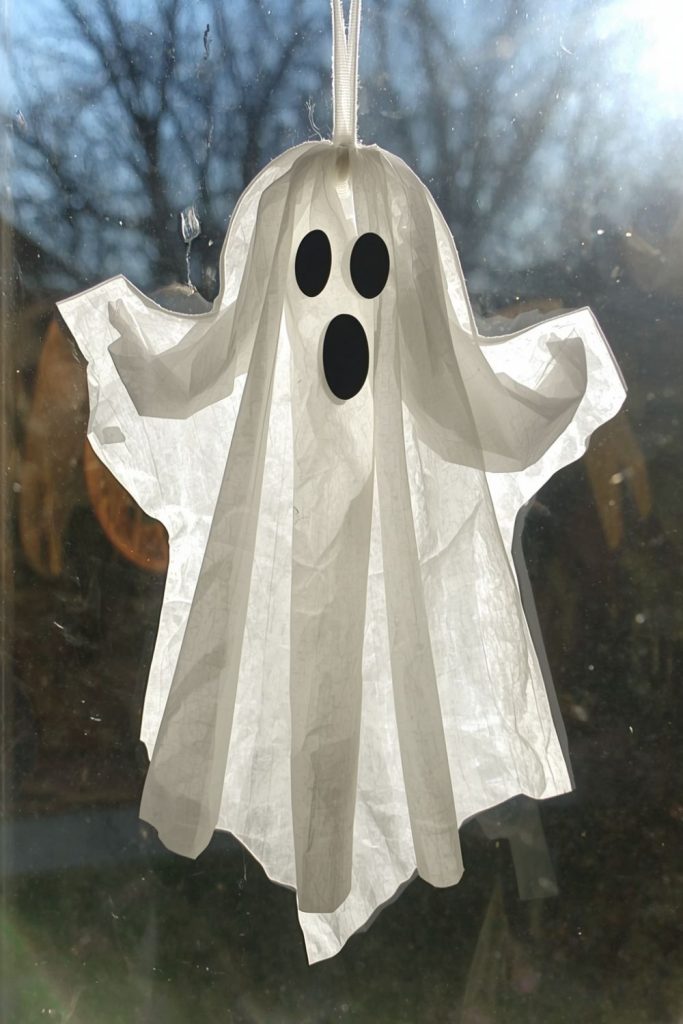
This tissue paper ghost decoration creates a soft and colorful Halloween display for home windows.
Toddlers can place lightweight paper pieces while making a friendly ghost design.
Materials Needed:
- Clear contact paper
- White tissue paper
- Black paper
- Scissors
- Tape
Step by Step Method:
- Cut a ghost shape from clear contact paper.
- Remove the protective layer and place the sticky side facing upward.
- Let toddlers place white tissue paper pieces onto the ghost shape.
- Cut small black circles for eyes and a mouth.
- Add the face pieces to complete the ghost.
- Cover the back with another piece of contact paper.
- Hang the ghost decoration on a window.
Toddlers enjoy this activity because the sticky surface makes placing materials exciting and different from regular paper projects. The soft tissue paper creates a glowing effect when sunlight passes through the decoration. Parents can create several ghosts in different sizes and place them together as a Halloween window display. The finished decoration looks cheerful instead of scary, making it suitable for young children. This project also helps toddlers practice careful placement while enjoying a simple seasonal activity.
13. Handprint Frankenstein Craft

This handprint Frankenstein activity turns a toddler’s hand shape into a friendly Halloween character.
It creates a fun keepsake while allowing children to enjoy painting and decorating.
Materials Needed:
- White paper
- Green washable paint
- Black paint or marker
- Googly eyes
- Glue
- Paint brush
Step by Step Method:
- Paint the toddler’s hand with green washable paint.
- Press the hand onto white paper.
- Allow the handprint to dry.
- Add Frankenstein details such as hair, stitches, and a smile.
- Attach googly eyes near the top of the handprint.
- Add small decorations around the character.
- Display the finished Halloween artwork.
This craft gives toddlers a chance to see how their hand can become a Halloween character. The green paint and funny Frankenstein face create a playful look that children usually enjoy. Parents often like handprint projects because they save a memory of their child’s small hands at a certain age. The activity does not require advanced skills and can be completed with simple art supplies. It is a good choice for a quiet Halloween activity at home.
14. Paper Strip 3D Pumpkin Craft
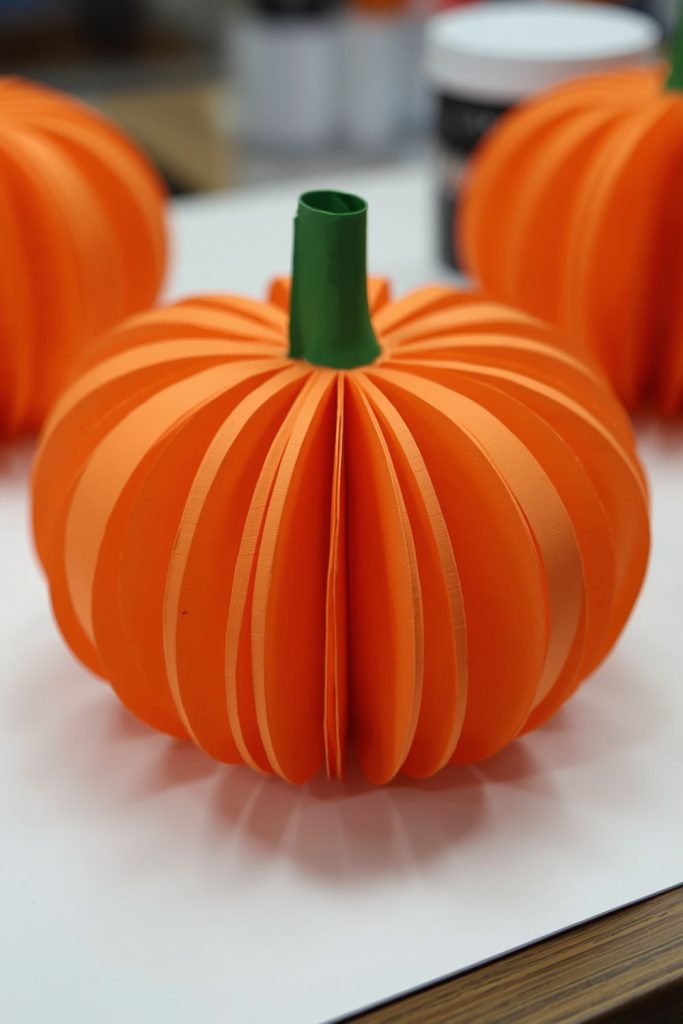
This paper strip pumpkin creates a raised pumpkin shape that looks different from a flat paper decoration.
Toddlers can help arrange colorful strips while learning how simple pieces can create a larger picture.
Materials Needed:
- Orange paper strips
- Green paper
- Glue
- White paper background
- Scissors
Step by Step Method:
- Cut several orange paper strips of similar length.
- Arrange the strips into a round pumpkin shape.
- Glue the ends of the strips onto the paper.
- Add a green paper stem and leaves.
- Add a small face using black paper if desired.
- Press the pieces gently so they stay attached.
- Let the pumpkin dry completely.
This pumpkin project creates a slightly raised design that looks attractive when displayed. Toddlers can help place the strips and watch the pumpkin shape appear step by step. The activity supports hand control because children need to hold and place narrow paper pieces carefully. Parents can simplify the project by preparing the strips before starting. The final result is a bright Halloween decoration that feels more special than a basic flat drawing.
15. Popsicle Stick Haunted House with Friendly Characters

This popsicle stick haunted house gives toddlers a chance to create a small Halloween scene with simple materials.
The finished project becomes a cute decoration filled with friendly Halloween characters.
Materials Needed:
- Popsicle sticks
- Colored paper
- Glue
- Paint
- Googly eyes
- Small Halloween stickers
Step by Step Method:
- Arrange popsicle sticks into a small house shape.
- Glue the sticks together with adult help.
- Paint the house using Halloween colors.
- Add paper shapes for doors, windows, and decorations.
- Create friendly characters using paper circles and googly eyes.
- Attach the characters around the house.
- Allow the decoration to dry before displaying it.
This activity is a nice option for toddlers because they can help decorate while parents handle the stronger parts of assembly. The small house design creates a fun Halloween scene without making the theme too scary. Children can add their own ideas using colors and decorations. The finished piece can be placed on a shelf or used as part of a seasonal display. It combines creativity, simple building, and Halloween imagination in one activity.
16. Halloween Sticker Scene Collage with Pumpkins and Monsters
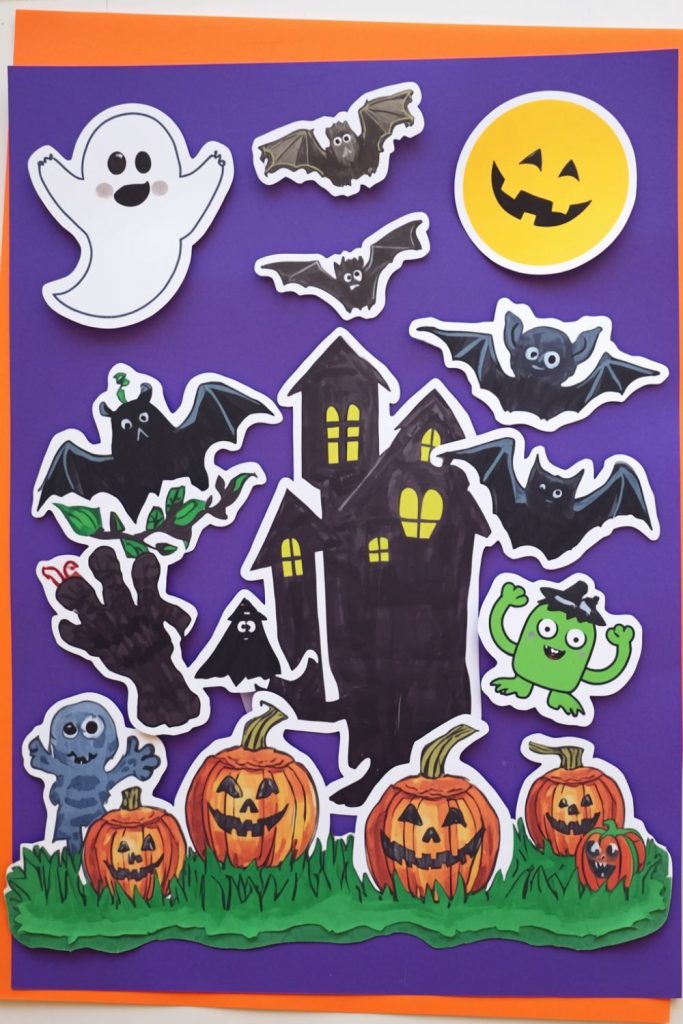
This sticker collage lets toddlers create their own Halloween picture using colorful stickers and simple backgrounds.
Children can place different shapes and characters to build a cheerful seasonal scene.
Materials Needed:
- White or black construction paper
- Halloween stickers
- Colored paper
- Glue
- Crayons
Step by Step Method:
- Choose a background paper for the Halloween scene.
- Add stickers such as pumpkins, ghosts, bats, and monsters.
- Let toddlers place the stickers wherever they like.
- Add paper shapes for extra decorations.
- Use crayons to draw simple details around the stickers.
- Add more stickers to fill empty spaces.
- Display the finished Halloween picture.
This activity is a simple choice for toddlers because stickers are easy for small hands to hold and place. Children can make creative choices without needing complicated instructions. The finished picture can look different every time because each child creates their own scene. Parents can use this activity during busy days because it requires little preparation and creates less mess compared to painting projects. The colorful stickers make the artwork attractive, while the process helps toddlers practice hand control and decision making. It is a fun way to introduce Halloween themes through a relaxed activity.
17. Bubble Wrap Pumpkin Painting
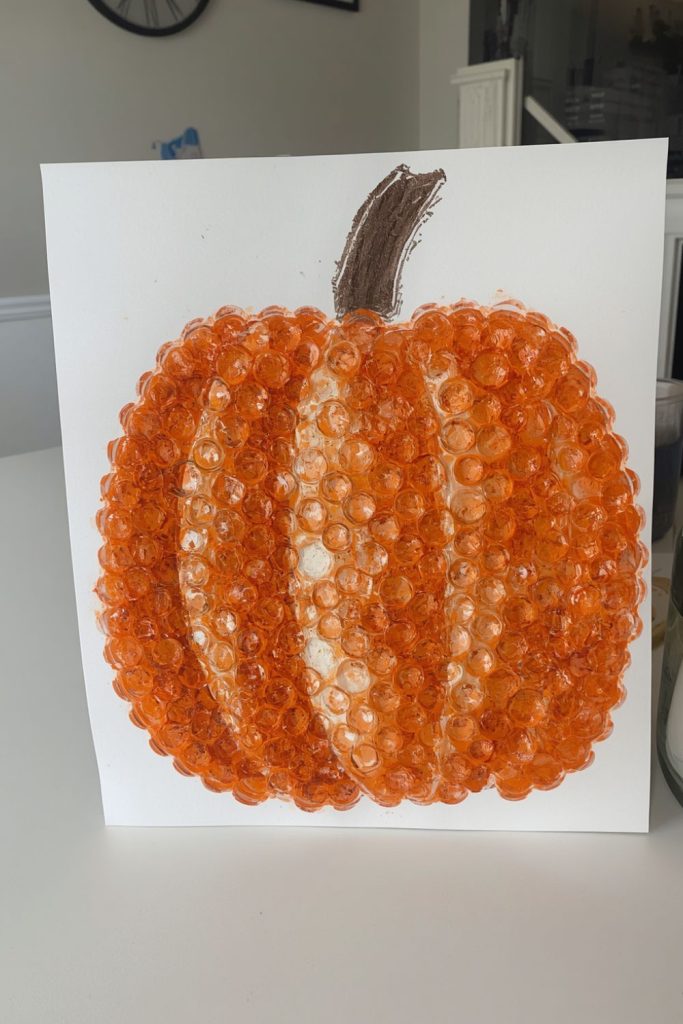
This bubble wrap pumpkin activity creates a textured Halloween artwork using an unexpected painting tool.
Toddlers can press, stamp, and create patterns while making a bright pumpkin picture.
Materials Needed:
- Bubble wrap
- Orange paint
- White paper
- Green paint
- Paint brush
- Black marker
Step by Step Method:
- Cut a pumpkin shape from white paper or draw one on the page.
- Dip bubble wrap into orange paint.
- Press the bubble wrap onto the pumpkin shape.
- Continue stamping until the pumpkin has a textured pattern.
- Add a green stem using paint.
- Draw or add a face after the paint dries.
- Display the finished pumpkin artwork.
Toddlers often enjoy activities that involve unusual textures, and bubble wrap creates an exciting experience. The small bumps leave interesting patterns that make the pumpkin look different from regular painted pictures. Parents can help children press the bubble wrap while allowing them to control the placement. This project is easy to prepare and does not require many supplies. The finished artwork has a fun appearance that works well for Halloween decorations. It also gives children a chance to experiment with a new way of painting.
18. Coffee Filter Bat Suncatcher

This coffee filter bat decoration creates a colorful window display that catches attention during the Halloween season.
Toddlers can add colors to a simple shape while enjoying a creative painting activity.
Materials Needed:
- Coffee filter
- Washable markers
- Water spray bottle
- Black paper
- Glue
- Scissors
Step by Step Method:
- Flatten the coffee filter on a protected surface.
- Let toddlers color the filter using washable markers.
- Lightly spray water over the colors to create a blended effect.
- Allow the filter to dry completely.
- Cut a bat shape from black paper.
- Attach the colorful filter behind the bat shape.
- Place the finished decoration on a window.
This craft creates a beautiful color effect without requiring difficult painting skills. Toddlers can enjoy watching the colors spread and mix together as water touches the marker lines. The finished bat looks bright when sunlight passes through the coffee filter. Parents can prepare several bats in different colors to create a small Halloween window display. The activity is simple enough for young children and gives them a chance to explore colors in a fun way.
19. Footprint Pumpkin Patch Art

This footprint pumpkin activity turns a toddler’s little feet into a seasonal Halloween picture.
It creates a memorable keepsake while allowing children to enjoy a fun painting experience.
Materials Needed:
- White paper
- Orange washable paint
- Green paint
- Paint brush
- Black marker
Step by Step Method:
- Paint the bottom of the toddler’s foot with orange washable paint.
- Press the foot onto paper to create pumpkin shapes.
- Allow the prints to dry.
- Add green stems and leaves above each pumpkin.
- Draw pumpkin faces using a marker.
- Add grass or extra decorations around the pumpkins.
- Display the finished pumpkin patch artwork.
Footprint activities are popular with parents because they capture a small moment from a child’s early years. Toddlers enjoy the feeling of paint on their feet and seeing the result appear on paper. This Halloween version creates a cute pumpkin patch scene that can be displayed at home. Parents may need to help with cleaning after the activity, but the finished keepsake makes the process worthwhile. The simple design works well for young children because they only need to participate in the footprint step.
20. Halloween Paper Chain Garland with Ghosts, Pumpkins, and Bats

This Halloween paper chain garland turns simple paper pieces into a decoration that can brighten any room.
Toddlers can help decorate each piece while creating a festive hanging display.
Materials Needed:
- Colored paper
- Glue
- Child safe scissors
- Markers
- Stickers
Step by Step Method:
- Cut paper strips from orange, black, and white paper.
- Create simple Halloween shapes such as ghosts, pumpkins, and bats.
- Let toddlers decorate the shapes with stickers or drawings.
- Connect paper strips into loops using glue.
- Attach the Halloween shapes between the loops.
- Continue adding pieces until the garland reaches the desired length.
- Hang the finished decoration around the home.
This activity works well for toddlers because it combines decorating and simple building. Children can enjoy choosing colors and adding their own touches to each part of the garland. The finished decoration brings Halloween colors into the room and can be reused each year. Parents can prepare the paper pieces ahead of time while toddlers focus on decorating and attaching parts. It is a low cost project that creates a cheerful result for the Halloween season.
21. Simple Paper Witch Hat Decoration with Stickers

This paper witch hat activity gives toddlers a simple way to create a colorful Halloween decoration.
Children can decorate the hat shape with stickers and shapes while enjoying a creative seasonal project.
Materials Needed:
- Black construction paper
- Colored stickers
- Glue
- Orange and purple paper
- Scissors
- Crayons
Step by Step Method:
- Cut a large triangle and rectangle shape from black paper to create the witch hat.
- Attach the triangle to the bottom part to form the hat shape.
- Add a paper band around the hat using colored paper.
- Let toddlers decorate the hat using stickers.
- Add small paper shapes such as stars, circles, or moons.
- Allow the decoration to dry.
- Display the finished witch hat on a wall or door.
This activity is suitable for toddlers because it focuses on simple decorating rather than complicated building. Children enjoy choosing stickers and deciding where to place each decoration. The black hat with colorful details creates a classic Halloween look that feels playful and friendly. Parents can prepare the hat shape before starting and let children enjoy the creative part. The finished decoration can become part of a Halloween display at home and gives toddlers a chance to participate in seasonal decorating.
22. Glow-in-the-Dark Ghost Painting
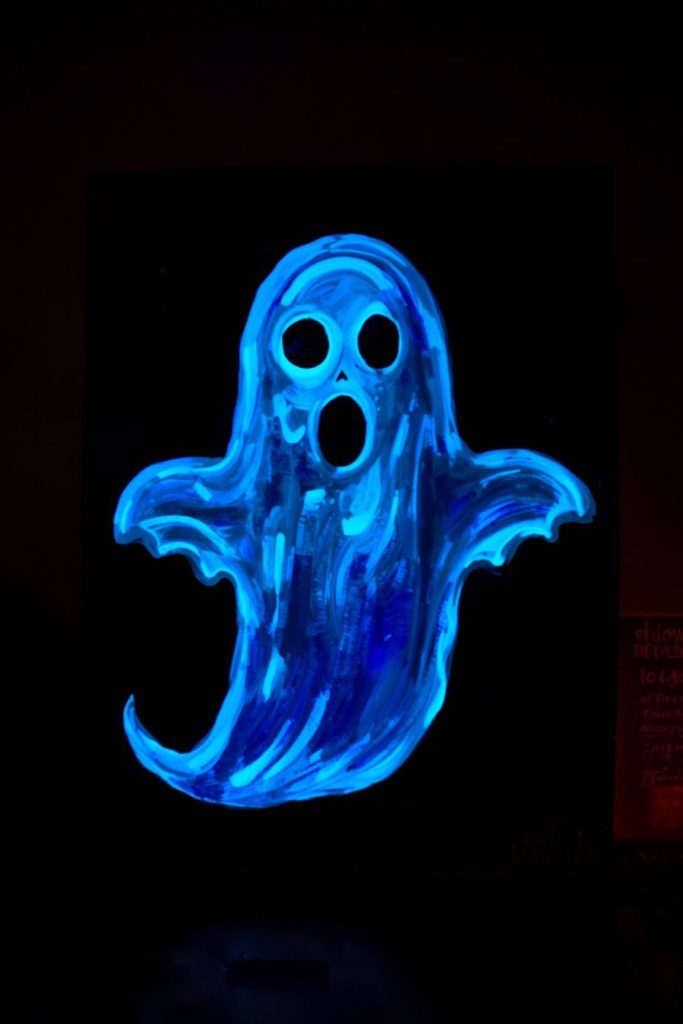
This glow-in-the-dark ghost painting creates a fun Halloween picture that changes when the lights go off.
Toddlers can paint a friendly ghost while enjoying a special nighttime effect.
Materials Needed:
- Dark colored paper
- White paint
- Glow-in-the-dark paint
- Paint brush
- Googly eyes
- Glue
Step by Step Method:
- Paint a simple ghost shape on dark paper using white paint.
- Add glow-in-the-dark paint around the ghost or on small details.
- Let toddlers add googly eyes after the paint dries slightly.
- Add extra Halloween details such as stars or a moon.
- Place the artwork under light for a short time.
- Turn off the lights to see the glowing effect.
- Display the finished painting in a child’s room.
Toddlers enjoy this project because the artwork has a surprise feature after dark. The glowing details make the ghost feel playful instead of scary. Parents can help children understand how the special paint works while allowing them to enjoy the painting process. The activity uses familiar art supplies but adds an exciting result that children can show to family members. It is a memorable Halloween project that combines creativity with a fun visual effect.
23. Egg Carton Spider Craft with Pipe Cleaner Legs

This recycled spider activity transforms an empty egg carton piece into a cute Halloween character.
Toddlers can decorate the spider while learning that everyday items can become fun creations.
Materials Needed:
- Egg carton pieces
- Black paint
- Pipe cleaners
- Googly eyes
- Glue
Step by Step Method:
- Cut one section from an egg carton with adult help.
- Paint the egg carton piece black.
- Allow the paint to dry.
- Add googly eyes to create the spider face.
- Attach pipe cleaners around the sides for spider legs.
- Bend the legs into different shapes.
- Place the finished spider on a Halloween display area.
This activity is a good option for toddlers because the egg carton shape already looks like a small body. Children can focus on painting and decorating instead of building from the beginning. The pipe cleaner legs add a fun texture and allow children to move the spider around after it is finished. Parents can talk about different insects while making the activity more educational. The final spider looks cute and works well as a small Halloween decoration.
24. Pom-Pom Monster Craft with Googly Eyes
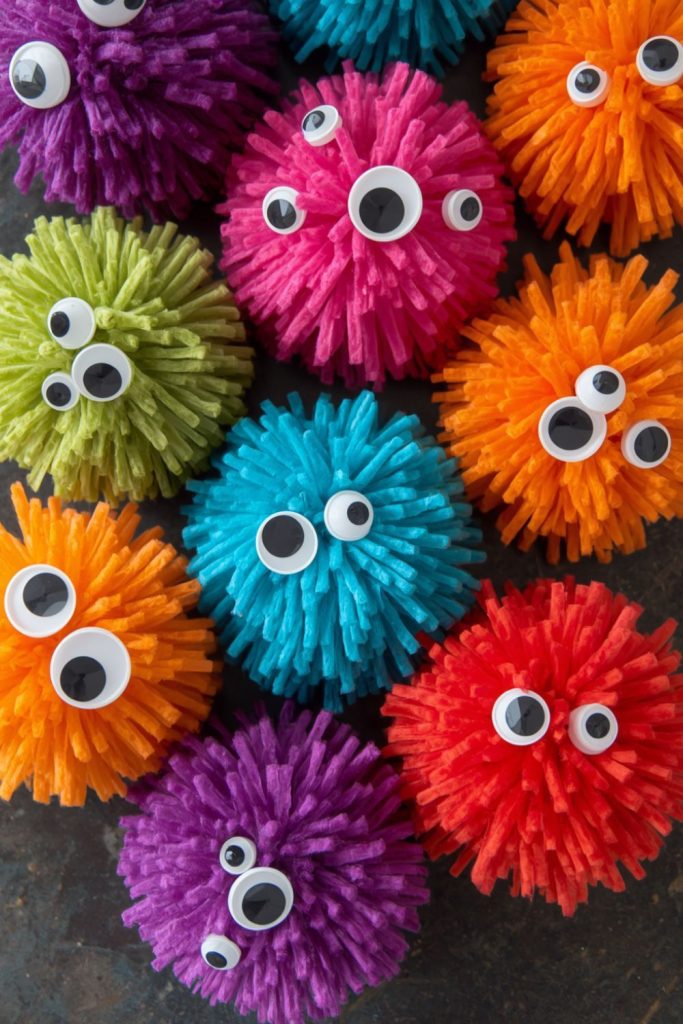
This pom-pom monster activity lets toddlers create soft, colorful Halloween characters using simple materials.
Children can choose different colors and decorations to make silly monster friends.
Materials Needed:
- Large pom-poms
- Googly eyes
- Glue
- Small paper pieces
- Pipe cleaners
- Felt pieces
Step by Step Method:
- Choose a large pom-pom to use as the monster body.
- Add googly eyes using glue.
- Attach paper shapes for mouths, ears, or horns.
- Add pipe cleaners for arms or extra details.
- Let the monster dry completely.
- Create more monsters using different colors.
- Arrange the finished monsters together as Halloween decorations.
This project is enjoyable for toddlers because the soft pom-poms are easy for small hands to hold. Children can create funny characters without needing to follow one design. The different colors and textures make each monster look different. Parents can prepare the materials and allow toddlers to make creative choices during the activity. The finished monsters are small, colorful decorations that can also become part of pretend play.
25. Paper Plate Spider Web Weaving Craft
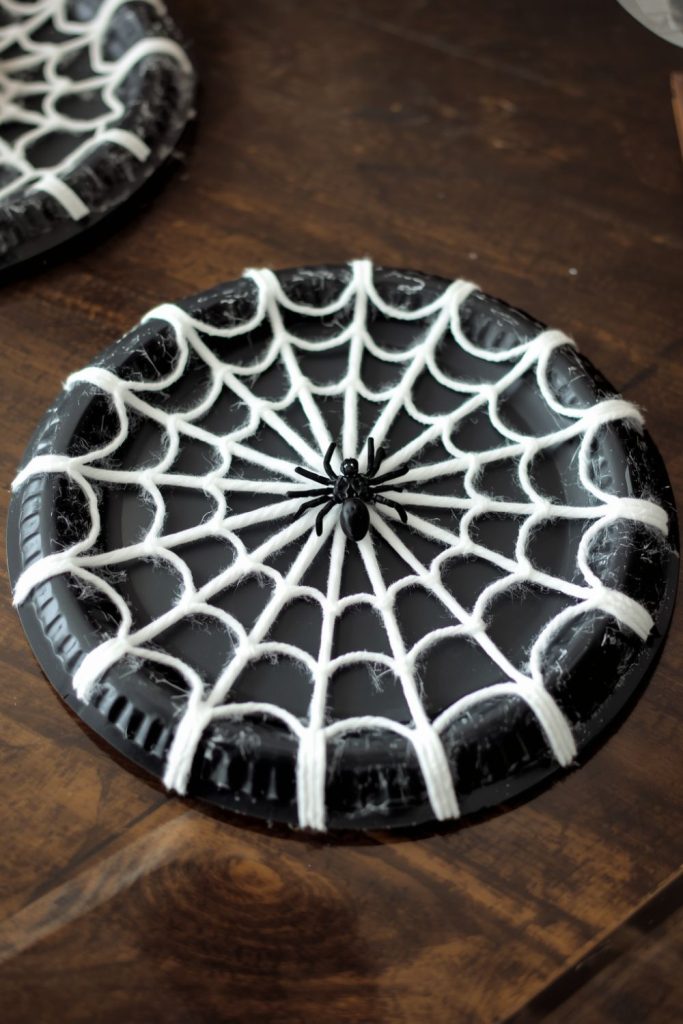
This spider web activity combines Halloween decoration with a simple weaving experience for toddlers.
Children can thread yarn through a paper plate while creating a fun spider web design.
Materials Needed:
- Paper plate
- White yarn
- Black paint
- Plastic spider toy or paper spider
- Hole punch
- Glue
Step by Step Method:
- Paint the paper plate black and allow it to dry.
- Punch small holes around the edge of the plate.
- Give toddlers white yarn and help them move it through the holes.
- Continue weaving the yarn across the plate.
- Add a small paper or plastic spider in the center.
- Attach a string if you want to hang the decoration.
- Display the finished spider web.
This craft gives toddlers a chance to practice careful hand movements while making a Halloween decoration. The weaving process can be adjusted based on the child’s age, with parents helping younger children. The contrast between the black plate and white yarn creates a strong Halloween appearance. Children often enjoy seeing the web grow as they add more yarn. The finished decoration can be displayed on a wall, door, or shelf during the Halloween season.